What’s the simplest way to install Quick Access Popup?

Here is the easy installation procedure:

  1. If you do not already have the QAP Easy Setup file, download it.
  2. Execute the file quickaccesspopup-setup.exe and just follow the setup instructions.

For more explanations, see the Easy Setup installation tutorial video.


Next?

Enjoy !

QAP 101: What should I know about Quick Access Popup before I start using it?

Antivirus false alerts

If you get a virus or malware alert from your anti-virus or protection software about Quick Access Popup being a potential threat, this is not the case (you can trust me… or read this setup file anti-virus report by VirusTotal.com). Please, also read this post: How can I use QAP if an anti-virus is blocking its download or its execution?

You prefer a portable installation?

If you prefer to use Quick Access Popup in “portable” mode, read this: How can I install Quick Access Popup to make it fully portable? This will, for example, allow you to run Quick Access Popup from an external drive or USB key.

You are a system administrator?

System administrators who install QAP for another end-users, please read this: Are administrator rights required to install QAP?

QAP 101: What should I know about Quick Access Popup before I start (and can’t stop) using it?

VIDEOS
> Quick Access Popup Installation Demo (9 min.)
> First steps with Quick Access Popup (9 min.)

When you run it, Quick Access Popup (QAP) adds an icon in the Notification Area and awaits your orders. When you want to open a frequently used folder, launch an application or work on a document, open the Quick Access Popup menu.

  1. There are different ways to to open the Quick Access Popup menu. The most common are:
    • click the Middle Mouse Button ANYWHERE on your Desktop;
    • or if you are a keyboard shortcut addict, press Windows + W.

Quick Access Popup icon in the Notification Area (System Tray)

You can also open the QAP menu from the Quick Access Popup icon in the Notification Area (System Tray).

Launching favorites

In the QAP menu, select your favorite folder, application or document. Quick Access Popup will instantly launch it!

You are already working in a Windows Explorer and just want to change the folder in the current window?

Click the Middle Mouse Button while the mouse pointer is over the Explorer window (or press Windows + W while the Explorer window is active). In the popup menu, select the desired folder. Quick Access Popup will instantly navigate your Explorer to the selected folder! Changing folders in file dialog boxes (Open, Save As, etc.) is also available if you enable this option (see  Can I change folders in file dialog boxes?).

Customize your menu

Now, you can’t resist to customize your popup menu? Adding your own folders, applications, documents, web links or FTP site is very easy.

  1. Open the QAP popup menu (Middle Mouse Button or Windows + W) and choose the Customize menu.
  2. In the Customize window, click the Add button, select the type of favorite to add (for example Folder, Document or Application) and click Continue.
  3. In the Add Favorite window, enter the menu name and the path to your favorite folder, application or document. There are plenty of options to discover in the other tabs but all you need to enter is in the first one justly named Basic Settings.
  4. Click Add when you are finished with the favorite’s settings.
  5. Back in the Customize window, use the various buttons to add, reorder, remove or edit your favorites. Don’t forget to click the big Save & Close button in the Customize window to keep your changes.

There are other ways to add favorites:

  • Add folders or web pages on the fly. When you are in a favorite folder or web page, open the QAP popup menu, select the menu Add Active Folder or Web page (or press Shift + Control + A) and enter the menu name of this new favorite. See more info about the Add Active Folder or Web page feature.
  • Drag & drop favorite folders, documents or applications from your file manager to the Customize window and give them a menu name. That’s it!
  • Add favorite folders, documents or application using the Windows Explorer context menu. See Which QAP commands are available using Explorer Context menus?
  • There are special items in the My QAP Essentials, My Special Folders, My Snippets and My Windows Apps allowing to add new QAP Features, new Windows Special Folders, new Windows Apps and new Snippets.

What else should I know when I’ll get familiar with the basics?

  1. Can I change folders in file dialog boxes?
  2. What are these special folders in the My Special Folders menu?
  3. What are these options in the My QAP Essentials menu?
  4. Gather favorites in submenus.
  5. Launch groups of related favorites.
  6. Harness the Alternative features
  7. Iron the QAP icon in the Notification Area
  8. What are the QAP global options?

How do I make sure that Quick Access Popup is launched when I start Windows?

If you installed Quick Access Popup with the Easy Setup installation, the application is launched automatically when you start Windows. If you prefered the portable installation (ZIP file) you will see hot to enable the auto-start here (this will create a shortcut in the Windows Startup folder).

This option can be turned on or off in one of these ways.

  • Right-click the QAP icon in the Notification Area (System Tray) menu to open the QAP system menu and select/deselect Run at Startup.
    or
  • In the Customize dialog box, select Options, General in the menu bar to open the Options dialog box and check/uncheck the Run at Startup option in General tab.

Notes for users who choose portable install: When you install a the new version of QAP, the shortcut in your Startup folder is automatically updated to launch the new version, if automatic startup is enabled.

How can I use QAP if an anti-virus is blocking its download or its execution?

Status: Clean

Analysis by VirusTotal.com for QAP setup file and for portable ZIP file

All you need to know about anti-virus false positives (false alerts)…

Protection software block malware applications that could harm your PC. But, sometime, they can also make collateral damages and block legit software like Quick Access Popup.

To prevent bad programs from taking control or infiltrate your PC, protection programs use two protection approaches.

  • Some protection programs block known malware and frequently update a blacklist database to catch these apps before they can do damage.
  • But, more often, protection software have a more aggressive approach: they block any app that could cause damage based on various criteria. To allow good applications to work, they maintain a whitelist of trusted apps.

This may result in occasional false malware alerts. In the case of Quick Access Popup, between 0% and 4% of the various detection softwares can produce such false alerts. All others declare Quick Access Popup as clean and safe!  If your protection software is blocking it, please see if you can approve (whitelist) Quick Access Popup in the configuration of your software. Also, you can probably go to your software website and report Quick Access Popup as a good app to add to the whitelist database. See this list many major Anti-Virus companies websites where you can ask to test and clear Quick Access Popup. See also this discussion on the page on this subject for my older app Folders Popup.

More about this issue in this post from another independent developer: Antivirus companies cause a big headache to small developers.

Needless to say – all these virus-related email messages that I receive every day are a big headache and require me to waste my time on answering/handling them, instead of adding new features to my utilities and updating my site. [ more… ]

At least, I know I’m not the only small developer facing this issue…

Windows Defender is blocking Quick Access Popup

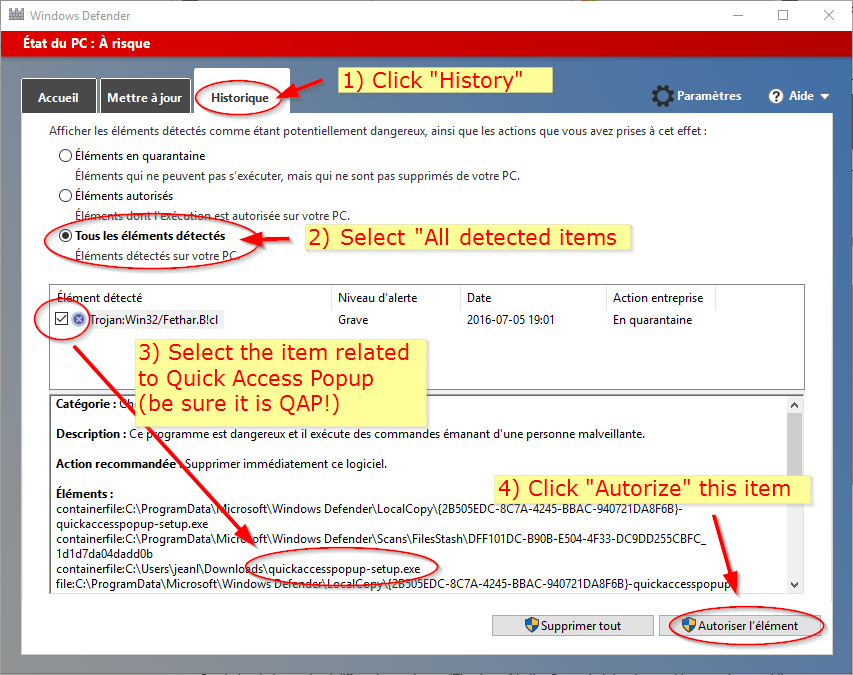
Until any new version of Quick Access Popup is recognized as a legit software by Windows Defender, this protection software could delete the QAP setup file when you try to install it. If you trust me and want to run QAP, you can prevent it: launch Windows Defender (type “Defender” in the search/launch bar) and open the History tab. See the instructions below (screen capture is in French; I translated to the best of my knowledge).

Windows-Defender-Instructions

Google Chrome is blocking Quick Access Popup

Until a new version of Quick Access Popup is recognized by Google Chrome as a legit software, you may see the following alert messages on your download bar (in your own Chrome language – this one is in French).

If Chrome tells you (my own translation to English): “The file quickaccesspopup-setup.exe is not commonly downloaded. It could harm your computer“. If you trust me and want to run QAP, in the menu, click Keep.

chrome-alerte


Windows SmartScreen

Since September 2016, Quick Access Popup setup and executable files are signed with a software certificate assessing that the publisher is known (that’s me!) and that the executable file has not been modified by a third-party (thanks to users who helped me share the expense of buying this software publisher certificate!).

Now that QAP is a “signed” software you should not see “publisher unknown alerts” from protection software like Windows SmartScreen.

However, if Windows tells you: “quickaccesspopup-setup.exe is not commonly downloaded and might harm your computer“, if you trust me and want to try QAP, Click Execute.

QAP-SmartScreen-1

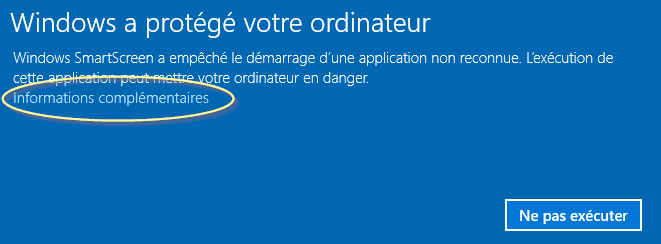
Then, the following message could appear: “Windows protected your PC“. Click More info.

QAP-SmartScreen-2

In the next message, you should see Publisher: Jean Lalonde. Click Run anyway. This will install QAP.

QAP-SmartScreen-3


How can I install Quick Access Popup to make it fully portable?

Most users prefer to install Quick Access Popup with the Easy Setup installation program. But you may have specific needs that would require a “portable” installation.

By installing Quick Access Popup in “portable” mode, you can use the application on a host PC without leaving any trace after usage. This will, for example, allow you to run Quick Access Popup from an external drive or USB key that can be connected to the host system and removed after usage.

Follow these instructions to install QAP in portable mode.

Note: You must not install Quick Access Popup in “portable” mode in a system-protected folders like those under C:\Program Files or C:\. This could prevent QAP from saving your configuration.

1. Download the zip file under the Portable installation zip file.
2. Just extract the files from the zip file to the folder of your choice (but not in a system-protected folders like those under C:\Program Files or C:\).
3. Run the .EXE file from this folder (choose QuickAccessPopup-32-bit.exe or QuickAccessPopup-64-bit.exe version depending on your system). Quick Access Popup will create and update the quickaccesspopup.ini file in this folder.
4. At your convenience, create a shortcut on your Desktop or select Run at Startup in the System Tray to launch Quick Access Popup automatically at startup.

If an anti-virus or protection software reports Quick Access Popup as a potential threat, this is not the case. Please read this post: How can I use QAP if an anti-virus is blocking its download or its execution?

If you are doing a portable “permanent” installation, you could turn the check for updates option on to stay up-to-date! You may also wish to enable Explorer context menus (right-click in Explorer or Desktop). Read the page Explorer Context Menus Help.

Installing a new version of Quick Access Popup in portable mode

Updating QAP is easy. All you have to do is to 1) quit QAP to allow overwriting of the the executable file and 2) unzip the content of the new ZIP file over the existing files in your QAP folder. Your settings files (.ini and .DB) will *not* be overwritten.

More info here: How do I install a new version of Quick Access Popup?.

Quick Access Popup is a Portable App

A portable application, sometimes also called standalone, is a program designed to run on a computer without being installed in a way that modifies the computer’s configuration information. This type of application can be stored on any storage device, including internal mass storage and external storage such as USB drives – storing its program files and any configuration information and data on the storage medium alone (source: Wikipedia).

Specifically, when installed using the Portable installation procedure, Quick Access Popup does not write any information in the Windows registry or in any system or temporary Windows folder. Running the .EXE file launches Quick Access Popup in its current directory. That’s it!

The app creates a temporary folder named _QAP_temp_nnn to store small images, language files and working files required at run time. The default location of the folder is in the Windows %TEMP% folder (e.g. C:\Users\UserName\AppData\Local\Temp). This folder is deleted when the app quits normally. You can set another default location for the temporary folder in Options, General tab, if you do not want to use the host computer’s temporary folder.

The only permanent files are created by Quick Access Popup in its own current directory: the QuickAccessPopup.ini file containing your favorite folders and options, the QAP_Frequent.DB SQLite database file containing data required to build dynamic menus and, if you select the Run at Startup option, the QuickAccessPopup.lnk file in your Startup folder.

To completely remove Quick Access Popup from a PC, delete the folder where you are running the app (preserve the QuickAccessPopup.ini and QAP_Frequent.DB files if you plan to re-use QAP) and delete the file QuickAccessPopup.lnk from your C:\Users\[name]\AppData\Roaming\Microsoft\Windows\Start Menu\Programs\Startup folder. If you enabled Explorer context menu, remove them following the instruction in the Explorer Context Menus Help.

See also:
What file managers are supported in addition to Windows Explorer?
Can I use relative paths in favorite settings?
Can I use system environment variables in favorite paths?

How do I install a new version of Quick Access Popup?

Using the Easy Setup tool

  1. Download the latest version of Quick Access Popup Easy Setup file.
  2. Run the setup file. If QAP is already running, the setup program will close it for you.
  3. Follow the instructions. Quick Access Popup will be launch at the end of the installation.
  4. The setup procedure will preserve your previous configuration and data in the QuickAccessPopup.ini and QAP_Frequent.DB files.

Using the portable ZIP file

  1. Download the latest version of Quick Access Popup Portable installation ZIP file.
  2. Quit your current version of Quick Access Popup: right-click the Quick Access Popup icon in the System Tray and choose Exit Quick Access Popup. If you don’t close QAP before executing the next step, QAP will not be updated.
  3. Extract the new version zip file content in the folder where your current version is installed, overwriting all existing content. Do not worry: this will NOT overwrite your settings in QuickAccessPopup.ini and your dynamic menus data in QAP_Frequent.DB because these files is not part of the ZIP file. All your settings and favorites will be preserved.
  4. For your information, a text file was added to your folder with, in its name, the version of the installed version (for example: QAP-v11_2.txt). You can delete this file as it is not required to run QAP.
  5. Restart Quick Access Popup by double-clicking the executable (.EXE) file of the new version. Choose the 32-bit or 64-bit version depending on your system: QuickAccessPopup-32-bit.exe or QuickAccessPopup-64-bit.exe.
  6. If you enabled this option, the shortcut in your Startup folder is automatically updated and will launch the new version when you will restart Windows.

Are administrator rights required to install QAP? Can QAP be installed for multiple users?

If the Quick Access Popup setup program asks for an administrator password, you have two options: ask your system administrator to install it for you (using the setup program). Or, if you have some basic technical knowledge and prefer to get it done yourself, install Quick Access Popup in portable mode since this type of installation does not require administrative rights.

Now, for your sysadmin…

The QAP setup program requires elevated rights (via a User Account Control dialog) when the installation is started. If the setup program was started by an unprivileged user, Windows will ask for the password of an account that has administrative privileges, and the setup will then run under that account.

In order to allow installation by the admin and to set configuration files specific to end users, the setup program is executing the following steps.

  1. It creates a group Quick Access Popup in the All Users Start Menu with the Start In parameter set to the common appdata folder (for example: C:\ProgramData\Quick Access Popup).
  2. In the common appdata folder, the setup program creates file named quickaccesspopup-setup.ini where QAP stores the language selected by user during setup. This folder can also include customized templates of the files QuickAccessPopup.ini and QAPconnect.ini. This would allow the sysadmin to create a default menu and default configuration for the needs of his organization’s end users.
  3. When Quick Access Popup is launched for the first time by an end user, it creates its Settings Folder.
    1. With QAP v10 or more recent: this folder is created in user’s My Document (for example: C:\Users\Username\Documents). User can change its Settings Folder in OptionsGeneral tab. The current value is saved in Registry key “HKEY_CURRENT_USER\Software\Jean Lalonde\Quick Access Popup\WorkingFolder”.
    2. With QAP v9 or earlier: this folder is created in user’s appdata folder (for example: C:\Users\Username\AppData\Roaming\Quick Access Popup). With v9 or earlier, the Settings Folder cannot be changed.
  4. In its Settings Folder, QAP creates the files QuickAccessPopup.ini and QAPconnect.ini from an internal template, unless templates of these files are found in the common appdata folder. In this case, these files are copied to user’s Settings Folder. Original files in the common appdata folder are never changed by end users.
  5. If the end user selects the Run at Startup option:
    1. With QAP v10: the startup command is stored in the Run Registry key “HKEY_CURRENT_USER\Software\Microsoft\Windows\CurrentVersion\Run\Quick Access Popup”.
    2. With QAP v9 or earlier: a Windows file shortcut is created in user’s personal Startup folder.

As seen at step #2 above, sysadmins could create or edit the quickaccesspopup.ini file in the common appdata folder to give their users a template with favorites of interest for all users: network folders, path to shared applications or documents, intranet URLs, etc. Administrator could also edit this file to enable the Shared Menus Catalogue to facilitate the addition of shared menus by end users (see Can I create a catalogue of shared menus for my team or workgroup?).

To facilitate the creation of a new quickaccesspopup.ini file, admin can run QAP in portable mode, configure options and favorites and copy to fresh ini file the common appdata folder.

About Explorer Context Menus

When installed with in setup mode, QAP always enable its Explorer Context Menus. There are two exceptions: context menus will *not* be enabled if “ExplorerContextMenus=0” under the “[Global]” section either of the quickaccesspopup.ini file in current user’s appdata folder or in common appdata folder. More about Explorer context menus: Explorer Context Menus Help.

I’m upgrading from Folders Popup. Can I import my favorites and option settings?

(Update February 2019) Up to version v9.4.1.3, the Quick Access Popup Easy Setup installer included an option to convert settings from Folders Popup (the “ancestor” of QAP, latest version v5.2.3, September 2016)  in order to import them in QAP. This option has been removed in more recent releases installer.

To convert your Folders Popup (FP) settings to QAP must:

  1. Download QAP version v9.4.1.3 and install it making sure you enable the option Import Folders Popup settings and favorites.
  2. Then download the latest QAP version and install it.

Users installing QAP in portable mode can still import FP settings using ImportFPsettings as described below.

More question/answers for Folders Popup users upgrading to QAP.


Everything possible is made to facilitate the transition from Folders Popup to Quick Access Popup.

The ImportFPsettings utility helps you do the transition from Folders Popup.

  • It imports favorites from Folders Popup and convert them to QAP format.
  • It also import options settings and hotkeys and adapt them to QAP.

Only Folders Popup groups settings cannot be imported to QAP settings. The group implementation has been completely reviewed in QAP, integrating them with favorites as if they were as special kind of submenus, making it difficult to import.

If you install QAP using the standard Setup program (v9.4.1.3 or before), make sure the Import Folders Popup settings and favorites option is checked during installation. The utility will be automatically executed after the initial QAP installation (if you preferred the portable installation, you must run ImportFPsettings manually).

Take note that ImportFPsettings replaces all favorites that could exist in QAP and overwrites existing option settings. It is recommended to use it when you just installed QAP.

After you installed QAP, do not forget to uninstall Folders Popup or, at least, remove it from your Startup group: uncheck Run at Startup in Folders Popup Options dialog box (first tab).

In what languages is Quick Access Popup available?

Quick Access Popup is available in various languages, thanks to voluntary translators for their precious work. Select your working language in the Options window, General tab.

Language Thanks to translators! Review in your language
French Jean Lalonde Quick Access Popup : accédez rapidement aux dossiers utilisés fréquemment (Freewares & Tutos)
German Edgar “Fast Edi” Hoffmann Quick Access Popup ist ein toller Nachfolger von Folders Popup. Die Möglichkeit, jetzt auch Programme zu starten oder Webseiten aufzurufen, macht daraus einmal mehr ein Allroundtool für jeden (Giga Software)
Italian Riccardo Leone Quick Access Popup: crea le scorciatoie per le cartelle e programmi (dundi.it)
Spanish Isaias Baez Quick Access Popup
Brazilian Portuguese Igor Ruckert Quick Access Popup (Baixaki)
Portuguese Luis Neves Quick Access Popup (Baixaki)
Dutch Ric Roggeveen Quick Access Popup – Snel toegang tot al je favorieten
Workshop QuickAccessPopup (QAP) is handige hulp bij bestandsnavigatie 
Korean Maeng Bong Kyun  
Simplified Chinese ilaoyao  
Russian WYLEK.ru Post about QAP on WYLEK.ru

Quick Access Popup was originally written in English. Proofreading always appreciated.


What file managers are supported in addition to Windows Explorer?

In addition to Windows Explorer and Windows command line utilities, Quick Access Popup provides extended support for popular Explorer replacement applications Directory Opus and Total Commander and support for about 15 other file managers.

You can select your preferred file manager in the Options window, tab File managers.

Directory Opus support (DOpus)

  • If installed on your system, Directory Opus is detected automatically at QAP’s first launched and you can select if you want to use it as your primary file manager when QAP opens a folder in a new window.
  • Changing folders in an existing DOpus lister is supported for both regular and Special folders (My Computer, Network Neighborhood, Recycle Bin, etc.).
  • QAP can integrate the content of the Directory Opus Favorites and Directory Opus Layouts in a QAP sub menu.
  • The list of folders currently open in DOpus are automatically included in the Current Windows and Reopen a Folder QAP features.
  • Quick Access Popup is fully compatible with the new Directory Opus version 12.
  • More info here: Using Quick Access Popup with Directory Opus.

Total Commander support (TC)

  • If installed on your system, Total Commander is detected automatically at QAP’s first launched and you can select if you want to use it as your primary file manager when QAP opens a folder in a new window.
  • Changing folders in an existing TC windows is supported for both regular and Special folders (My Computer, Network Neighborhood, Recycle Bin, etc.).
  • QAP can integrate the content of the TC Directory Hotlist in a QAP sub menu (the TC wincmd.ini location must be set in Options).
  • The folders in currently active tabs in TC panes are automatically included in the Current Windows and Reopen a Folder QAP features.
  • More info here: Using Quick Access Popup with Total Commander.

QAPconnect: Universal File Managers Support

  • QAP also offers partial  support for a list of about 15 file managers described in the setting file QAPconnect.ini based on a list developed by Roland Toth (blog.rolandtoth.hu) for Folders Popup.
  • There is no need to install an addon to use these file managers in QAP.
  • First, make sure the info for your file manager is accurate in QAPconnect.ini: the directory must be the one where your app is installed.
  • To edit the QAPconnect settings file, in the Options, tab File managers, select QAPconnect and click the Edit QAPconnect.ini button under the dropdown list. Save the file and deselect/reselect the QAPconnect radio button to refresh the list.
  • Then, select QAPconnect and choose your file manager in the dropdown list.
  • Supported file managers: A43, Altap Salamander, CubicExplorer, Double Commander, EF Commander Free, Everything, Explorer++, ExplorerXP, Far Manager, FreeCommander XE, IrfanView, Just Manager, MultiCommander, One Commander, Nomad.NET, Snowbird, SpeedCommander, Tablacus Explorer, UltraExplorer, Unreal Commander, WinNC, XnView, xplorer2 lite, XYplorer & XYplorerFree.

How do I enable Directory Opus support in Quick Access Popup?

Quick Access Popup is fully compatible with the new Directory Opus version 12!
Video Demos: 

Quick Access Popup is fully compatible with Directory Opus, an impressive file manager program written by GPSoftware, in Australia. Directory Opus (DOpus) replaces Windows Explorer and integrates lots of features, including file compression, FTP capabilities, folder syncing and much more.

QAP is fully aware of DOpus capabilities and utilizes them via the internal DOpusRt.exe commands to offer seamless and reliable integration.

Directory Opus support

  • Automatic (but optional) enabling of DOpus support if the software is found on your system.
  • Seamlessly change a DOpus lister to user favorite folders, recent folders or Special folders (My Computer, Network Neighborhood, Recycle Bin, etc.).
  • Integration of Directory Opus Favorites and Directory Opus Layouts to the QAP menu.
  • Easily add the folder currently displayed in a lister to your favorites with the Add Active Folder or Web page menu.
  • Switch to a folder open in an existing lister with the Current Windows menu.
  • Switch instantly any file dialog boxes (File Open, Save As, etc.) to the folder active in a Directory Opus lister or Windows Explorer with the Reopen Current Folder in Dialog Box menu.
  • Open any folder active in a Directory Opus lister or Windows Explorer with the Reopen a Folder menu.
  • Restore groups of related folders in desired tabs and sides.
  • Adapted support for Special folders and FTP sites in DOpus.

How-to enable DOpus support

When you start it for the first time, Quick Access Popup checks if DOpus is installed on your computer (looking for the file [Program Files]GPSoftware\Directory Opus\dopus.exe). If it is found, it asks if you wish to enable Directory Opus integration. If you answer Yes, it records the DOpus.exe file path in the Settings, Options dialog box.


If DOpus is installed on your system after QAP or is installed in folder not found by Quick Access Popup, you can manually enable integration by browsing to your DOpus.exe file in the Options dialog box, File managers tab.

Directory Opus Favorites and Layouts

You can also add the Directory Opus Favorites menu manually from the QAP Features list. In the Customize window click Add, select the QAP Feature type, under the Dynamic Menus category, select Directory Opus Favorites and click the Add button, then Save your changes.

DOpus layouts are included by default under the QAP DOpus favorites menu but there is an option if you prefer not to include them if you do not use Layouts. Note that all layouts are displayed in this menu. QAP currently does not exclude layouts that would have the Hide option checked.

How do I enable Total Commander support in Quick Access Popup?

Quick Access Popup is fully compatible with Total Commander, a very popular file manager program written by Christian Ghisler, in Switzerland. Total Commander (TC) replaces Windows Explorer and integrates lots of features, including file compression, FTP capabilities, folder syncing and much more.

Quick Access Popup is aware of TC capabilities and utilizes them via TC internal commands to offer seamless and reliable integration.

Total Commander support

  • Automatic (but optional) enabling of Total Commander support if the software is found on your system.
  • Seamlessly change a TC window (any pane or tab) to user favorite folders, recent folders or special folders (My Computer, Network Neighborhood, Recycle Bin, etc.).
  • Integration of Total Commander Directory Hotlist.
  • Easily add the folder currently displayed in a TC window to your favorites with the Add Active Folder or Web page menu.
  • Switch to a folder open TC with the Current Windows menu.
  • Switch instantly any file dialog boxes (File Open, Save As, etc.) to the folder active in TC or Windows Explorer with the Reopen Current Folder in Dialog Box menu.
  • Open a folder active in a TC pane or Windows Explorer with the Reopen a Folder menu.
  • Restore groups of related folders in desired tabs and sides.
  • Adapted support for special folders and FTP sites in TC.
  • Import TotalCommander Hotlist to QAP menu

How-to enable Total Commander support

When you start it for the first time, Quick Access Popup checks if TC is installed on your computer (looking for the file TOTALCMD.EXE or TOTALCMD64.EXE). If it is found, it asks if you wish to enable Total Commander integration. If you answer Yes, it records the TOTALCMD.EXE file path in the Options dialog box, File Managers tab.


If TC is installed in a folder not found by Quick Access Popup, you can manually enable integration by browsing to your TOTALCMD.EXE or TOTALCMD64.EXE file in the Options dialog box. In order to integrate the TC Directory Hotlist in QAP, set the TC wincdm.ini file location in Options, File Managers tab.

You can choose if you prefer to launch Total Commander and on which pane you prefer to add new tabs: active side, left, right or destination (target) side.

Note: Applications launched from Total Commander can use some TC exclusive environment variables like %COMMANDER_PATH% or %COMMANDER_EXE% (see the Pseudo environment variables section of this page). These variables are unknown from QAP if you launch QAP before Total Commander.

To use these variables in your QAP configuration, for example if the variable %COMMANDER_PATH% is used in a redirection command for the Directory HotList data ([DirMenu] section of the settings file wincdm.ini) or to use TC variables in your favorites paths, you must launch QAP from Total Commander. This can be done manually but can also be automated at startup using a plugin like Autorun.

Or, if you prefer to run QAP normally, you could simply avoid using these pseudo-variables and enter the fully qualified paths where required.

If the TC Directory Hotlist menu has not been added automatically to your QAP menu when you installed it, go to the Customize window, click the Add button, select the QAP Feature type and, under the Dynamic Menus category, select TC Directory Hotlist.

Note: Total Commander commands starting with cm_ (like cm_OpenDesktop or cm_OpenDrives) are currently not supported in QAP TC Directory Hotlist. Entries in the ini file containing these commands are skipped.

At this time, the Reopen a Folder and Current Windows menus will only include the active tab in each TC pane. Other tabs are not included in these menus. Also, re-opening the active TC folder in a file dialog box is currently not supported for some Windows Special Folders like My Computer or Recycle Bin. These features could be improved with future releases of QAP and TC.

New! Import Total Commander HotList to QAP

QAP Forum user CaptainSolo wrote an utility program to convert the TC Hotlist to a CSV file that can be imported in QAP using the CSV in Add Multiple Favorites. Simply run this great utility and import the resulting CSV in QAP.

To import the CSV file, open the Favorite, Add Multiple Favorites dialog box, select CSV file and import all or only the selected favorites. More help here.

How do I setup QAPconnect for another file manager?

QAP offers partial  support for a list of about 15 file managers. The QAPconnect.ini settings file act as an interface between Quick Access Popup and these file mangers. You can find this file in QAP’s Settings Folder.

When configured for your file manager and selected in the QAP Options dialog box, File managers tab, these settings allow QAP to change folder or open new folder in your file manager.

Note 1: If you only use Windows Explorer and file dialog boxes (Open, Save As, etc.), you don’t need to care about this file. Just use QAP as it is.

Note 2: The file managers Directory Opus and Total Commander are already supported by QAP without needing additional settings in this file. To use one of these file managers, select it in OptionsFile managers tab.

How does QAPconnect works?

When QAP needs to open a new window (or tab) in a file manager or to change folder in the current window, it needs to know what command to send to the file manager. This is done by selecting your file manager in QAP Options dialog box.

But, first, you need to make sure the info in the file QAPconnect.ini is OK for your installation of the file manager.

  1. In the Options, File Managers tab, click the Edit QAPconnect.ini button.
  2. In the list of file managers in the QAPconnect.ini file, find your file manager. File manager names are enclosed in square brackets. If you do not find it, see Note 3 below.
  3. Edit the AppPath parameter to reflect the current path to your file manager exe file.
  4. Save this file keeping its actual name and location.
  5. In Quick Access Popup, open the Options window and select the File managers tab.
  6. Select the QAPconnect radio button and choose your file manager in the Application drop-down list.

Note 3: File managers added to QAPconnect after you installed QAP are not added the file QAPconnect.ini (to avoid overwriting the file if it was edited). Instead, the file QAPconnect-default.ini is added to your QAP Settings folder. Check if this file includes your file manager. If yes, copy the section for this file manager to the QAPconnect.ini file and edit it as explained from steps 3 above.

Note 4: For users using QAP in a “portable” environment like an USB key, you can set a relative path for your file manager exe file (i.e. “..\MyManager\MyManager.exe”). Path is relative to the QAP Settings Folder. If you preferred the portable installation, it is the directory where QAP exe file is running.

Adding a file manager

Actually, over 15 file managers are supported in QAPconnect. If your custom file manager is not in QAPconnect.ini, you can add it to the list if it meets certain conditions. The main condition is that it must accept commands via the command line to open a new window, open a new tab (if applicable) or change the folder in the current file manager’s window.

1. To add a file manager, add a new section at the bottom of this file with the name and version of your file manager between square brackets […]. For example:

[MyManager (v1.2.3)]
AppPath=
CommandLine=
NewTabSwitch=
NeverQuotes=

2. Set your file manager path and command line options:

a) AppPath: path to your custom file manager application executable (absolute or relative)

b) CommandLine: parameters that will be passed to the application (set in AppPath)
  – the placeholder %Path% will be replaced with the path of the favorite folder selected in QAP popup menu
  – the placeholder %NewTabSwitch% will be replaced with the NewTabSwitch parameter (see below)
See examples in sections for other file managers in the QAPconnect.ini file. Refer to your file manager’s documentation to see if these parameters are available.

c) NewTabSwitch (optional): command line parameter to open folder in a new tab (if available) or in a new instance of your file manager. NewTabSwitch is used only when you ask Quick Access Popup to open a folder in a new window. It will tell QAP how to open the folder in a new tab instead of a new window.

d) CompanionPath (optional): path to a command line executable, companion of the main file manager executable. For example, EF Commander Free main application is EFCommanderFreePortable.exe. But a second executable EFCWT.EXE is used to open or change folders. Setting the CompanionPath helps QAP manage properly file manager windows.

e) NeverQuotes: Normally, QAP encloses %Path% between double-quotes if it includes at least one space. If in your file manager, %Path% should never be enclosed, set NeverQuotes to “1” (without the double-quotes).

3. Save this file. In QAP, click the Refresh applications list to reflect your changes in QAPconnect.ini. You can now select your newly added file manager.


What hotkeys or shortcuts are set by default when QAP is installed and how can I change them?

During installation, shortcuts are created for two types of hotkeys: popup menu hotkeys and favorite hotkeys. These hotkeys are always available, regardless of the active window. If whenever they interfere with your existing hotkeys, you will see below how to change or remove them.

Note: There are also a set of hotkeys available only in the Customize window. These hotkeys are covered in the Customize help page.

Popup menu hotkeys

By default, the QAP popup menu can be triggered by the Middle Mouse Button and the keyboard shortcut Windows + W. A second popup menu called Alternative menu is triggered by default by Shift + Middle Mouse Button or Shift + Windows + W. You can change these settings in Options dialog box, Popup Hotkeys tab.

Favorite hotkeys

Mouse or keyboard hotkeys can also be assigned to any favorite in your menu. This allow you to launch a favorite without having to open the QAP popup menu and locate your favorite.

At installation time, only some QAP feature favorites are assigned to shortcuts. They are in the My QAP Essentials menu. This menu is created at installation in the Main popup menu. It includes keyboard shortcuts for the following menu and QAP features:

  • Shift-Control-Q for Quick Launch
  • Shift-Control-U for Reopen Current Folder in Dialog Box
  • Shift-Control-F for Reopen a Folder

Two other QAP features shortcuts are also inserted in the Main menu during installation:

  • Shift-Control-C for Customize
  • Shift-Control-A for Add Active Folder or Web page

You can change all these shortcuts by editing each favorite separately or you can edit all of them in the Hotkeys dialog box: select Tools, Hotkeys in the Customize window menu bar. See also Can I launch my favorites with keyboard or mouse shortcuts?


Can I install and update QAP silently with Chocolatey?

Thanks to QAP user Nicola Farina, Quick Access Popup can now be installed and updated automatically and silently using the Chocolatey package manager.

To install or update QAP using this tool:

  1. Install Chocolatey
  2. Open a CMD or PowerShell window with administrative rights (see tip below).
  3. Launch the Chocolatey command to install or upgrade the QAP package:
    • choco install qap
    • choco upgrade qap

Put the upgrade command in a batch saved in your Startup folder to have the update command run automatically at every startup of your system.

See the Quick Access Popup package page for more information about the QAP version available. Because of package update and approval delays, it may take a day or two before a new QAP version becomes available on Chocolatey.

Tip: Create a QAP favorite to open CMD as administrator easily. Create an Application favorite, the Application path enter %COMSPEC% (or C:/Windows/System32/cmd.exe) and, in the Advanced Settings, check the Elevate application with administrative privileges option.