Could you give me a quick tour of the Customize window and the menu bar?

Welcome aboard!

Favorites list


  1. Most Customize window commands are available in the QAP menu bar. See a description of these menus below.
  2. In the drop down list Menu or group to edit, select the Main menu or the submenu to display in the Customize window. You can also use the Up arrow on the top-left to navigate to the parent menu.
  3. The Back and Forward arrows allows to move back and forth in the previously displayed submenus or search results.
  4. Move the selected favorite(s) up or down in the current submenu using the Up and Down round icons.
  5. Add of these types of separators to your menu: horizontal bar, column break or text separator.
  6. Launch the favorite selected in the favorites list (new button added in v11.6.3); this button is enabled for favorite of types Folder, Document, Application, Special, URL, FTP, QAP and Group. View the items in the Customize window in a temporary popup menu with the eye icon. Sort the selected favorites in the current submenu. With the pin icon above, make the window Always on top to make files or folders drag and drop easier.
  7. Click the magnifier icon to reveal the Search box to filter the favorites by keyword in favorite name or in more properties if you check Extended Search.
  8. Use the AddEditRemoveMove or Copy buttons to manage the favorites in the current submenu.
  9. This is the list of favorites in the current submenu or filtered by keyword. Double-click a favorite to edit it or double-click a submenu to navigate to this menu.
  10. After you’ve made changes to your menu, click Save & Close to save your changes and close the Customize window, Save to save changes but stay in the Customize window or Cancel to forget your changes.
Menu bar


In the File menu, save your changes, manage your QAP settings file QuickAccessPopup.ini or quit QAP.


In the Favorite menu, add single or multiple favorites, manage your favorites, insert separators or sort the favorites in the current menu.


In the Tools menu, Search for favorites, under the Special Searches search for all favorites or broken favorites, manage all your ShortcutsHotstrings or Icons, update the Live Folders and Shared menus or suspend QAP hotkeys.


In the Options menu, manage your QAP preferences in 14 sections.


In the Help menu, get basic help, get more help from the QAP website, check for updates, get your QAP license (if you do not already own it), manage your license or get more info about QAP development.

 
Keyboard shortcuts


Hit F1 to get the list of keyboard shortcuts available in the Customize window.

Can I sort the favorites in my menu?

Yes. There are two approaches to sort sort favorites in a menu: you can sort them on demand or have them sorted automatically.

Sort on demand

In the Customize window, open the menu that you want to sort and click the Sort button on the left side of the window. This opens a popup menu when you can select the sort criteria. Selecting the same criteria again will sort in the reverse order.

If no favorite is selected, all favorites are selected and sorted. To sort only part of your menu, select multiple favorites using Shift + Click or Control + Click. After you sorted your menu, you can still use the Up/Down arrows on the left to change the order manually.

Automatic sorting

Menu can also be sorted automatically by a sort criteria that will be maintained whenever you add favorites to tour menu. To select the sorting criteria, edit the menu by selecting it in the favorites list and clicking on the Edit button on the right side or, if you are already in the menu, by selecting the Edit this menu item in the Sort popup menu.

Enable the Sort menu automatically checkbox and click the Change button to choose the sort criteria and the sort order.

If you select a sort criteria for a column that is not currently displayed in the Customize window, you should enable the Display dates and stats columns in Favorites list and Search results option in Options, Customize Window and enable the QAP database in Options, Database.

You can also open the Sort popup menu in a menu sorted automatically to select another sort criteria.

Can I search inside my favorites?

Yes, you can filter the favorites by keywords. As you add favorites to your main menu and your submenus, it can become tricky to find the favorite you want to edit. In addition to easing favorites edition, this tool also gives you a global view of your favorites, allowing to eliminate unwanted duplicates or to better organize your menu.

Using the Search tool

First, to reveal the Search box, click the Magnifier icon, select the menu ToolsSearch for favorites or hit Ctrl-F.

To filter you favorites, simply type a few characters in the Search box just above the favorite list. To restore the full list, simply click the X button on the right.

By default, only the favorites with the searched string in their name will appear in the filtered list. But you can select the check box Extended Search to extend the search to more favorites properties: favorite submenu, type, shortcut, hotstring trigger, location (file or folder path), snippet content, FTP login name and password, and advanced settings Parameters and Start in folder.

You can now search one or more sequence of characters. For example, searching “qui” list find items with this sequence of characters in their name (or other properties). You could also search “qui pop” to find items containing both “qui” AND “pop”.

On the left column, the Sort button sorts the search result by any column, ascending or descending if you select again the current sort column. You can also sort using the context menu that you open by right-clicking inside the list.

Just above, the View button (eye icon) shows a popup menu with the items currently in the search result (see an example, below). This allows you to review the content of these favorites in addition to editing them. If multiple search result items have the same name, the [!] suffix is used to differentiate them. More info: What is the “eye” icon on the left side of the Customize window?.

And above again is the Open the submenu button that opens the submenu containing the item currently selected in the search result.

With the Tools menu, you can open the Search box and select the Extended Search option. In addition, the Special Searches  menu offer very powerful search results. See: What are the Special Searches?

Editing favorites from the search result

To edit your favorites, select one or multiple items in the list (using Click, Shift+Click or Ctrl+Click) and hit one of the buttons in the right column.

  • Edit: edit the selected favorite or submenu (you can also double-click to edit an item).
  • Remove: remove one or multiple favorites or submenus (and all the submenus content).
  • Copy: copy one or multiple favorites, or copy one submenu and its content (submenus, groups and shared menus can only be copied or moved individually).
  • Move: move one or multiple favorites, or move one submenu and its content.
  • Add: close the search result and add a new favorite.

Search options

Various options under the Customize Windows section of the Options dialog box will affect hot the Search tool works.

  • Search scope: by default, the search result includes all menu items, from the Main menu down to the last submenus but you can select the second radio button to search only in the menu (or group) currently displayed in the Customize window and its submenu.
  • Search result with edit dates and stats columns: by default, only the NameMenuTypeHotkey (or Hotstring) and Location or content columns are displayed in search results but enabling this options allows to add the Last ModifiedCreated and Last Used dates and the Usage columns are added. See an example below.The Usage column is shown only if the QAP database is enabled in the Database section of the Options dialog box. It displays the number of times an item was launched using the QAP menu or appeared in the Windows Recent Items special folder during the period covered by the database (see: How can I control how the Frequent Items database works?).
  • Search with language settings: by default, the search filter uses the Windows locale language settings (aka regional settings) when handling accentuated characters (for example, searching for “école” and “ecole” will return the same result) but, by disabling this option, accentuated letters will be treated as specific characters.

The following screen capture shows an example of the search result with additional columns.

A few notes, for those who want to know everything:

  • filtering is case insensitive;
  • filtered favorites are displayed in the order they were found, starting from the current menu;
  • changing menu using the dropdown list or the navigation arrows restore the regular unfiltered list;
  • the back and forward arrows allows to return to the previously closed search results as well as to previously opened submenus.

Can I find broken favorites or list all favorites in all submenus?

Under the Tools menu, the Special Searches submenu allows to list all favorites in one window where you can sort them by any column. Other entries in this menu allows to identify “not found” favorites or broken links.

Selecting Search All Favorites insert the code {All} in the search box and list all favorites in all submenus. To sort favorites in any the search result, click the Sort icon in the left column and select the sort order. You can also open this menu by right-clicking in the search result itself.

Selecting the Search Folders, Documents or Applications not found menu will insert the code {BrokenLocations} inside the search box and list favorites having a location that cannot be found. Take note that locations including {…} placeholders are not checked. You can edit these entries as you would do in any list of favorites.

Selecting the Search Broken Favorites Links (404) menu will insert the code {BrokenLinks} inside the search box and list favorites of type Link having an invalid URL (therefore, producing an error 404). Take note that some broken links could take time to respond, that password protected links may be wrongly identified as broken and that links including {…} placeholders are not checked.

How do I move a favorite or a submenu to another submenu?

You can edit a favorite, open the Menu Options tab and select a new submenu in the Favorite parent menu list.

But a quicker way, in the Customize window, is to select the favorite (or multiple favorites with Shift + Click or Ctrl + Click) and hit the Move button or press Control + M. You can move submenus or groups as well, using the same techniques.


In the Move Favorites dialog box, select the new submenu for your favorite(s) and the position in this menu. And click the Move button.

Can I embellish my popup menu with my preferred icons?

Video – Beautiful and efficients menu with icons (12 min.)

By default, Quick Access Popup select icons based various criteria. For documents, it shows the default icon for the document type (based on filename extension). For applications, it reads the default icon in the application executable file. For QAP features, it use a default image representing the feature’s action. Finally, for folders, it use the plain basic folder icon or the folder’s custom icon if one has been assigned in Windows file system.

You can assign your own custom icons to favorites in the Menu Options tab of the Add / Edit Favorite window. You can pick icons in any .EXE, .DLL or .ICO file. You can also load icons from image files (*.PNG, *.BMP, *.GIF, *.JPG). These images must be square and between 16×16 and 64×64 pixels.

In the Menu Options tab, click the current icon or the Change icon link to select a new icon. Click No icon if you prefer no icon for this favorite or click Edit icon resource if you want to edit the icon file and index manually. In this example, QAP selected the default icon for Excel documents in an Excel .EXE file.

In the Select Icon dialog box, you see all the icons in this file. If the number of icons in this file exceed one page, click Next or Previous to see other pages. You can double click an icon to select it. Or you can use the keyboard arrows to select an icon and select it with the OK button.

You can select an icon from another file with he Browse button. You can open an icons file (*.DLL, *.EXE, *.ICO, *.OCX, *.CPL) or, since v11.3, an image files (*.PNG, *.BMP, *.GIF, *.JPG). Image files must be square and between 16×16 and 64×64 pixels. If you select an image file or an icon file with only one icon, this icon is selected immediately.

You can also select an icon from the JLicons.dll file included with QAP or one of the Windows DLL files by clicking the links JLicons.dll, Shell32.dll or ImageRes.dll.

See how to manage the icons of all your favorite’s icons in a single dialog box: Can I manage all my menu icons in one screen?. See also: How to sync your menu folder icons and Windows folders icons. And don’t miss this video on QAP icons.


Can I manage all my menu icons in one screen?

The Manage Icons dialog box lists all the favorites in your QAP menu with their current icon and the default icon for this type favorite. To open this dialog box, select the Tools, Icons in the menu bar or add to your menu the QAP Feature named Icons.

Manage Icons - Click to enlarge

Manage Icons – Click to enlarge

Change icon dialog box

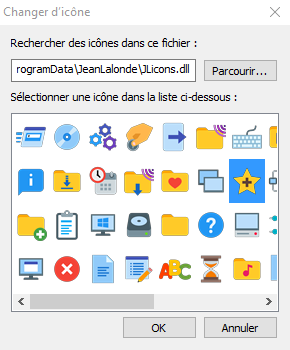
Change icon dialog box (captured here on a French Windows)

For each favorite or submenu, the first two columns show the favorite parent menu and the favorite name. The third column shows the favorite’s current icon and a button to select a custom icon. The last column shows the default icon for this type of favorite and a button to reset the favorite to its default icon.

Some types of favorite have their own default icon. For example, Folder favorites have the classic folder icon. Others, like Application and Document favorites, use the default icon from the associated application’s executable file.

To select a custom icon, click the Select icon button. In the Change icon dialog box, select the file containing the icon and select the icon. More info on how to embellish your QAP menu with icons.

Manage Icons window size

The number of rows displayed in the Manage Icons window is calculated to display as many icons as possible according to the size of your window with Next and Previous buttons to change page. If the window is too large and unusable (if you do not see the buttons at the bottom), read: The Manage Icons window is too large. How can I resize it or scroll the list?

A note for users upgrading from Folders Popup or QAP v7

New QAP icons were introduced with v8. To reset your icons from a previous version, in the Manage Icons window, click on the Set default icon for every icon except for your own custom icons or for the Application and Document favorites icons. More info here: I upgraded from a pre-v8 QAP version, why don’t I see the icons in my menu?


Can I filter out items in Current Windows, Recent or Frequent menus?

The section Menu Exclusions/Inclusions of the Options dialog box allows to control what folders or files will appear in the submenu found by default under the In the Works menu.

Exclude or include folders in the Recent and Frequent menus

To exclude folders (including their subfolders and files) from the Recent Folders, Recent Files, Frequent Folders and Frequent Files menus, click the Exclude radio button under Folders Exclusions/Inclusions and enter their paths, one per line. Optionally, you can use wildcards characters * (standing for any number of any characters) and ? (standing for any single character) before an ending slash.

For example, the following exclusions in the Folders Exclusions box would exclude the folders (including all their subfolders and files) C:\Private and all folders on the C:\ drive with a name that starts with Hide.

C:\Private
C:\Hide*\

Alternatively, you can choose the folders that will be included in these menus the Recent Folders, Recent Files, Frequent Folders and Frequent Files menus. All other folders will be excluded. Click the Include only radio button under Folders Exclusions/Inclusions and enter the selected folders paths, one per line.

Exclude or include files in the Recent and Frequent menus

In addition to folder exclusions, for the Recent Files and Frequent Files menus, you can exclude files in any folder by clicking the Exclude radio button under Files Exclusions/Inclusions and entering the files extension. You can also use file wildcards characters * (standing for any number of any characters) and ? (standing for any single character).

For example, the following exclusions in the File Exclusions box would exclude the MP3 files and all files with name starting with priv and having an extension like .mp3 or .mp4.

mp3
priv*.mp?

Alternatively, you can choose the files that will be included in the Recent Files and Frequent Files menus. All other files will be excluded. Click the Include only radio button under Files Exclusions/Inclusions and enter the file extensions or wildcards expressions, one per line.

Exclude or include files applications in the Current Windows menu

There may be some applications that you do not want to see in the Current Windows menu. In the Current Windows Exclusions/Inclusions box, click the Exclude radio button and enter a list applications that you want to exclude.

Enter any part of the window title of the application to exclude (the window title is what appears in the top horizontal bar of the window). You can enter multiple exclusions, one per line. You can also use the dropdown list under the Current Windows Exclusions/Inclusions section to add one of the running applications.

For example, to exclude windows of applications Sticky and GhostWindows, enter these lines as shown below:

AStickies:
GhostWindows

You can also exclude windows by their class name or process name (EXE file name). You can find more help on these advanced techniques on last parts of the page Can I block the QAP menu trigger (middle mouse button) if it interfere with one of my other apps?

Alternatively, you can choose the applications included in the Current Windows menu. All other applications will be excluded. Click the Include only radio button under Current Windows Exclusions/Inclusions and enter the applications to include, one per line.

What is the “eye” icon on the left side of the Customize window?

This “eye” icon opens a popup menu containing the favorites currently displayed in the Customize window. The favorites do not need to be saved to be viewed in this menu. It can be used as a preview of the menu you are editing.

This popup menu can also be used to see the favorites found in the Search window. If some favorites in the search result have the same name, duplicates name in the popup menu will have the [!] suffix in order to make each name temporarily unique. 

Can I create menu entry with a keyboard shortcut in its name? Why is the “&” hidden in my menu name?

First, the quick answer to the second question: To display an ampersand in a menu you have to type it twice, for example: “Sweet && Sour”.

Why? The ampersand character in Windows menu is used to make the following character a keyboard accelerator (or shortcut). For example, in the screen capture from Notepad on the right, the Replace command can be called by pression Atl + E (to open the Edit menu) then to launch the command. This is because, under the hood, the names of the menu and menu item are “&Edit” and “&Replace”.

The ampersand can be inserted anywhere in a menu name to enable the following character as a keyboard accelerator.

And what about Quick Access Popup? If you open the QAP menu using the keyboard shortcut (Win + W), it is easy to fire a favorite by pressing its menu accelerator. In the following example, the Work menu is named “&Work” to enable W as an accelerator (the W appears as underlined if you open the menu with the keyboard shortcut).

Quick Access Popup menu

Normally, Windows will underline the menu accelerators only when you open the menu with a keyboard shortcut. To force Windows to always display the accelerators, check the Underline keyboard shortcuts option in the Ease of Access Center section of the Windows Settings (aka Windows Control Panel).

Underline keyboard shortcuts

Ease of Access Center of Control Panel (groovypost.com)

Can I change the font, size, color or behavior of the QAP popup menu items?

Yes and no. QAP is building its menus using standard Windows commands. Depending on your Windows version, you may be able to change menu fonts, size or color in Windows Settings (aka Windows Control Panel). But you can’t change the menu font only in QAP menus.

If you want to reduce the space occupied by your menu, you can change the size of menu icons, or even completely remove them. This will allow you to have more menu entries in the same space. Open the Menu Appearance tab of the Options window change the Menu icon size. Also, you can use sub-menus to group menu entries under a single entry.

The left menu has icons size of 48 pixels, the middle one has the default size 32 pixels and the right one has the smallest 16 pixels width.

For the same reason (because QAP is relying on standard Windows menus), QAP cannot do the followings:

  • Make some menu items bold: only one “default” item Customize in the Main menu is displayed bold.
  • Decide on what side will popup a sub menu: this is determined by Windows depending on the space available on the right side of the menu (if not, the submenu will on on the left – I know, I hate this too…).
  • Have a Live Folder submenu entry to be clickable to open the Live folder itself. In Windows menus, submenu entries are not clickable.
  • Trigger an action if you right-click on a menu item: the right-click on a menu cannot be catched to trigger an action. It just does nothing (but you could be interested by these options: Can I launch Alternative menu features directly from the regular popup menu?)
  • Scroll inside the popup menu using the mouse wheel.
  • Etc…

The alternative would be to completely rewrite the QAP menu (using the AHK platform and much advanced libraries) but this would be way too much work and would open the door to a whole new set of bugs and issues. Sorry but this is not on the QAP roadmap.

What are favorites advanced settings?

Advanced Settings give more control on how favorites are launched.

  • Launch with this application: Normally, folders and FTP sites are opened with Windows Explorer (or your custom file manager), documents are open with their default application and links are accessed with your default browser. With the advanced setting Launch with this application, you can choose to launch your favorite with another application. See Placeholders, below.
 
 
  • Start in: This advanced setting available for Application favorites allows to set the default working directory for the application. Take note that not all applications will comply with this Windows setting. See Placeholders, below.
 
  • Auto-open sub folder: When you open a favorite folder, you can ask QAP to automatically open the most recently created sub folder in this favorite folder. QAP could also open the most anciently created, or the most recently/anciently modified or accessed sub folder. More info here: What are the advanced options for favorite folders?
 
  • Encode FTP URL: When you specify a user name and a password for a FTP favorite, these values are added to the URL and sent to the FTP server. When enabled, this options make sure login name and password are properly encoded. Some application (like Total Commander) may prefer the values to be sent without encoding. For these apps, uncheck the option.Take note that this encoding is not encrypting. It does not prevent the password from being saved in the settings file and sent on Internet in clear text. Be cautious if your password protects sensitive data!
 
  • Sound played when launching the application: Set the file name or the codes of the sound to play. The sound is played immediately after the favorite is launched or the group is executed. You can play a sound file, a system sound or your own custom sound sequence. See also: Can I play a sound when I launch a favorite?
 
Placeholders and User variables

You can use placeholders and user variables in Launch with this applicationParameters and Start In fields. These placeholders can be replaced with:

  • the location or part of the full path and file name of the favorite’s location;
  • the folder where the QAP menu was opened;
  • the file selected when the menu was opened;
  • the content of the Windows Clipboard;
  • user input;
  • parts of the current date or time.

For all the details, see:

Can I create custom user variables and use them in file paths or snippets?

Video demo

User variables can be of great help in various situations:

  • network drive users having to enter long (and often cryptic) paths to reach their content can shorten these paths using convenient variable names;
  • if you use a Shared menu of type Personal on two different computers sharing the same cloud drive (like Dropbox), user variables like {Dropbox} allow you to have fix favorites paths in your menu even if your cloud drive is at different locations on your two systems;
  • same thing for teams using shared menus and cloud drives; favorites in shared menus for folders or files on a cloud drive will work regardless the cloud drives location on each team member PCs;
  • if you plan to move your files to another location, you can use a variable to avoid having to edit all the favorites after you moved the files to the new location;
  • user variables can also be used in favorites name;
  • etc.

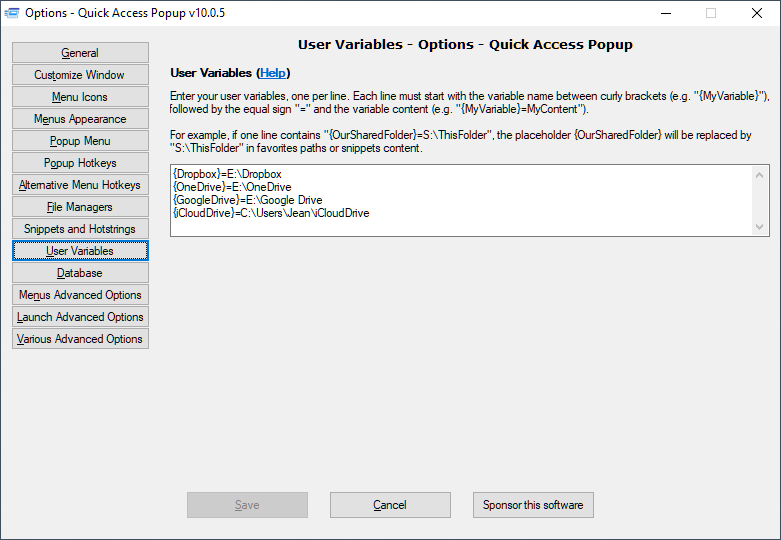
To manage your user variables, select the menu Options, User Variables. In this tab, enter your user variables, one by line. Each line must start with the variable name between curly brackets (e.g. {MyVariable}), followed by the equal sign = and the variable content (e.g. {MyVariable}=My Content).

The first time you launch QAP, it creates user variables for commonly used cloud drives found on the system: {Dropbox}, {OneDrive}, {GoogleDrive} and {iCloudDrive}.


You can add your own variables. For example, if one line contains {OurSharedFolder}=S:\ThisFolder, the placeholder {OurSharedFolder} will be replaced by S:\ThisFolder in a favorite paths (and other location properties) when launching it or in snippet’s content when pasting it.

If you have multiple user variables, you can use text separators to make your list easier to read. Any lines not starting with { is treated as a comment.

In the following example, the user variable {OneDrive} is inserted in the favorite folder {OneDrive}\Project. If the variable contains C:\Users\Standard\OneDrive as in the previous example, the Project folder will be opened in C:\Users\Standard\OneDrive\Projects.

Notes

  • Nesting user variables: User variables can be nested but remember that variables are resolved (or replaced) in the order they appear in the list. If {Var2} includes {Var1}, {Var2} must appear before {Var1} in the list of variables. 
  • Inserting a user variable “as-is” in a text snippet: precede the variable’s opening bracket with a backtick, eg.: `{Dropbox}.

See also:

Can I search and replace values in multiple favorites?

Using Quick Access Popup v11.4+, you can update the location and various other properties in many favorites all at once. This can be extremely helpful if you need to update your QAP menu after moving folders or documents from one drive to another, for example.

To launch a Search and replace operation, select the Tools, Search and replace menu. In the Search and replace dialog box, specify the value to search for and its replacement string. Use the various checkboxes to select in what types of favorites and in what properties to search and replace the value.

Click the Start button to launch the Search and replace operation, starting in the menu or submenu currently displayed in the Customize dialog box and including all its submenus. When a first favorite is found, in the Confirmation dialog box, click:

  • Find next to leave this favorite unchanged and search for the next favorite;
  • Replace this favorite to replace the found value (or values) in this favorite;
  • Replace all favorites to replace the found values in this favorite and all remaining favorites all at once;
  • Stop to interrupt the Search and replace operation before it normal completion.

In the following example, in the favorite named RoadMap found in the Main > QAP submenu, the location will be updated with the Replace with value if the user clicks Replace this favorite button or the Replace all favorites button.

In this second example, in the favorite named MyTunesCovers found in the Main > Musique submenu, the location and the icon resource path will be updated with the Replace with value if the user clicks one of the Replace buttons.

When Quick Access Popup completes the search and replace operation (or if you click Stop in the confirmation dialog box), it shows again the Search and replace dialog box where you can change the values and launch another operation, or click Close to quit this dialog box.

Do not forget to click the Save button in the Customize window to save your changes. If you prefer, you can click Cancel to keep your favorites as they were before the search and replace operation(s).