Video – Tutorial Using the Quick Launch box (13 min.)
In this tutorial, I present to the new Quick Launch box: type a few characters and press Enter or double-click your item in the search result. This feature was introduced in QAP v11.6.
“The greatest tool that Microsoft didn’t make.” – JarisGV on QAP Forum
In this tutorial, I present to the new Quick Launch box: type a few characters and press Enter or double-click your item in the search result. This feature was introduced in QAP v11.6.
Joe Glines hosts this discussion with Leo Davidson, one of the developers of Directory Opus, and myself highlighting how Quick Access Popup complements this great replacement tool for Windows Explorer.
In this tutorial with Joe Glines, you will see some essential settings you need to know in the Options dialog box.
Also, for the first time, you will see Quick Access Popup running (well!) under Windows 11.

For more explanations, see the Easy Setup installation tutorial video.
Enjoy !
QAP 101: What should I know about Quick Access Popup before I start using it?
If you get a virus or malware alert from your anti-virus or protection software about Quick Access Popup being a potential threat, this is not the case (you can trust me… or read this setup file anti-virus report by VirusTotal.com). Please, also read this post: How can I use QAP if an anti-virus is blocking its download or its execution?
If you prefer to use Quick Access Popup in “portable” mode, read this: How can I install Quick Access Popup to make it fully portable? This will, for example, allow you to run Quick Access Popup from an external drive or USB key.
System administrators who install QAP for another end-users, please read this: Are administrator rights required to install QAP?
| VIDEOS > Quick Access Popup Installation Demo (9 min.) > First steps with Quick Access Popup (9 min.) |
When you run it, Quick Access Popup (QAP) adds an icon in the Notification Area and awaits your orders. When you want to open a frequently used folder, launch an application or work on a document, open the Quick Access Popup menu.


Quick Access Popup icon in the Notification Area (System Tray)
You can also open the QAP menu from the Quick Access Popup icon in the Notification Area (System Tray).
In the QAP menu, select your favorite folder, application or document. Quick Access Popup will instantly launch it!
You are already working in a Windows Explorer and just want to change the folder in the current window?
Click the Middle Mouse Button while the mouse pointer is over the Explorer window (or press Windows + W while the Explorer window is active). In the popup menu, select the desired folder. Quick Access Popup will instantly navigate your Explorer to the selected folder! Changing folders in file dialog boxes (Open, Save As, etc.) is also available if you enable this option (see Can I change folders in file dialog boxes?).
Now, you can’t resist to customize your popup menu? Adding your own folders, applications, documents, web links or FTP site is very easy.
There are other ways to add favorites:
What else should I know when I’ll get familiar with the basics?
If you installed Quick Access Popup with the Easy Setup installation, the application is launched automatically when you start Windows. If you prefered the portable installation (ZIP file) you will see hot to enable the auto-start here (this will create a shortcut in the Windows Startup folder).
 This option can be turned on or off in one of these ways.
Notes for users who choose portable install: When you install a the new version of QAP, the shortcut in your Startup folder is automatically updated to launch the new version, if automatic startup is enabled.
Status: Clean
Analysis by VirusTotal.com for QAP setup file and for portable ZIP file
All you need to know about anti-virus false positives (false alerts)…
Protection software block malware applications that could harm your PC. But, sometime, they can also make collateral damages and block legit software like Quick Access Popup.
To prevent bad programs from taking control or infiltrate your PC, protection programs use two protection approaches.
This may result in occasional false malware alerts. In the case of Quick Access Popup, between 0% and 4% of the various detection softwares can produce such false alerts. All others declare Quick Access Popup as clean and safe! If your protection software is blocking it, please see if you can approve (whitelist) Quick Access Popup in the configuration of your software. Also, you can probably go to your software website and report Quick Access Popup as a good app to add to the whitelist database. See this list many major Anti-Virus companies websites where you can ask to test and clear Quick Access Popup. See also this discussion on the page on this subject for my older app Folders Popup.
More about this issue in this post from another independent developer: Antivirus companies cause a big headache to small developers.
Needless to say – all these virus-related email messages that I receive every day are a big headache and require me to waste my time on answering/handling them, instead of adding new features to my utilities and updating my site. [ more… ]
At least, I know I’m not the only small developer facing this issue…
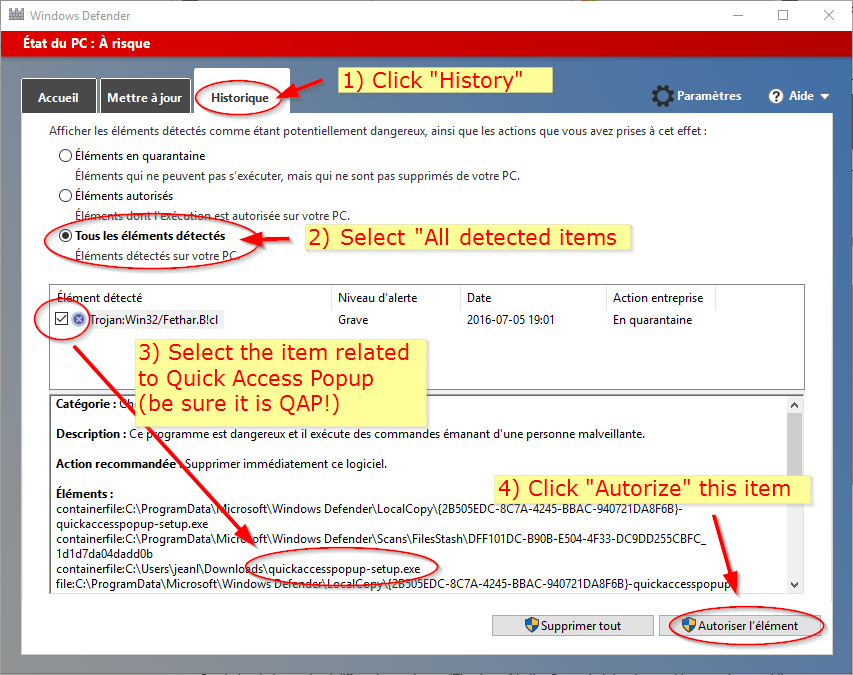
Windows Defender is blocking Quick Access Popup
Until any new version of Quick Access Popup is recognized as a legit software by Windows Defender, this protection software could delete the QAP setup file when you try to install it. If you trust me and want to run QAP, you can prevent it: launch Windows Defender (type “Defender” in the search/launch bar) and open the History tab. See the instructions below (screen capture is in French; I translated to the best of my knowledge).
Google Chrome is blocking Quick Access Popup
Until a new version of Quick Access Popup is recognized by Google Chrome as a legit software, you may see the following alert messages on your download bar (in your own Chrome language – this one is in French).
If Chrome tells you (my own translation to English): “The file quickaccesspopup-setup.exe is not commonly downloaded. It could harm your computer“. If you trust me and want to run QAP, in the menu, click Keep.

Windows SmartScreen
Since September 2016, Quick Access Popup setup and executable files are signed with a software certificate assessing that the publisher is known (that’s me!) and that the executable file has not been modified by a third-party (thanks to users who helped me share the expense of buying this software publisher certificate!).
Now that QAP is a “signed” software you should not see “publisher unknown alerts” from protection software like Windows SmartScreen.
However, if Windows tells you: “quickaccesspopup-setup.exe is not commonly downloaded and might harm your computer“, if you trust me and want to try QAP, Click Execute.

Then, the following message could appear: “Windows protected your PC“. Click More info.
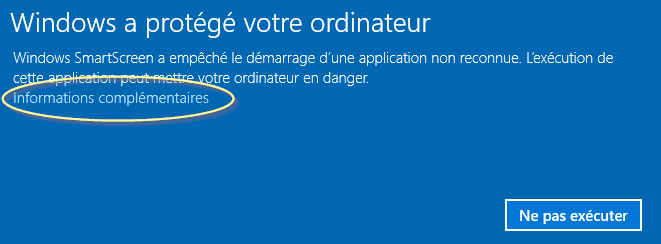
In the next message, you should see Publisher: Jean Lalonde. Click Run anyway. This will install QAP.

Most users prefer to install Quick Access Popup with the Easy Setup installation program. But you may have specific needs that would require a “portable” installation.
By installing Quick Access Popup in “portable” mode, you can use the application on a host PC without leaving any trace after usage. This will, for example, allow you to run Quick Access Popup from an external drive or USB key that can be connected to the host system and removed after usage.
Follow these instructions to install QAP in portable mode.
| Note: You must not install Quick Access Popup in “portable” mode in a system-protected folders like those under C:\Program Files or C:\. This could prevent QAP from saving your configuration. |
1. Download the zip file under the Portable installation zip file.
2. Just extract the files from the zip file to the folder of your choice (but not in a system-protected folders like those under C:\Program Files or C:\).
3. Run the .EXE file from this folder (choose QuickAccessPopup-32-bit.exe or QuickAccessPopup-64-bit.exe version depending on your system). Quick Access Popup will create and update the quickaccesspopup.ini file in this folder.
4. At your convenience, create a shortcut on your Desktop or select Run at Startup in the System Tray to launch Quick Access Popup automatically at startup.
If an anti-virus or protection software reports Quick Access Popup as a potential threat, this is not the case. Please read this post: How can I use QAP if an anti-virus is blocking its download or its execution?
If you are doing a portable “permanent” installation, you could turn the check for updates option on to stay up-to-date! You may also wish to enable Explorer context menus (right-click in Explorer or Desktop). Read the page Explorer Context Menus Help.
Updating QAP is easy. All you have to do is to 1) quit QAP to allow overwriting of the the executable file and 2) unzip the content of the new ZIP file over the existing files in your QAP folder. Your settings files (.ini and .DB) will *not* be overwritten.
More info here: How do I install a new version of Quick Access Popup?.
A portable application, sometimes also called standalone, is a program designed to run on a computer without being installed in a way that modifies the computer’s configuration information. This type of application can be stored on any storage device, including internal mass storage and external storage such as USB drives – storing its program files and any configuration information and data on the storage medium alone (source: Wikipedia).
Specifically, when installed using the Portable installation procedure, Quick Access Popup does not write any information in the Windows registry or in any system or temporary Windows folder. Running the .EXE file launches Quick Access Popup in its current directory. That’s it!
The app creates a temporary folder named _QAP_temp_nnn to store small images, language files and working files required at run time. The default location of the folder is in the Windows %TEMP% folder (e.g. C:\Users\UserName\AppData\Local\Temp). This folder is deleted when the app quits normally. You can set another default location for the temporary folder in Options, General tab, if you do not want to use the host computer’s temporary folder.
The only permanent files are created by Quick Access Popup in its own current directory: the QuickAccessPopup.ini file containing your favorite folders and options, the QAP_Frequent.DB SQLite database file containing data required to build dynamic menus and, if you select the Run at Startup option, the QuickAccessPopup.lnk file in your Startup folder.
To completely remove Quick Access Popup from a PC, delete the folder where you are running the app (preserve the QuickAccessPopup.ini and QAP_Frequent.DB files if you plan to re-use QAP) and delete the file QuickAccessPopup.lnk from your C:\Users\[name]\AppData\Roaming\Microsoft\Windows\Start Menu\Programs\Startup folder. If you enabled Explorer context menu, remove them following the instruction in the Explorer Context Menus Help.
See also:
What file managers are supported in addition to Windows Explorer?
Can I use relative paths in favorite settings?
Can I use system environment variables in favorite paths?
Using the Easy Setup tool
Using the portable ZIP file
If the Quick Access Popup setup program asks for an administrator password, you have two options: ask your system administrator to install it for you (using the setup program). Or, if you have some basic technical knowledge and prefer to get it done yourself, install Quick Access Popup in portable mode since this type of installation does not require administrative rights.
Now, for your sysadmin…
The QAP setup program requires elevated rights (via a User Account Control dialog) when the installation is started. If the setup program was started by an unprivileged user, Windows will ask for the password of an account that has administrative privileges, and the setup will then run under that account.
In order to allow installation by the admin and to set configuration files specific to end users, the setup program is executing the following steps.
As seen at step #2 above, sysadmins could create or edit the quickaccesspopup.ini file in the common appdata folder to give their users a template with favorites of interest for all users: network folders, path to shared applications or documents, intranet URLs, etc. Administrator could also edit this file to enable the Shared Menus Catalogue to facilitate the addition of shared menus by end users (see Can I create a catalogue of shared menus for my team or workgroup?).
To facilitate the creation of a new quickaccesspopup.ini file, admin can run QAP in portable mode, configure options and favorites and copy to fresh ini file the common appdata folder.
About Explorer Context Menus
When installed with in setup mode, QAP always enable its Explorer Context Menus. There are two exceptions: context menus will *not* be enabled if “ExplorerContextMenus=0” under the “[Global]” section either of the quickaccesspopup.ini file in current user’s appdata folder or in common appdata folder. More about Explorer context menus: Explorer Context Menus Help.
(Update February 2019) Up to version v9.4.1.3, the Quick Access Popup Easy Setup installer included an option to convert settings from Folders Popup (the “ancestor” of QAP, latest version v5.2.3, September 2016) in order to import them in QAP. This option has been removed in more recent releases installer.
To convert your Folders Popup (FP) settings to QAP must:
Users installing QAP in portable mode can still import FP settings using ImportFPsettings as described below.
More question/answers for Folders Popup users upgrading to QAP.
Everything possible is made to facilitate the transition from Folders Popup to Quick Access Popup.
The ImportFPsettings utility helps you do the transition from Folders Popup.
Only Folders Popup groups settings cannot be imported to QAP settings. The group implementation has been completely reviewed in QAP, integrating them with favorites as if they were as special kind of submenus, making it difficult to import.
If you install QAP using the standard Setup program (v9.4.1.3 or before), make sure the Import Folders Popup settings and favorites option is checked during installation. The utility will be automatically executed after the initial QAP installation (if you preferred the portable installation, you must run ImportFPsettings manually).
Take note that ImportFPsettings replaces all favorites that could exist in QAP and overwrites existing option settings. It is recommended to use it when you just installed QAP.
After you installed QAP, do not forget to uninstall Folders Popup or, at least, remove it from your Startup group: uncheck Run at Startup in Folders Popup Options dialog box (first tab).
Quick Access Popup is available in various languages, thanks to voluntary translators for their precious work. Select your working language in the Options window, General tab.
| Language | Thanks to translators! | Review in your language |
|---|---|---|
| French | Jean Lalonde | Quick Access Popup : accédez rapidement aux dossiers utilisés fréquemment (Freewares & Tutos) |
| German | Edgar “Fast Edi” Hoffmann | Quick Access Popup ist ein toller Nachfolger von Folders Popup. Die Möglichkeit, jetzt auch Programme zu starten oder Webseiten aufzurufen, macht daraus einmal mehr ein Allroundtool für jeden (Giga Software) |
| Italian | Riccardo Leone | Quick Access Popup: crea le scorciatoie per le cartelle e programmi (dundi.it) |
| Spanish | Isaias Baez | Quick Access Popup |
| Brazilian Portuguese | Igor Ruckert | Quick Access Popup (Baixaki) |
| Portuguese | Luis Neves | Quick Access Popup (Baixaki) |
| Dutch | Ric Roggeveen | Quick Access Popup – Snel toegang tot al je favorieten Workshop QuickAccessPopup (QAP) is handige hulp bij bestandsnavigatie |
| Korean | Maeng Bong Kyun | |
| Simplified Chinese | ilaoyao | |
| Russian | WYLEK.ru | Post about QAP on WYLEK.ru |
Quick Access Popup was originally written in English. Proofreading always appreciated.
In addition to Windows Explorer and Windows command line utilities, Quick Access Popup provides extended support for popular Explorer replacement applications Directory Opus and Total Commander and support for about 15 other file managers.
You can select your preferred file manager in the Options window, tab File managers.
Directory Opus support (DOpus)


QAPconnect: Universal File Managers Support

| Quick Access Popup is fully compatible with the new Directory Opus version 12! |
| Video Demos: |
Quick Access Popup is fully compatible with Directory Opus, an impressive file manager program written by GPSoftware, in Australia. Directory Opus (DOpus) replaces Windows Explorer and integrates lots of features, including file compression, FTP capabilities, folder syncing and much more.
QAP is fully aware of DOpus capabilities and utilizes them via the internal DOpusRt.exe commands to offer seamless and reliable integration.
Directory Opus support
How-to enable DOpus support
When you start it for the first time, Quick Access Popup checks if DOpus is installed on your computer (looking for the file [Program Files]GPSoftware\Directory Opus\dopus.exe). If it is found, it asks if you wish to enable Directory Opus integration. If you answer Yes, it records the DOpus.exe file path in the Settings, Options dialog box.

If DOpus is installed on your system after QAP or is installed in folder not found by Quick Access Popup, you can manually enable integration by browsing to your DOpus.exe file in the Options dialog box, File managers tab.
You can also add the Directory Opus Favorites menu manually from the QAP Features list. In the Customize window click Add, select the QAP Feature type, under the Dynamic Menus category, select Directory Opus Favorites and click the Add button, then Save your changes.

DOpus layouts are included by default under the QAP DOpus favorites menu but there is an option if you prefer not to include them if you do not use Layouts. Note that all layouts are displayed in this menu. QAP currently does not exclude layouts that would have the Hide option checked.
Quick Access Popup is fully compatible with Total Commander, a very popular file manager program written by Christian Ghisler, in Switzerland. Total Commander (TC) replaces Windows Explorer and integrates lots of features, including file compression, FTP capabilities, folder syncing and much more.
Quick Access Popup is aware of TC capabilities and utilizes them via TC internal commands to offer seamless and reliable integration.
Total Commander support
How-to enable Total Commander support
When you start it for the first time, Quick Access Popup checks if TC is installed on your computer (looking for the file TOTALCMD.EXE or TOTALCMD64.EXE). If it is found, it asks if you wish to enable Total Commander integration. If you answer Yes, it records the TOTALCMD.EXE file path in the Options dialog box, File Managers tab.

If TC is installed in a folder not found by Quick Access Popup, you can manually enable integration by browsing to your TOTALCMD.EXE or TOTALCMD64.EXE file in the Options dialog box. In order to integrate the TC Directory Hotlist in QAP, set the TC wincdm.ini file location in Options, File Managers tab.
You can choose if you prefer to launch Total Commander and on which pane you prefer to add new tabs: active side, left, right or destination (target) side.
Note: Applications launched from Total Commander can use some TC exclusive environment variables like %COMMANDER_PATH% or %COMMANDER_EXE% (see the Pseudo environment variables section of this page). These variables are unknown from QAP if you launch QAP before Total Commander.
To use these variables in your QAP configuration, for example if the variable %COMMANDER_PATH% is used in a redirection command for the Directory HotList data ([DirMenu] section of the settings file wincdm.ini) or to use TC variables in your favorites paths, you must launch QAP from Total Commander. This can be done manually but can also be automated at startup using a plugin like Autorun.
Or, if you prefer to run QAP normally, you could simply avoid using these pseudo-variables and enter the fully qualified paths where required.
If the TC Directory Hotlist menu has not been added automatically to your QAP menu when you installed it, go to the Customize window, click the Add button, select the QAP Feature type and, under the Dynamic Menus category, select TC Directory Hotlist.
Note: Total Commander commands starting with cm_ (like cm_OpenDesktop or cm_OpenDrives) are currently not supported in QAP TC Directory Hotlist. Entries in the ini file containing these commands are skipped.
At this time, the Reopen a Folder and Current Windows menus will only include the active tab in each TC pane. Other tabs are not included in these menus. Also, re-opening the active TC folder in a file dialog box is currently not supported for some Windows Special Folders like My Computer or Recycle Bin. These features could be improved with future releases of QAP and TC.
QAP offers partial support for a list of about 15 file managers. The QAPconnect.ini settings file act as an interface between Quick Access Popup and these file mangers. You can find this file in QAP’s Settings Folder.
When configured for your file manager and selected in the QAP Options dialog box, File managers tab, these settings allow QAP to change folder or open new folder in your file manager.
Note 1: If you only use Windows Explorer and file dialog boxes (Open, Save As, etc.), you don’t need to care about this file. Just use QAP as it is.
Note 2: The file managers Directory Opus and Total Commander are already supported by QAP without needing additional settings in this file. To use one of these file managers, select it in Options, File managers tab.
When QAP needs to open a new window (or tab) in a file manager or to change folder in the current window, it needs to know what command to send to the file manager. This is done by selecting your file manager in QAP Options dialog box.

But, first, you need to make sure the info in the file QAPconnect.ini is OK for your installation of the file manager.
Note 3: File managers added to QAPconnect after you installed QAP are not added the file QAPconnect.ini (to avoid overwriting the file if it was edited). Instead, the file QAPconnect-default.ini is added to your QAP Settings folder. Check if this file includes your file manager. If yes, copy the section for this file manager to the QAPconnect.ini file and edit it as explained from steps 3 above.
Note 4: For users using QAP in a “portable” environment like an USB key, you can set a relative path for your file manager exe file (i.e. “..\MyManager\MyManager.exe”). Path is relative to the QAP Settings Folder. If you preferred the portable installation, it is the directory where QAP exe file is running.
Actually, over 15 file managers are supported in QAPconnect. If your custom file manager is not in QAPconnect.ini, you can add it to the list if it meets certain conditions. The main condition is that it must accept commands via the command line to open a new window, open a new tab (if applicable) or change the folder in the current file manager’s window.
1. To add a file manager, add a new section at the bottom of this file with the name and version of your file manager between square brackets […]. For example:
[MyManager (v1.2.3)]
AppPath=
CommandLine=
NewTabSwitch=
NeverQuotes=
2. Set your file manager path and command line options:
a) AppPath: path to your custom file manager application executable (absolute or relative)
b) CommandLine: parameters that will be passed to the application (set in AppPath)
– the placeholder %Path% will be replaced with the path of the favorite folder selected in QAP popup menu
– the placeholder %NewTabSwitch% will be replaced with the NewTabSwitch parameter (see below)
See examples in sections for other file managers in the QAPconnect.ini file. Refer to your file manager’s documentation to see if these parameters are available.
c) NewTabSwitch (optional): command line parameter to open folder in a new tab (if available) or in a new instance of your file manager. NewTabSwitch is used only when you ask Quick Access Popup to open a folder in a new window. It will tell QAP how to to open the folder in a new tab instead of a new window.
d) CompanionPath (optional): path to a command line executable, companion of the main file manager executable. For example, EF Commander Free main application is EFCommanderFreePortable.exe. But a second executable EFCWT.EXE is used to open or change folders. Setting the CompanionPath helps QAP manage properly file manager windows.
e) NeverQuotes: Normally, QAP encloses %Path% between double-quotes if it includes at least one space. If in your file manager, %Path% should never be enclosed, set NeverQuotes to “1” (without the double-quotes).
3. Save this file. In QAP, click the Refresh applications list to reflect your changes in QAPconnect.ini. You can now select your newly added file manager.
During installation, shortcuts are created for two types of hotkeys: popup menu hotkeys and favorite hotkeys. These hotkeys are always available, regardless of the active window. If whenever they interfere with your existing hotkeys, you will see below how to change or remove them.
Note: There are also a set of hotkeys available only in the Customize window. These hotkeys are covered in the Customize help page.
Popup menu hotkeys
By default, the QAP popup menu can be triggered by the Middle Mouse Button and the keyboard shortcut Windows + W. A second popup menu called Alternative menu is triggered by default by Shift + Middle Mouse Button or Shift + Windows + W. You can change these settings in Options dialog box, Popup Hotkeys tab.
Favorite hotkeys
Mouse or keyboard hotkeys can also be assigned to any favorite in your menu. This allow you to launch a favorite without having to open the QAP popup menu and locate your favorite.
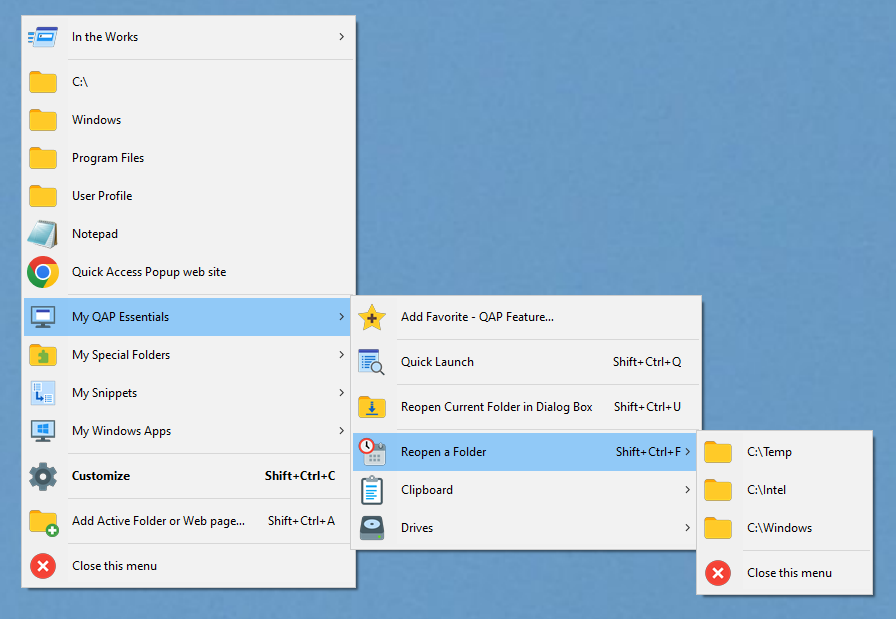
At installation time, only some QAP feature favorites are assigned to shortcuts. They are in the My QAP Essentials menu. This menu is created at installation in the Main popup menu. It includes keyboard shortcuts for the following menu and QAP features:
Two other QAP features shortcuts are also inserted in the Main menu during installation:
You can change all these shortcuts by editing each favorite separately or you can edit all of them in the Hotkeys dialog box: select Tools, Hotkeys in the Customize window menu bar. See also Can I launch my favorites with keyboard or mouse shortcuts?

Thanks to QAP user Nicola Farina, Quick Access Popup can now be installed and updated automatically and silently using the Chocolatey package manager.

To install or update QAP using this tool:
choco install qapchoco upgrade qapPut the upgrade command in a batch saved in your Startup folder to have the update command run automatically at every startup of your system.
See the Quick Access Popup package page for more information about the QAP version available. Because of package update and approval delays, it may take a day or two before a new QAP version becomes available on Chocolatey.
Tip: Create a QAP favorite to open CMD as administrator easily. Create an Application favorite, the Application path enter %COMSPEC% (or C:/Windows/System32/cmd.exe) and, in the Advanced Settings, check the Elevate application with administrative privileges option.
QAP has various types of triggers to open two different menus. Each menu can be open with a mouse button, a keyboard hotkey or an icon.
1) Main QAP menu mouse and keyboard triggers
The default mouse trigger is the Middle Mouse Button and the default keyboard trigger is Windows+W.
Using a touchpad
Most of the touchpads can be configured to emulate a click on the middle mouse button (for example, by doing a three fingers tap). Check the documentation of your touchpad. You will find more info in this How-To Geek article.

Open the Alternative menu with Shift + Middle Mouse Button or Shift + Windows + W
2) Alternative menu mouse and keyboard triggers
The default mouse trigger is Shift + Middle Mouse Button and the default keyboard trigger is Shift + Windows + W.
You can open the menu by clicking the QAP icon in the Notifications area (right part of the task bar). More info here.
You can also show the popup menu from the Explorer context menu (right-click menu). On the Desktop, right-click anywhere except on icons and select Show Quick Access Popup menu. To use the Alternative menu, hold Shift key while you right-click the Desktop and select Show Quick Access Popup Alternative menu.
You can also open the main QAP menu by pressing twice the left or right Control key. Enable this feature in the Options, Popup Hotkeys.
Finally, you can open the menu from the command line, a batch file (or any script) or from a file shortcut using the QAP companion executable QAPmessenger.

Video demo

The In the Works menu is built automatically by Quick Access Popup to give you an easy access to the contents you most probably need because you use them…
Chances are high that the content you need to work NOW is already in one of these submenus.
| Privacy Statement The data in the Quick Access Popup database is collected and stored locally, solely to build dynamic menus and increase performance. This data resides ONLY on your system and NO information is transmitted to a remote server. |
To build the Frequent Items menus, QAP is maintaining a local and private database that remembers the folders and files you used in the last days. Before going further, for those concerned with privacy, see my statement in the box beside.
If you prefer not having QAP collect this data, you can go to the Database options to turn this feature off, flush its content or control its behavior.
The Frequent Folders and Frequent Files menus contain by order of frequency the ten folders or ten documents you opened most frequently in the last days. In your first hours or days of usage of QAP, these menus may not be full or may not reflect your most often used content. But, they will improve quickly as you use QAP.


Frequent Files – Click to enlarge
You can change the number of items in these menus in Options, Menu Appearance tab. Set the Number of items in menus under Frequent Items and Recent Items Menus. You can also see how QAP discovers your most frequently used folders and file and set various parameters here: How can I control how the Frequent Items Database works?
The Recent folders and Recent files menus list the recent places or documents memorized by Windows. You can find more information here: From where comes the content of the Recent folders and Recent files menus?

Recent Files – Click to enlarge

Recent Folders – Click to enlarge
 The last item of the In the Works menu shows all the folders and windows open on your system. You can can find more information here: How is built the Current Windows menu?
The In the works menu was added automatically at the top of your main menu when you launched QAP. Using the Customize window, you will be able, if you wish, to rename this menu, move it or break up its content in other submenus. See how to open the Customize window and how to use it to customize your menu.
You can select folders or files to exclude from these menus. See: Can I filter out items in Current Windows, Recent or Frequent menus?
QAP Features are powerful functionalities that can be inserted in any QAP menu or submenu. For your convenience, the My QAP Essentials menu is built automatically when you installed QAP. It gives access to a subset of the most useful QAP Features.
Finally, other QAP features were also added in the main QAP menu:
Feel free to add QAP Features to this menu or to move them around. See the list of other QAP features.
The My QAP Essentials menu was added automatically to your main menu when you launched QAP. Using the Customize window, you will be able, if you wish, to rename this menu, move it or break up its content in other submenus. See how to open the Customize window and how to use it to customize your menu.

When Windows is installed, numerous system folders are created. Quick Access Popup knows more than 50 of these “Windows Special Folders”. The My Special folders menu gives access to the most known and used:
With the first item of this menu Add Favorite – Special Folder…, you can add new system folders to this menu (see How do I add a favorite to my menu? for help on adding favorites to your menu). There are plenty of other special folders that you can also add using the Add Favorite button in the Customize window, for example: Libraries, Recent items, Startup folder, History, Favorites, Quick Launch, Cookies, Temporary files, etc. Special folders can be inserted in any QAP menu or submenu. For your convenience, the My Special Folders menu was built when you installed QAP. Feel free to add special folders to this menu or to move them around.
The My Special Folders menu was added automatically to your main menu when you launched QAP. Using the Customize window, you will be able, if you wish, to rename this menu, move it or break up its content in other submenus. See how to open the Customize window and how to use it to customize your menu.
The Quick Access Popup icon in the Notification Area (System Tray) has two functions: menu launcher and System menu.

Right-click the icon in the Notification area to open the QAP System menu:
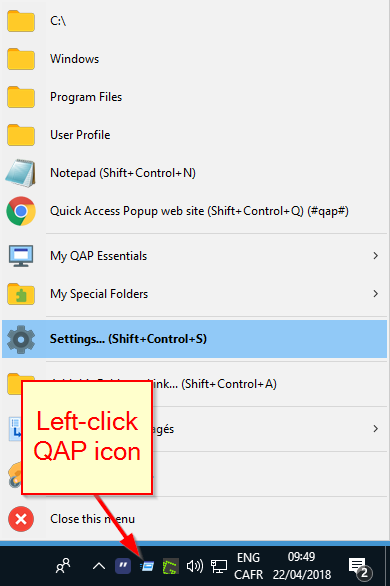 Left-click on the Quick Access Popup icon in the Notification area to open your favorites menu. This menu is always available in the Tray. When you select a folder, it is open in the most recently active Windows Explorer window or in a new window, depending on the option selected in the Options, File Managers tab.
See also: How can I make the QAP icon always stay in the Notification Area?
Alternative menu features are actions to be executed on one of the favorites in your QAP menu. After you click one of the options in the Alternative menu, the full QAP menu is displayed to let you choose on what favorite you want to execute the Alternative menu command.
You open the Alternative menu with a mouse or a keyboard triggers. The default mouse trigger is Shift + Middle Mouse Button and the default keyboard trigger is Shift + Windows + W.
Alternative menu features
The Alternative menu offers the following features:
Alternative menu features are also available directly from the regular menu by using various keyboard modifiers when clicking a favorite in the popup menu. By default these keyboard modifiers are available:
About this, see how to configure Alternative menu features shortcuts: Can I launch Alternative menu features directly from the regular popup menu?
Finally, you can also use these Alternative menu features in the Quick Launch search box. See Can I quickly search QAP to launch one of my favorites? for more details.

My AHK colleague and friend Joe Glines asked me what was the most useful but least known feature of Quick Access Popup. Answer: the Alternative menu!
Can I quickly search QAP to launch one of my favorites?
Can I quickly search QAP to launch one of my favorites?
Alternative menu features are also available directly from the regular menu by using keyboard modifiers when clicking a favorite in the popup menu. These keyboards modifiers are by default :
Note: Two Alternative menu features added in v11.5.7, Move the selected file to a favorite folder and Copy the selected file to a favorite folder, do not have default modifiers. To assign one the the modifiers to them, you must first one of the modifier by selecting None for another feature.
To continue our previous example where you want to edit a favorite, you could open the your QAP menu using the regular shortcut (by default Middle Mouse Button) and before clicking the favorite to edit, keep the Left Shift and Left Control keys pressed while clicking the favorite to edit.

The keyboard shortcuts opening the QAP menu for specific Alternative menu command and the keyboard modifiers for the Main menu can be changed in the Option, Alternative Menu Hotkeys section.

If you made changes in the modifiers dropdown list and want to return to the current modifiers, click the button Reset to saved modifiers on the bottom right of the window. If you wish to go back to the default modifiers settings, click the button Reset to default modifiers.
These keyboard modifiers can also be used in the Quick Launch search box. See Can I quickly search QAP to launch one of my favorites? for more details.
More info about these features: What are the Alternative menu features?
By default, the Drives, Recent Folders and Recent Files menus are displayed as part of the main menu (“attached”). But, because these menus have to be refreshed before being shown, this could slow down the display of your main menu (this would happen only on relatively slow systems or drives). In this case, you could ask QAP to display these items in a “detached” (or stand-alone) menus. For this, uncheck the checkbox Attach all dynamic menus to QAP main menu in the Options dialog box, Popup Menu tab.

When these menus are “attached”, you may notice a slight refresh delay when you invoke the QAP menu. This delay is caused by the time it takes to Windows to provide the refreshed information required to display the Drives, Recent Folders and Recent Files menus. Because Windows does not always provide this info instantly, the delay may vary at each display of the popup menu. Again, this would be an issue on relatively slow systems.
Update: If the QAP database is enabled (in Options, Database tab), QAP caches the dynamic menus content in its database and refresh them with a background task. This eliminates the need to display the dynamic menus in a detached menu.
You display the QAP menu or launch QAP favorites using the QAP executable companion QAPmessenger.exe installed in the QAP application folder. This utility is used to send commands to QAP from the Windows Explorer Context menus. But you can also use it this utility to call the QAP menu or launch QAP favorites from the command line, a batch file, a Windows shortcut, etc.
Enter one of the following lines at the command prompt, in a .BAT file line or in the Target field in a Windows shortcut. Replace C:\Program Files\Quick Access Popup\QAPmessenger.exe with the current path and filename of QAPmessenger in your setup.
The first line shows the regular menu. The second line shows the same menu but will change the folder in the current Windows Explorer window (for favorites of type Folder or Special) instead of opening a new window:
"C:\Program Files\Quick Access Popup\QAPmessenger.exe" ShowMenuLaunch
"C:\Program Files\Quick Access Popup\QAPmessenger.exe" ShowMenuNavigate
You can also use these commands to popup a specific submenu. Enclose in double-quotes > (greater than + space) and the name of the submenu, for example:
"C:\Program Files\Quick Access Popup\QAPmessenger.exe" ShowMenuLaunch "> MySubMenu"
"C:\Program Files\Quick Access Popup\QAPmessenger.exe" ShowMenuLaunch "> MySubMenu > 2nd Level"
This example shows the Alternative menu:
"C:\Program Files\Quick Access Popup\QAPmessenger.exe" ShowMenuAlternative
The last examples shows how to launch a favorite named FavName from the command line (requires QAP v11.5.4 or more recent). In the first line, QAP will launch the favorite FavName located in the Main menu. The following lines shows how to launch favorites in a submenus.
"C:\Program Files\Quick Access Popup\QAPmessenger.exe" LaunchFavorite "> FavName"
"C:\Program Files\Quick Access Popup\QAPmessenger.exe" LaunchFavorite "> SubMenu > FavName"
"C:\Program Files\Quick Access Popup\QAPmessenger.exe" LaunchFavorite "> Sub1 > Sub2 > FavName"
If you use the ampersand (&) in a submenu or favorite name to make a keyboard shortcut, make sure you reference the submenu or favorite with its name as it is entered in the Customize window (for example &&FavName). Same thing if you use the double-ampersand to insert a real ampersand in the favorite name.
"C:\Program Files\Quick Access Popup\QAPmessenger.exe" LaunchFavorite "> &FavName"
"C:\Program Files\Quick Access Popup\QAPmessenger.exe" LaunchFavorite "> FavName && Co."
You can display the QAP dynamic menus (Recent Folders, Frequent Folders, Recent Files, Frequent Files, Current Windows, TC Directory Hotlist, DOpus Favorites, etc.) if these menus are present in the QAP menu. In these cases, unlike previous examples, you must not enter the submenu where the dynamic menu is located. For example:
"C:\Program Files\Quick Access Popup\QAPmessenger.exe" ShowMenuDynamic "Recent Folders"
"C:\Program Files\Quick Access Popup\QAPmessenger.exe" ShowMenuDynamic "Current Windows"
You can also launch submenus (this will display the submenu) or groups (this will launch all group items). When launching groups, do not include the «n» suffix in the group name (indicating the number of items in the group). For example:
"C:\Program Files\Quick Access Popup\QAPmessenger.exe" LaunchFavorite "> SubMenu > GroupName"
See also how you can use a command-line to add favorites to your menu.
Welcome aboard!


In the File menu, save your changes, manage your QAP settings file QuickAccessPopup.ini or quit QAP.

In the Favorite menu, add single or multiple favorites, manage your favorites, insert separators or sort the favorites in the current menu.

In the Tools menu, Search for favorites, under the Special Searches search for all favorites or broken favorites, manage all your Shortcuts, Hotstrings or Icons, update the Live Folders and Shared menus or suspend QAP hotkeys.

In the Options menu, manage your QAP preferences in 14 sections.

In the Help menu, get basic help, get more help from the QAP website, check for updates, get your QAP license (if you do not already own it), manage your license or get more info about QAP development.

Hit F1 to get the list of keyboard shortcuts available in the Customize window.
Yes. There are two approaches to sort sort favorites in a menu: you can sort them on demand or have them sorted automatically.
In the Customize window, open the menu that you want to sort and click the Sort button on the left side of the window. This opens a popup menu when you can select the sort criteria. Selecting the same criteria again will sort in the reverse order.
If no favorite is selected, all favorites are selected and sorted. To sort only part of your menu, select multiple favorites using Shift + Click or Control + Click. After you sorted your menu, you can still use the Up/Down arrows on the left to change the order manually.

Menu can also be sorted automatically by a sort criteria that will be maintained whenever you add favorites to tour menu. To select the sorting criteria, edit the menu by selecting it in the favorites list and clicking on the Edit button on the right side or, if you are already in the menu, by selecting the Edit this menu item in the Sort popup menu.
Enable the Sort menu automatically checkbox and click the Change button to choose the sort criteria and the sort order.

If you select a sort criteria for a column that is not currently displayed in the Customize window, you should enable the Display dates and stats columns in Favorites list and Search results option in Options, Customize Window and enable the QAP database in Options, Database.
You can also open the Sort popup menu in a menu sorted automatically to select another sort criteria.
Yes, you can filter the favorites by keywords. As you add favorites to your main menu and your submenus, it can become tricky to find the favorite you want to edit. In addition to easing favorites edition, this tool also gives you a global view of your favorites, allowing to eliminate unwanted duplicates or to better organize your menu.
First, to reveal the Search box, click the Magnifier icon, select the menu Tools, Search for favorites or hit Ctrl-F.

To filter you favorites, simply type a few characters in the Search box just above the favorite list. To restore the full list, simply click the X button on the right.

By default, only the favorites with the searched string in their name will appear in the filtered list. But you can select the check box Extended Search to extend the search to more favorites properties: favorite submenu, type, shortcut, hotstring trigger, location (file or folder path), snippet content, FTP login name and password, and advanced settings Parameters and Start in folder.
You can now search one or more sequence of characters. For example, searching “qui” list find items with this sequence of characters in their name (or other properties). You could also search “qui pop” to find items containing both “qui” AND “pop”.

On the left column, the Sort button sorts the search result by any column, ascending or descending if you select again the current sort column. You can also sort using the context menu that you open by right-clicking inside the list.
Just above, the View button (eye icon) shows a popup menu with the items currently in the search result (see an example, below). This allows you to review the content of these favorites in addition to editing them. If multiple search result items have the same name, the [!] suffix is used to differentiate them. More info: What is the “eye” icon on the left side of the Customize window?.

And above again is the Open the submenu button that opens the submenu containing the item currently selected in the search result.

With the Tools menu, you can open the Search box and select the Extended Search option. In addition, the Special Searches menu offer very powerful search results. See: What are the Special Searches?

To edit your favorites, select one or multiple items in the list (using Click, Shift+Click or Ctrl+Click) and hit one of the buttons in the right column.
Various options under the Customize Windows section of the Options dialog box will affect hot the Search tool works.

The following screen capture shows an example of the search result with additional columns.

A few notes, for those who want to know everything:
Under the Tools menu, the Special Searches submenu allows to list all favorites in one window where you can sort them by any column. Other entries in this menu allows to identify “not found” favorites or broken links.

Selecting Search All Favorites insert the code {All} in the search box and list all favorites in all submenus. To sort favorites in any the search result, click the Sort icon in the left column and select the sort order. You can also open this menu by right-clicking in the search result itself.

Selecting the Search Folders, Documents or Applications not found menu will insert the code {BrokenLocations} inside the search box and list favorites having a location that cannot be found. Take note that locations including {…} placeholders are not checked. You can edit these entries as you would do in any list of favorites.

Selecting the Search Broken Favorites Links (404) menu will insert the code {BrokenLinks} inside the search box and list favorites of type Link having an invalid URL (therefore, producing an error 404). Take note that some broken links could take time to respond, that password protected links may be wrongly identified as broken and that links including {…} placeholders are not checked.

You can edit a favorite, open the Menu Options tab and select a new submenu in the Favorite parent menu list.

But a quicker way, in the Customize window, is to select the favorite (or multiple favorites with Shift + Click or Ctrl + Click) and hit the Move button or press Control + M. You can move submenus or groups as well, using the same techniques.

In the Move Favorites dialog box, select the new submenu for your favorite(s) and the position in this menu. And click the Move button.

By default, Quick Access Popup select icons based various criteria. For documents, it shows the default icon for the document type (based on filename extension). For applications, it reads the default icon in the application executable file. For QAP features, it use a default image representing the feature’s action. Finally, for folders, it use the plain basic folder icon or the folder’s custom icon if one has been assigned in Windows file system.
You can assign your own custom icons to favorites in the Menu Options tab of the Add / Edit Favorite window. You can pick icons in any .EXE, .DLL or .ICO file. You can also load icons from image files (*.PNG, *.BMP, *.GIF, *.JPG). These images must be square and between 16×16 and 64×64 pixels.

In the Menu Options tab, click the current icon or the Change icon link to select a new icon. Click No icon if you prefer no icon for this favorite or click Edit icon resource if you want to edit the icon file and index manually. In this example, QAP selected the default icon for Excel documents in an Excel .EXE file.
In the Select Icon dialog box, you see all the icons in this file. If the number of icons in this file exceed one page, click Next or Previous to see other pages. You can double click an icon to select it. Or you can use the keyboard arrows to select an icon and select it with the OK button.

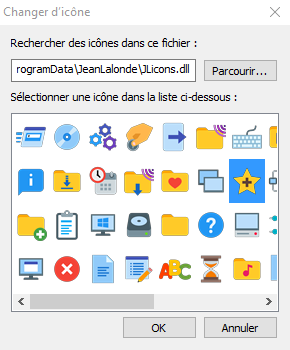
You can select an icon from another file with he Browse button. You can open an icons file (*.DLL, *.EXE, *.ICO, *.OCX, *.CPL) or, since v11.3, an image files (*.PNG, *.BMP, *.GIF, *.JPG). Image files must be square and between 16×16 and 64×64 pixels. If you select an image file or an icon file with only one icon, this icon is selected immediately.
You can also select an icon from the JLicons.dll file included with QAP or one of the Windows DLL files by clicking the links JLicons.dll, Shell32.dll or ImageRes.dll.
See how to manage the icons of all your favorite’s icons in a single dialog box: Can I manage all my menu icons in one screen?. See also: How to sync your menu folder icons and Windows folders icons. And don’t miss this video on QAP icons.
The Manage Icons dialog box lists all the favorites in your QAP menu with their current icon and the default icon for this type favorite. To open this dialog box, select the Tools, Icons in the menu bar or add to your menu the QAP Feature named Icons.
Manage Icons – Click to enlarge
Change icon dialog box (captured here on a French Windows)
For each favorite or submenu, the first two columns show the favorite parent menu and the favorite name. The third column shows the favorite’s current icon and a button to select a custom icon. The last column shows the default icon for this type of favorite and a button to reset the favorite to its default icon.
Some types of favorite have their own default icon. For example, Folder favorites have the classic folder icon. Others, like Application and Document favorites, use the default icon from the associated application’s executable file.
To select a custom icon, click the Select icon button. In the Change icon dialog box, select the file containing the icon and select the icon. More info on how to embellish your QAP menu with icons.
Manage Icons window size
The number of rows displayed in the Manage Icons window is calculated to display as many icons as possible according to the size of your window with Next and Previous buttons to change page. If the window is too large and unusable (if you do not see the buttons at the bottom), read: The Manage Icons window is too large. How can I resize it or scroll the list?
A note for users upgrading from Folders Popup or QAP v7
New QAP icons were introduced with v8. To reset your icons from a previous version, in the Manage Icons window, click on the Set default icon for every icon except for your own custom icons or for the Application and Document favorites icons. More info here: I upgraded from a pre-v8 QAP version, why don’t I see the icons in my menu?
The section Menu Exclusions/Inclusions of the Options dialog box allows to control what folders or files will appear in the submenu found by default under the In the Works menu.

To exclude folders (including their subfolders and files) from the Recent Folders, Recent Files, Frequent Folders and Frequent Files menus, click the Exclude radio button under Folders Exclusions/Inclusions and enter their paths, one per line. Optionally, you can use wildcards characters * (standing for any number of any characters) and ? (standing for any single character) before an ending slash.
For example, the following exclusions in the Folders Exclusions box would exclude the folders (including all their subfolders and files) C:\Private and all folders on the C:\ drive with a name that starts with Hide.
C:\Private
C:\Hide*\
Alternatively, you can choose the folders that will be included in these menus the Recent Folders, Recent Files, Frequent Folders and Frequent Files menus. All other folders will be excluded. Click the Include only radio button under Folders Exclusions/Inclusions and enter the selected folders paths, one per line.
In addition to folder exclusions, for the Recent Files and Frequent Files menus, you can exclude files in any folder by clicking the Exclude radio button under Files Exclusions/Inclusions and entering the files extension. You can also use file wildcards characters * (standing for any number of any characters) and ? (standing for any single character).
For example, the following exclusions in the File Exclusions box would exclude the MP3 files and all files with name starting with priv and having an extension like .mp3 or .mp4.
mp3
priv*.mp?
Alternatively, you can choose the files that will be included in the Recent Files and Frequent Files menus. All other files will be excluded. Click the Include only radio button under Files Exclusions/Inclusions and enter the file extensions or wildcards expressions, one per line.
There may be some applications that you do not want to see in the Current Windows menu. In the Current Windows Exclusions/Inclusions box, click the Exclude radio button and enter a list applications that you want to exclude.
Enter any part of the window title of the application to exclude (the window title is what appears in the top horizontal bar of the window). You can enter multiple exclusions, one per line. You can also use the dropdown list under the Current Windows Exclusions/Inclusions section to add one of the running applications.
For example, to exclude windows of applications Sticky and GhostWindows, enter these lines as shown below:
AStickies:
GhostWindows
You can also exclude windows by their class name or process name (EXE file name). You can find more help on these advanced techniques on last parts of the page Can I block the QAP menu trigger (middle mouse button) if it interfere with one of my other apps?
Alternatively, you can choose the applications included in the Current Windows menu. All other applications will be excluded. Click the Include only radio button under Current Windows Exclusions/Inclusions and enter the applications to include, one per line.
This “eye” icon opens a popup menu containing the favorites currently displayed in the Customize window. The favorites do not need to be saved to be viewed in this menu. It can be used as a preview of the menu you are editing.

This popup menu can also be used to see the favorites found in the Search window. If some favorites in the search result have the same name, duplicates name in the popup menu will have the [!] suffix in order to make each name temporarily unique.


First, the quick answer to the second question: To display an ampersand in a menu you have to type it twice, for example: “Sweet && Sour”.
Why? The ampersand character in Windows menu is used to make the following character a keyboard accelerator (or shortcut). For example, in the screen capture from Notepad on the right, the Replace command can be called by pression Atl + E (to open the Edit menu) then R to launch the command. This is because, under the hood, the names of the menu and menu item are “&Edit” and “&Replace”.
The ampersand can be inserted anywhere in a menu name to enable the following character as a keyboard accelerator.

Quick Access Popup menu
Normally, Windows will underline the menu accelerators only when you open the menu with a keyboard shortcut. To force Windows to always display the accelerators, check the Underline keyboard shortcuts option in the Ease of Access Center section of the Windows Settings (aka Windows Control Panel).

Ease of Access Center of Control Panel (groovypost.com)
Yes and no. QAP is building its menus using standard Windows commands. Depending on your Windows version, you may be able to change menu fonts, size or color in Windows Settings (aka Windows Control Panel). But you can’t change the menu font only in QAP menus.
If you want to reduce the space occupied by your menu, you can change the size of menu icons, or even completely remove them. This will allow you to have more menu entries in the same space. Open the Menu Appearance tab of the Options window change the Menu icon size. Also, you can use sub-menus to group menu entries under a single entry.

The left menu has icons size of 48 pixels, the middle one has the default size 32 pixels and the right one has the smallest 16 pixels width.
For the same reason (because QAP is relying on standard Windows menus), QAP cannot do the followings:
The alternative would be to completely rewrite the QAP menu (using the AHK platform and much advanced libraries) but this would be way too much work and would open the door to a whole new set of bugs and issues. Sorry but this is not on the QAP roadmap.
 You can move, edit or delete favorites in the Settings window using your keyboard. You can also select multiple favorites (with Shift + Click or Ctrl + Click) to move or remove them all at once.
In the Customize window, press F1 to see the list of available keyboard shortcuts.
Advanced Settings give more control on how favorites are launched.
 Launch with this application: Normally, folders and FTP sites are opened with Windows Explorer (or your custom file manager), documents are open with their default application and links are accessed with your default browser. With the advanced setting Launch with this application, you can choose to launch your favorite with another application. See Placeholders, below.
 Parameters: Add parameters to the command that will launch your favorite. This option is used mostly with Application favorites but it is also available for other types of favorites. It supports placeholders for location, current location, selected location, clipboard content, user input or current date-time. See Placeholders, below.
 Start in: This advanced setting available for Application favorites allows to set the default working directory for the application. Take note that not all applications will comply with this Windows setting. See Placeholders, below.
 Auto-open sub folder: When you open a favorite folder, you can ask QAP to automatically open the most recently created sub folder in this favorite folder. QAP could also open the most anciently created, or the most recently/anciently modified or accessed sub folder. More info here: What are the advanced options for favorite folders?
 Encode FTP URL: When you specify a user name and a password for a FTP favorite, these values are added to the URL and sent to the FTP server. When enabled, this options make sure login name and password are properly encoded. Some application (like Total Commander) may prefer the values to be sent without encoding. For these apps, uncheck the option.Take note that this encoding is not encrypting. It does not prevent the password from being saved in the settings file and sent on Internet in clear text. Be cautious if your password protects sensitive data!
 Sound played when launching the application: Set the file name or the codes of the sound to play. The sound is played immediately after the favorite is launched or the group is executed. You can play a sound file, a system sound or your own custom sound sequence. See also: Can I play a sound when I launch a favorite?
You can use placeholders and user variables in Launch with this application, Parameters and Start In fields. These placeholders can be replaced with:
For all the details, see:

Video demo
User variables can be of great help in various situations:
{Dropbox} allow you to have fix favorites paths in your menu even if your cloud drive is at different locations on your two systems;To manage your user variables, select the menu Options, User Variables. In this tab, enter your user variables, one by line. Each line must start with the variable name between curly brackets (e.g. {MyVariable}), followed by the equal sign = and the variable content (e.g. {MyVariable}=My Content).
The first time you launch QAP, it creates user variables for commonly used cloud drives found on the system: {Dropbox}, {OneDrive}, {GoogleDrive} and {iCloudDrive}.

You can add your own variables. For example, if one line contains {OurSharedFolder}=S:\ThisFolder, the placeholder {OurSharedFolder} will be replaced by S:\ThisFolder in a favorite paths (and other location properties) when launching it or in snippet’s content when pasting it.
If you have multiple user variables, you can use text separators to make your list easier to read. Any lines not starting with { is treated as a comment.
In the following example, the user variable {OneDrive} is inserted in the favorite folder {OneDrive}\Project. If the variable contains C:\Users\Standard\OneDrive as in the previous example, the Project folder will be opened in C:\Users\Standard\OneDrive\Projects.

{Var2} includes {Var1}, {Var2} must appear before {Var1} in the list of variables. `{Dropbox}.See also:
Using Quick Access Popup v11.4+, you can update the location and various other properties in many favorites all at once. This can be extremely helpful if you need to update your QAP menu after moving folders or documents from one drive to another, for example.
To launch a Search and replace operation, select the Tools, Search and replace menu. In the Search and replace dialog box, specify the value to search for and its replacement string. Use the various checkboxes to select in what types of favorites and in what properties to search and replace the value.

Click the Start button to launch the Search and replace operation, starting in the menu or submenu currently displayed in the Customize dialog box and including all its submenus. When a first favorite is found, in the Confirmation dialog box, click:
In the following example, in the favorite named RoadMap found in the Main > QAP submenu, the location will be updated with the Replace with value if the user clicks Replace this favorite button or the Replace all favorites button.

In this second example, in the favorite named MyTunesCovers found in the Main > Musique submenu, the location and the icon resource path will be updated with the Replace with value if the user clicks one of the Replace buttons.

When Quick Access Popup completes the search and replace operation (or if you click Stop in the confirmation dialog box), it shows again the Search and replace dialog box where you can change the values and launch another operation, or click Close to quit this dialog box.
Do not forget to click the Save button in the Customize window to save your changes. If you prefer, you can click Cancel to keep your favorites as they were before the search and replace operation(s).

Changing folder inside Save As or Open dialog boxes is often described as being the single most productivity booster offered by Quick Access Popup.
Yes, the main QAP triggers (middle mouse button or Windows+W) can change folders in all software that use the standard Windows file dialog boxes (Open, Save As, etc.). It can instantly open one of your current, recent, frequent or pre-configured favorites folders.
However, this feature must be enabled in Options (first tab General, first option). The first time you try to change the folder in a dialog box, QAP takes you to this Options, General window.

If you enable this option, you understand that this feature is reserved to “file dialog boxes” (Open, Save As, etc.). If you use it in other types of dialog box, for example a Preferences dialog box, trying to change folder in this dialog box could modify and save values in the dialog box without any notification (see a more technical explanations below).
In order to enable Change folders in dialog box, you must confirm in the QAP Options that you understand the consequence of misusing the change folder feature in “non-file dialog boxes” and that you will only use it the proper dialog boxes.
 Reopen Current Folder in Dialog Box
Talking about dialog boxes, the QAP feature Reopen Current Folder in Dialog Box under the submenu My QAP Essentials can accelerate your work in file dialog boxes by taking you instantly to the folder you use in Windows Explorer. See this video demo.
Technical explanation
If the Change folders in dialog box is enabled and you select a Folder favorite while the mouse cursor is over a dialog box (or when a dialog box is the active window if you use the keyboard hotkey), QAP sends commands to change the current folder in this dialog box. If the dialog box is not an Open or Save As dialog box, if it is an Options dialog box instead, for example, QAP cannot detect it (because all dialog boxes have the same class name “#32770”, regardless of the dialog box task) and QAP will act as if it was a file dialog box.
To change folder, QAP tries to change the content of a text field of the dialog box named internally “Edit1” or “Edit2” (in a file dialog box, this field is usually labeled File name). If it succeeds, QAP sends “Enter” to press the OK button of the dialog box. In a file dialog box, it changes the current folder in the dialog box. Then, QAP restores the initial content of the Filename field and stops, letting the user continue his work.
If the dialog box is not a file dialog box but contains an “Edit1” or “Edit2” (I’ve seen this situation only once but I have no stats on this), there is a risk to see the text field changed and the “Enter” sent to the OK to the dialog box, saving the changed content without the user consent.

If you know the first letters of the favorite or a recent file/folder you want to open, save more time! Instead of opening the QAP menu and look for the favorite in one of your submenus, just open the Quick Launch box, type a few letters and press Enter or select the favorite you want to launch in the list.
If you installed QAP for the first time with version 11.6 or more recent, this feature is already included in your QAP menu. Open it under the My QAP Essentials submenu or hit the keyboard shortcut Shift+Ctrl+Q.
IMPORTANT: If, on the other hand, you upgraded QAP from a version earlier that v11.6, you have to add the feature to your QAP menu. Add a favorite of type QAP Feature and select Quick Launch under the Various Utilities section.
In both case, you can change the keyboard shortcut in the Edit favorite dialog box’s Menu Options tab. For example, you could prefer the Middle Mouse Button with the Alt or Ctrl modifier key. Finally, it is always possible to open the box from the Customize window menu bar Tools, Quick Launch menu.
To launch a favorite with the Quick Launch box, simply type a few letters. Favorites and recent items with these letters in their name will be listed sorted by usage, the most frequently used first. The more letters you type the more precise is the search result.
At any time, you can launch the highlighted item by pressing Enter. By default, the first item is already selected. You can use Down/Up arrows to select another item and press Enter. You can also double-click on an item to launch it. If it is a folder or a document, QAP will open it. If it is a menu, it will display the menu.
If you have a lot of favorites in your QAP menu, to be more specific in your search, type multiple sequences separated by space. For example, type qui pop to search items having “qui” AND “pop” in their name.
There are a few Options that you can set to change the way the Quick Launch box behaves. Under Options, Customize Window, you can enable the Extended Search (search all properties). That way, you query will return more results because the search is done not only in the favorites and files name but also in all favorites properties (location, parameters, snippet content, etc.).

By default, Recent and Frequent menus are included in the Quick Launch result. This means that not only the favorites in your menu are included in the search result but also the folders or files you used recently or frequently. By default, the option Include Recent and Frequent menus items is enabled. If you prefer, you can turn this option off to exclude these folders and files.
By default the Quick Launch box shows 10 search results. You can always resize this window manually. If you prefer, you can change the default height by setting a different Number of rows of search result.
Finally, you can set the sort order of the Quick Launch box. By default, the most frequently used favorites will be shown first. This works only if your database is enabled in the Options, Database. If you prefer, you can Sort by: Favorite name or by the Menu order following the natural order of the favorites in your menu.
The QAP Alternative menu gives access to actions that can be taken on items from your menu. Normally, you would open the Alternative menu with Shift+Middle Mouse Button and afterwards select a favorite in your QAP menu. With Alternative menu features, you can Edit a Favorite, Copy a Favorite’s Path or URL (or event a snippet content), Run as administrator for an application and Open the Containing Folder of the favorite. See What are the Alternative menu features? for more details.
You can use these commands in the Quick Launch search result. Right-click on an item to open the Alternative menu and select the action you want to take on this item.
You can also call the Alternative menu features with keyboard keys. For example, if you press the Right Shift key while you double-click on a favorite or press Enter, this will open the folder containing a favorite. You can review the Alternative menu hotkeys in Options, Alternative Menu Hotkeys.
The Current Windows menu is built in two sections. This first part shows the folders already open in the Explorer windows and, if you use this file manager, the Directory Opus listers.
The second part lists the applications running on your system (starting with the most recently activated window). Only applications having “visible” windows are listed. System-hidden windows and zero-width/height windows are excluded. Most of the apps in the System Tray could not be listed unless their window is already visible in the task bar.
When you select an item in this menu, its window is automatically activated (bring to the “front”). This menu is refreshed every time you open the QAP menu.

By default, the Current Windows feature is found under the In the Works menu (before v9.2, it was names Switch and located under the My QAP Essentials menu). You can add it to your menu by adding a favorite of type QAP Feature and select Current Windows under the Dynamic Menus section.
There may be some applications that you do not want to see in the Current Windows menu. Option the Various Advanced Options tab in the Options dialog box. In the text box, enter a list applications that you want to exclude.
Enter any part of the window title of the application to exclude (the window title is what appears in the top horizontal bar of the window). You can enter multiple exclusions, one per line. For example, to exclude windows of applications Sticky and GhostWindows, enter these lines as shown below:
AStickies:
GhostWindows

You can also exclude windows by their class name or process name (EXE file name). You can find more help on these advanced techniques on last parts of the page Can I block the QAP menu trigger (middle mouse button) if it interfere with one of my other apps?
Shortcuts addicts will feel like in a candy store 🙂 ! In Quick Access Popup, any favorite location can be associated to a keyboard or a mouse shortcut.
In the Add/Edit Favorite dialog box, second tab Menu Options, click the Change button beside the Shortcut section.

Shortcuts can be assigned to any type of favorite. Not only to folders, documents or applications, but also to submenus, groups of favorites or QAP features.
When setting a shortcut, QAP check if the shortcut is already assigned to another favorite or to one of the QAP menus triggers. If yes, it will ask for another shortcut.
You can assign a mouse button using the Mouse drop down list. You can also use any key in the Keyboard key selector (“T” in the above screen capture). You can also select special characters like space bar, tab, enter, escape or menu key (also known as “application key” or “context menu key”, and displayed “application” in the key selector) by clicking on the desired link under the key selector.
All these mouse buttons or keys can be combined with one or more of the keyboard modifiers on the left side: Shift, Alt, Ctrl and Win keys. You can create shortcuts for Left only, Right only or Any keyboard modifiers. For example, Left Alt + Space and Right Alt + Space can launch different favorites or submenus. In the hotkeys lists, left modifiers are prefixes with “<” (for example “<Alt+Space”) and right modifiers with “>” (for example, “>Alt+Space”).
You can select None to remove the shortcut or, when a default hotkey is defined for this favorite, click Reset default hotkey to choose the suggested hotkey.
Starting with v11.5.6.9.1, you can also enter a hotkey code manually by clicking the manual input link. This allows you to assign hotkeys to special keys only accessible by their scan code. For example, you can assign a favorite to the Pause hotkey using its scan code SC045. Simply enter SC045 in the manual input dialog box. You can find more info on Special keys and on the internal representation of other hotkeys in the AutoHotkey documentation.
Note: You may find that some default hotkeys set by Windows using the Windows key (like Windows + L that locks your PC) could prevent you from assigning these keys with QAP. If you wish, you can disable the Windows + L (Lock) hotkey or even disable all Windows default hotkeys by creating or editing some registry keys.
Manage Hotkeys
To get a global view of your keyboards or mouse shortcuts, click the Hotkeys button in the Settings window. In the shortcuts list of the Manage Hotkeys window, you can sort shortcuts by Menu, Favorite Name, Hotkey or Favorite Location. Double click a shortcut to change or remove its assigned hotkey.

By default, the list shows only favorites with shortcuts. Check See all favorites to find the favorites for which you could assign a new shortcut.
Take note that this window has a second tab named Hotstrings. See What are hotstrings?
There may be some applications where you do not want the QAP keyboard hotkeys to interfere with the app’s normal behavior. See this: Can I block the QAP keyboard shortcuts if they interfere with one of my apps?
| “Hotstrings are a very useful new feature. Its much easier to remember short alias strings for snippets compared to a lot of hotkeys.”
– Horst |
Using hotstrings is a powerful way to launch your favorites.
An hotstring is a shortcode or small sequence of keys that automatically triggers a QAP favorite (as a keyboard shortcut would do). The most common action for an hotstring is to replace an abbreviation (also called trigger) with the full content of a Text Snippet favorite.
For example, if you set “adr#” as an hotstring for a Text Snippet containing your full address, when, in any window, you type “adr#” plus Space or Enter, the trigger “adr#” is automatically deleted and your full address is typed as a replacement. This works in the active window of any application. In my example, the hash (“#”) symbols at the end of the hotstring is my personal way to make sure the hotstring trigger would not appear in the normal text I could type.
Hotstrings can also launch any type of favorites (folders, documents, applications, etc.). With some creativity, users could find efficient ways to use hotstring for any kind of favorites, or even some funny ways, for example, play a gentle sound when you type your sweetheart’s name. Hotstring can even open a submenu of your QAP menu or launch a group of favorites.
Since hotstrings are generally used with Snippet favorites, add a favorite of type Snippet or edit an existing Snippet favorite. In the Content text zone of the Basic Settings tab, type what will be sent as replacement text for this hotstring. Remember that you will also be able to send this content to the active window by selecting the favorite in the popup menu or by assigning a keyboard shortcut to this favorite.

To set an hotstring, open the Edit Favorite dialog box and select the Menu Options tab. Then, click the Change button beside Hotstring (trigger and options).

In the Change hotstring dialog box, set the trigger and its options. Any character (letters, numbers or symbols) can be used as trigger.
| You can also assign an hotstring to a new snippet using the Snippet Quick Add QAP feature. See: Can I create a Snippet using the Clipboard and define its Hotstring in one step? |
Due to large number of options combinations (taking into account its case-sensitivity and other options), QAP does not validate that the hotstring triggers are unique. In case of duplication, depending on various options, only one hotstring will be triggered. Checkbox options are described below.

When an hotstring is added to a favorite, its trigger will be displayed in the popup menu after the favorite name. This reminder is displayed (or not) according to the Hotkey and Hotstring reminders option in the Menu Appearance tab of the Options window.
The favorites hotstrings are also displayed in the Customize main window, under the Hotkey column, after the keyboard shortcut if there is one.

You can review all your hotstrings at once in the Manage Hotkeys dialog box. Select the Tools, Hotstrings menu in the Customize window. This will take you the Hotstrings tab in the Manage Hotkeys dialog box (you can change tab at the top to edit keyboard Shortcuts if you wish). Double-click on a favorite to edit its hotstring. If you want to add hotstrings to other favorites, first click the See all favorites checkbox (lower-left) to display favorites without hotstring and double-click the favorite to edit.

Various options can be configured for each hotstrings. These are for specific needs and may be left with their default unchecked values.

- ( ) ' : ; " / , . ? ! [ ] { } \. With this option, you will not need to type an ending key. For example, the abbreviation adr# would be replaced (or would launch its associated favorite) the moment you type the # character.If you always use the same options for your hotstrings (for example, I always use the Do not wait for Ending key option), you can set them in the Options window, Snippets and Hotstrings tab.

These default options will only be used for new hotstrings. They will not impact existing hotstrings.
If, like me, you always end the triggers with a specific character to make them unique (“#” in my case because, on my French Canadian keyboard, this key is easily accessible), you can set the option Do not wait for Ending key as default and the last character of your trigger (“#”) will immediately launch the replacement or the favorite.
Tip: Users reported that starting an hotstring trigger with a comma (,), for example ,adr is a convenient way to make a trigger unique since, in normal writing, the comma is always followed by a space.
The Reopen a Folder shows the folders already open in the Explorer windows and the Directory Opus listers if you use this file manager. It is refreshed every time you open the QAP menu.
The Reopen a Folder is particularly useful when you are in a file dialog box and want to open a file in a folder already open in another Explorer window. Just select one of these folders in the QAP menu and the dialog box will be moved to it. Change folder in dialog boxes must be enabled in Options.

Reopen Current Folder
You can also reopen the folder in the currently active Windows Explorer window with the Reopen Current Folder in Dialog Box (video).
The Clipboard menu in the My QAP Essentials menu reflects the content of you current Windows clipboard. If the clipboard contains URLs, documents, applications or folders file path, QAP shows this list in the menu, allowing you to open a document, launch an application or navigate to a folder found in the Windows Clipboard.

For example, if you select and copy a group of files in Windows Explorer, the list of file paths resides in the Windows clipboard. Quick Access Popup scans this content and adds the files that exists in your system to the Clipboard menu. You can also copy a list of files from a text editor (or any other source) and QAP will display these files in the menu (each line of text must contain a file name/path alone). Relative paths and environment variables are supported.
QAP also scans the Windows clipboard for URLs and displays them as Link entries in the Clipboard menu. In the case of URLs, an address can stands anywhere on a line of text copied to the Clipboard. However, if one line contains more than one URL, only the last one is included in the menu.
To avoid too long delay when refreshing the QAP menu, the Windows Clipboard is processed only if it contains 10 000 characters or less. This default size can be changed in Options, Menus Advanced Options.
If you open the Clipboard menu when the Windows clipboard contains no file or URL, it displays the message No path or URL in Clipboard. If the Clipboard is empty, it displays Clipboard is empty and if it is too large, it displays Clipboard too large to be processed.
Placeholders are special codes between curly brackets {...} inserted in your favorites properties that are replaced with text that can be different each time you open a favorite. It can be used to insert dynamic or interactive text in a text Snippet. It allows to adapt the location or parameter of a folder, document or application favorite to various situations like the active folder in Windows Explorer, the selected document or the active window. Some placeholders can also be used in favorites name.
Placeholders are presented in two groups:
You can insert values from placeholders in Snippets content and in favorite’s Location, Parameters, Launch with and Start In fields (for all types of favorites supporting these options). When inserted in your favorites, placeholders can be replaced with locations or part of these locations (like folder, filename or drive) based on:
See also:
Can I insert values in favorites properties using dynamic or interactive placeholders?
Debugging placeholders and user variables.
In an Application favorite, you can re-use the favorite’s location (or part of it) in the Start In or the Parameters fields. For example {DIR} in the the Start In field will be replaced with the favorite’s location folder. The following examples are based on the favorite’s location C:\MyFolder\MyFile.exe:
In the following example, an Application favorite named My App with data file will be open with a parameter based on the application’s folder.

The Parameters field below includes the {DIR} placeholder with a file name Client.DAT. The second red box shows that the {DIR} placeholder will be expanded taking into account the applications’ location from the above screen capture.

Multiple parameters can be inserted in this field. Each parameter must be enclosed between quotes. Also, do not forget that, even if there is only one parameter, a parameter must be enclosed between quotes if it contains spaces.
You can also use the placeholders {CUR_LOC}, {CUR_DIR}, etc. that will be replaced with the current location of your Explorer window (window under the mouse pointer or active Explorer window when you open the menu). Let’s say you have various folders with the same subfolders structure, for example:
C:\Client-1
C:\Client-1\Contract
C:\Client-1\Contract\Draft
C:\Client-1\Contract\Signed
C:\Client-2
C:\Client-2\Contract
C:\Client-2\Contract\Draft
C:\Client-2\Contract\Signed
etc.
You can create favorites of type Folder or Document that will be opened in a given subfolder under the current (or active) folder in Windows Explorer. For example, a favorite Folder named Current Client’s Signed Contract would open the Signed subfolder for Client-1 if you are in the C:\Client-1 folder, or for the second client if you are in C:\Client-2, etc.
Create a favorite folder with the Folder (path) {CUR_LOC}\Contract\Signed in the Basic Settings tab:

When you will launch this favorite, QAP will get the current folder (in Windows Explorer, Directory Opus or Total Commander) and will replace the placeholder {CUR_LOC} with the detected current folder’s location. To avoid “folder not found” errors, make sure you have a strictly constant subfolders structure and that you always use this favorite in the appropriate folder.
Current (or active) folder in Windows Explorer placeholder can be inserted in location for favorites of types Folder, Document and Application. You can also use these placeholder variations. The following examples are based on the current (or active) folder location C:\Parent\Child:
In situations where QAP could not detect the current folder in Windows Explorer (for example, if the active window is not Explorer), QAP can use a fallback folder if specified like this: {CUR_...|fallback_value}. For example:
See also this page for more info about the Start In and Parameters settings: Can I pass the current folder as parameter to an application launched with QAP?.
Note-1: Remember that, in QAP, the relative path conventions .\ for current folder or ..\ for parent folder are processed relatively to QAP’s Settings Folder, not to the current directory in your Explorer window.
Note-2: The current location cannot be detected by QAP for some dynamic folders or libraries (like Music or Videos). For example, the Desktop folder is a dynamic folder combining the content from the user’s Desktop (C:\Users\UserName\Desktop) and from the Common Desktop (C:\Users\Public\Desktop). In this case, QAP detects that the current folder is the Desktop but, because it can’t distinguish between these two dynamic sources, it will always use the C:\Users\UserName\Desktop as current location since it is the most frequently used folder.
Similar to using the context menu with Right-Click but with much more flexibility, you can use QAP to pass the location of the selected file (or part of it) to a given favorite application or script.
In the following example, when launching the application favorite MyApp, QAP will replace the {SEL_NAME} placeholder in the Parameters zone with the file name of the item under the mouse pointer when you open the QAP menu with the Middle Mouse Button. If you open the QAP menu with the keyboard shortcut (Windows + W), the placeholder will be replaced with the name of the selected file in the active file manager window.

Open the QAP menu by pressing the Middle Mouse Button while the mouse pointer is over the desired file and launch the favorite. In the following example, the favorite application is showing a dialog box with, as parameter, the name of the selected file quickaccesspopup-9_1_2.zip.

These placeholders work in Windows Explorer and Directory Opus. They are not available in Total Commander at this time.
Available placeholders for the selected file are (examples are based on a selected file C:\Parent\Child\Name.Ext):
For user of Quick Access Popup with portable installation, the {SETTINGS_…} placeholders are replaced with the location of the quickaccesspopup.ini file in its working directory. Using the relative path special characters .. (parent directory) and \ (root directory) can also give access to the QAP working directory. However, these placeholders allow to use parts of this path, for example {SETTINGS_DRIVE} to designate the drive where QAP is running.
Thanks to the placeholder {ActiveWindow}, you can open Documents, Links and FTP favorites in the active window. Simply insert the placeholder {ActiveWindow} in the Launch with this application property of the favorite in the Advanced Settings tab. To be the “active window”, an application must be at the foreground and, generally, have the keyboard or mouse focus.
For example, if you have Notepad and Notepad++ text editors running at the same time on your system, if you select in your QAP menu a text file favorite with this option, it will be open the editor that is currently the “active window”. The same is true for Link favorites and if you have two different browsers (like Chrome and Firefox) running at the same time on your system.

To open the favorite with the active window, QAP is using the Windows Run command using the active application path with the favorite’s path as parameter. Most of the time, the application will open the document in a new tab or a new internal window. However, in some case (for example with Notepad), the document will be open in a new instance (a new window) of the same application.
At this time, for safety, before launching a favorite, QAP displays a confirmation prompt with the path of the active widow. An option could be added in the future to bypass this prompt. If you need it, please raise this issue on the QAP forum.
You can insert values from placeholders in Snippets content and in favorite’s Location, Parameters, Launch with and Start In fields (for all types of favorites supporting these options). When inserted in your favorites, placeholders can be replaced with text based on:
See also:
How can I use placeholders in favorites location, parameters, snippet text, etc.?
Debugging placeholders and user variables
Placeholders in favorites name
You can use the Windows Clipboard to insert variable pieces of text in your snippets or in various paths in favorites dialog box. When you launch your favorite, QAP automatically replaces the placeholder “{Clipboard}” (without the quotes) with the current text in the Windows Clipboard.
For example, in the following Snippet example, the Clipboard’s content will be inserted in the second line between the arrows. If the Clipboard contains an image or binary data, nothing is inserted.

In this second example, the content of the clipboard is sent as parameter. The content of the Parameters zone is expanded in the preview zone named Current parameters with expanded placeholders at the bottom of the dialog box. It shows what would be the parameter sent to the application with the current Clipboard’s content.

The example above is a working example for browsers applications Chrome, Firefox and Internet Explorer. This parameter will automatically launch your browser to search for the text contained in your Windows Clipboard. Make sure you include the quotes correctly to include all word in the search. If you want to search for an exact expression, add surrounding quotes like this: "? \"{Clipboard}\"" (these browsers consider the backslash “\” as an escape character for quotes inside the parameter).
If you use the browser Microsoft Edge, simply enter in the Parameters zone {Clipboard} (no quotes) for a normal search or "{Clipboard}" (with quotes) to search for an expression.
Starting with QAP v11.6.3, you can use the placeholder {SelectedText} that will be replaced with the text selected in the active window. This can also be selected contents in other formats than plain text, for example cells in a spreadsheet, as long as a text-only version of this content is copied to the Clipboard by the active application. This cannot be an image.
See the Clipboard section above for similar example of usage of the {SelectedText} placeholder.
Note: Some applications may not react as expected when QAP tries to copy the selected text. If the copy does not succeed, the placeholder is simply deleted.
Using the placeholder {Input:prompt} you can enter a different content at each launch of a snippet or favorite.

The prompt inside the parameter will be displayed as a prompt in the input box, In the example below, QAP will open the folder c:\clients\ABC123.

The content entered by the user can be re-used in the same favorite thanks to a temporary user variable named based on the prompt of the Input placeholder. For example, in a Snippet with a placeholder {Input:Enter Client ID}, a temporary user variable named {Enter client ID} would allow to paste the ID of the client again later in the same snippet.
Using the placeholder {Menu:prompt} you can select a different item from a menu each time you launch a snippet or a favorite. The basic syntax for this placeholder is: {Menu:text1|text2|text3}. In this example, the text from the menu label (text1, text2, etc.) will be inserted in your favorite.
If you have long or multiline menu items, each item can be preceded with a shorter label using the tilde (~) as separator. For example: {Menu:label1~long or multiline text|label2~another item|…}. For better readability in the Edit favorite dialog box, the labels can include line breaks and tabs that will not be displayed in the menu.
Finally, you can make the first menu item bold to look like a title by starting the menu with an empty item with only a label. For example: {Menu:Title~|item label 1~item content 1|…}, as in this example:

Artist: {Menu:
Artists ~|
LD     ~Leonardo DiCaprio|
TC     ~Tom Cruise|
AS     ~Arnold Schwarzenegger}.
The placeholder {Now:format} inserts in favorite’s location or in a snippet the date or time at the moment the favorite is launched. The date and/or time is inserted following the syntax described in the AHK FormatTime command, for example:
In addition to the AHK format the format {Now:ld} allows to insert the last day of the current month. You can combine this with other {Now:...} placeholders to form a complete date, for example:
These placeholders can be inserted in locations, for example:
C:\reports\{Now:yyyyMM} for the folder of the current month (as in C:\reports\202203)
or in Snippets, for example:
Report sent on {Now:MMMM d, yyyy} at {Now:hh:mm tt}
Add UTC at the end of the format string to insert Universal Coordinated Time, for example: Report sent at {Now:h:mm UTC} UTC
You can also insert future or past dates and time using calculation with the following syntax:
{Now[sign][value pairs]:[format]}[sign] is either + (plus) or - (minus);[value pairs] is one or more pairs of:
smhdMy (case sensitive) for seconds, minutes, hours, days, Months or years;[format] is the date or time format as described above.For example (supposing we are March, 13, 2022 at 4h30 PM):
The {RandomText:...} and {RandomNumber:...} are replaced by a random piece of text or number (integer or floating number) each time you launch a snippet or favorite.
The placeholder {GUID} placeholder is replaced with a different Globally Unique ID of 32 hex digits (128-bit) each time you use a favorite.
Some placeholders can be inserted in favorites name. The most obvious usage is to insert a date in your menu. {NOW:…} will be replaced the date and time when the menu is built (or refreshed).
These placeholders can also be used if whenever someone finds a usage for this:
The other placeholders {CUR_…}, {SEL_…} and {ActiveWindow} are not applicable in the case of favorites names and will be replaced by an empty string. In all cases, if the resulting name is not unique, the suffix “[!]” will be added to the duplicate.
You can test the effect of your placeholders and user variables in your favorites by enabling the Favorite debugging for placeholders and user variables in Options, Various Advanced Options tab.

When this option is enabled, an additional checkbox will be available in the Add/Edit Favorite dialog box Basic Settings tab allowing to enable debugging for this favorite.

When this option is enabled, instead of launching the favorite, QAP will display a dialog box containing the location (with parameter and Start in folder if applicable) expanded with the content of the placeholders and user variables. Disable the debug option to use your favorite.

In favorite’s Advanced Settings tab, you can enter command line parameters (also called arguments) that are added to the application path when the application is launched (more info on this). If you have only one parameter, simply type it in the field Parameters of the last tab of the Add/Edit Favorite dialog box. Usually, you would not need to enclose the parameter between double-quotes but this is something you could try if this does not work as expected.
You need to know that not all applications parse command-line parameters the same way. This is why some trial-error may be required. This is especially true if you want to enter more than one parameter. These parameters need to be separated by putting a space between them. But this may not be sufficient because spaces could be part of the parameters. The solution I found (based on my personal experience with a limited number of applications) is to enclose each parameter between double-quotes.
For example, if you want to launch Outlook with two parameters:

This will launch Outlook without checking mail at startup (“/nopollmail”) and will create a new mail item with the specified file attached (“/a c:\filename.txt”).
(note: this parameter /nopollmail used as an example does not work anymore with recent versions of Outlook)
But remember that this technique is not universal and may require adjustments depending on the target application.
The Eye icon on the left side of the Customize window allow you to open a temporary menu showing the current content of the favorites list. This menu can be open and these favorites can be launched as in the regular menu. Your menu does not need to be saved to be previewed.

This preview menu can also be shown in search results. In this example, the search result shows items containing “My”. The temporary menu shows the five items in the search result.

Often favorites for a given project or task need to be launched together. Quick Access Popup let you gather different folders, documents or application that can be launched in one click, each favorite in the group having its own settings. Folders in the group can also have a predefined window position (see: What are the advanced options for favorite folders?).
You create and manage groups as you do for submenus. Favorites can be copied or moved in and out of groups and submenus. A delay can be configured in group’s advanced settings to pace the restoration of group windows (see also Group member options below).
In the QAP menu, group names are followed by the number of items in the group between quotation marks (for example: Group name «3») making groups easier to recognize in menus.
Folders in groups can be restored with Windows Explorer or, if they are configured, with the file managers Directory Opus or Total Commander. If you are using Directory Opus or Total Commander, you can set on what side (or pane) of the file manager each folder member of a group is opened. Each favorite on the same side are open in tabs from left to right in the order they appear in the group.
Here is an example. In the Customize, we see the three favorites in the group named My Group of windows: the Chrome browser (with a parameter to search “project” images), a text file named draft.txt (that will be opened with Notepad) and a folder named Project Charter (with, in the Window Options, the window position in the lower-right part of the screen).

The popup menu shows that the group My Group of windows contains three favorites.

When selected, the three windows are opened and the Windows Explorer window is position as directed in the Windows Options.

Starting with QAP v11.5.5, you can ask QAP to display the group members in a submenu, allowing to launch the whole group or only one of its member if you just need it.

Starting with QAP v11.5.1, each group member can have its own launching options.

| Video Demo: |
Users with dual-display or multi-monitor systems have full control on the location of the Windows Explorer windows displaying their favorite folders.
By default, QAP let Windows decide where new Explorer windows are open. But you can control it by enabling the option On a multi-monitor system, always open the Explorer window on the active monitor under the File Managers tab of the Options dialog box. Make sure Windows Explorer is selected first (this option is not available for users of other file managers).

When this option is enabled, the new Explorer windows are open on the active monitor. The following screen capture shows a system that has two monitors. The active monitor is the one where the Middle Mouse Button (or another button if you configured it differently) was clicked to open the QAP menu. If you open the menu with the keyboard shortcut (Windows + W, by default), the active monitor is the one where is the active application (top most window).

If, in the Add/Edit Favorite dialog box for a Folder favorite, you select a custom window position under the Window Options, and choose the Maximized window state, you can specify on which monitor the Explorer or Total Commander window for this favorite will be maximized. This is also available for favorites of types Special and FTP when Explorer or Total Commander is the active file manager (Directory Opus users should use DOpus Layouts instead).

You can reopen a recently opened favorite in the Repeat Last Actions menu. If this menu is not already in your popup menu, add a new favorite of type QAP Feature (see What are the QAP features?).
 If you select Repeat Last Action (singular), an item labeled Repeat Last Action is added to this menu and, when you select it, it reopen the last favorite you opened. The label of this feature is always Repeat Last Action. You have to remember what was the last action you selected.
If you select Repeat Last Actions (plural), a menu labeled Repeat Last Actions is shown containing the 10 most recent favorites that you launched. You can configure the number of items in this menu in the Options, Menu Appearance tab.
 Items in the Repeat Last Actions menu are sorted chronologically (most recent first). When an item is selected in the Repeat Last Actions menu, it is launched and its entry is moved to the top of the menu.
If a favorite is edited, the favorite in the Repeat Last Actions menu will remain unchanged. And if a favorite is removed, it will stay in the Repeat Last Actions menu until it is pushed out of the menu or until QAP is closed.
Open the Advanced Settings tab in the Add/Edit Favorite dialog box and set the file name or the codes of the sound to play. The sound is played immediately after the command to open the menu item or the group is executed.
Playing a sound file
In the Advanced Settings tab, beside the text box Sound played when launching this favorite, click Browse to select the file to play. Depending on your system configuration various sound formats are supported: .wav, .mp3, .mid, etc.

You can continue to use QAP while the sound file is played. But be careful not to select a too long sound because it is played completely unless you launch another favorite with a sound file or you exit QAP.
Click the Play button to listen to the selected sound.
Windows System Sounds
You can also enter these codes to play Windows system sound.
| Code | System sound |
*-1 |
Simple beep. If the sound card is not available, the sound is generated using the PC’s speaker. |
*16 |
Hand (stop/error) |
*32 |
Question |
*48 |
Exclamation |
*64 |
Asterisk (info) |
For example:

Custom Sound Sequence
You can also build your own sequence of sounds specifying each sound duration (in milliseconds) and frequency (note). The format is:
*|duration@frequency|duration@frequency|...
The frequency must be a number between 37 and 32767. Use the frequency 0 to insert a silence.
For example, try this:
*|450@586|450@658|450@522|675@260|1800@392

But be careful not to build a too long sequence because it will be played until the end and you will not be able to reopen the QAP menu before the end of the sequence. A sequence can only be interrupted by exiting QAP.
Yes. But creating an application favorite for a Windows/DOS built-in command (like dir, copy, rd, start, etc.) is a bit tricky. You have to create an Application favorite and insert as the application path:
%COMSPEC%
This is an environment variable containing the path to the Console (or CMD) executable. Then, in the Advanced Settings tab, enter the following Parameters:
/k command param1 "param 2"
or
/c command param1 "param 2"
With “/k” the Console window remain open after the command is executed. With “/c”, it will be closed. “command” is the command you want to launch (“DIR” in the following example). And “param1” (etc.) are the parameters for the command. Enclose each of them in double-quotes if they include spaces.
In the following example, the DIR command is called to list the .EXE files in the current folder (“{cur_loc}” is replaced with the path of the folder on which you middle-clicked to open the QAP popup menu):


Sysadmins love it! Yes, you can popup the QAP menu over the Windows Console (CMD command line utility) and the newer PowerShell application. The console emulator ConEmu is also supported. Ans, since v11, the Windows app Windows Terminal is supported as well.
To change folder in these applications, click the Middle Mouse Button over the CMD or PowerShell window (or activate the CMD/PowerShell window and hit Windows + W) and select a folder in your popup menu. The folder will be sent to the target window with the appropriate command to change folder in CMD or PowerShell.


Users of international Windows versions who had issues with accentuated characters not being sent properly to the CMD window, this issue has been solved since v8.7.
Yes, with s QAP release v11.5.4 or more recent. To launch a favorite or a group of favorite at Quick Access Popup startup, simply enable the checkbox Launch this favorite at startup.

To bypass the autoexecution of these favorites, hold the Shift key while launching QAP.
To list all your autoexecuted favorites, use the Tool, Special Searches, Launch this favorite at startup item.
Quick Access Popup gives you full control on how you close your computer or your screen. With the new QAP Feature Close Computer Control Center, you can Power down, Shutdown, Restart your computer or simply Logoff. You can tell Windows to forced the selected command if required (if you really require it, because this can cause loss of data).

You can also Sleep or Hibernate your computer with two options: Sleep immediately (which may cause data loss) and Disable wake events which prevents some events (like alerts) to wake up you computer when you do not want it.

Finally, you can simply Turn monitor off, Put monitor in low-power mode or Start screen saver.
The Close Computer Control Center feature is available in the QAP Features tree view under the category Windows Features. In addition, other individual QAP Features are available under the Close Computer Commands subcategory: Restart computer, Logoff user, Sleep computer, Hibernate computer, Turn monitor off, Put monitor in low-power mode and Start screen saver.
The QAP Feature Close All Windows displays a dialog box listing all the windows of applications running on your PC. In this list you can select the windows to close. Use the Select/Deselect all buttons or select the check boxes individually. Then click Close selected windows to proceed.
You can double-click (or press Enter) on one window to see more info about its application and close this app individually.
To add this QAP Feature, select the menu Favorite, Add, choose the favorite type QAP Feature and select the feature Close all windows under the section Window Management.
The QAP Feature Window Always on top will turn any window to be the top-most window even if another normal window should cover part or all of it. If the window already has the Always on Top property enabled, the QAP feature will toggle it it to OFF.
To use this feature, you must add it to your menu, add a QAP Feature favorite and select the item under the Window Management category.

![]() QAP can read the current Windows folders custom icons and even set new custom icons to Windows folders .
QAP can read the current Windows folders custom icons and even set new custom icons to Windows folders .
When you create a favorite folder, if the folder already has a custom icon (configured in the hidden system file desktop.ini), this icon will automatically be associated to your new favorite and shown in your QAP menu.
If the folder has no icon, you can use the Add/Edit favorite dialog box link Set Windows folder icon to change the icon in the folder’s desktop.ini files to the image selected for your favorite. That way, your QAP menu and your Windows file system will show the same icons for your favorite folders. QAP can also Remove Windows folder icon if you want to revert your changes.
See this YouTube video!
![]()
The Recent folders and Recent files menus list the recent places or documents memorized by Windows. An option in the Menu tab of the Options window determines the number of items displayed in these menus (default is 10).
Quick Access Popup Recent folders and Recent files are taken from the Windows virtual folder Recent items (C:\Users\[username]\AppData\Roaming\Microsoft\Windows\Recent or, using the appdata variable, %appdata%\Microsoft\Windows\Recent).
This Windows system folder lists the files and folders recently accessed by the user. The Recent Folders menu includes only folder items from this list and the Recent Files includes the rest of it.

Windows is also using this list to populate the Recent Places virtual folder found in Explorer left pane. Recent items are also used to populate the Microsoft applications Jump Lists.
If you want to delete the content of Recent Items folder and of these QAP menus, see these instructions: How can I delete the content of the Recent Folders or Recent Files menus?
The Frequent folders, Frequent files, Recent folders and Recent Files menus under the In the works menu are populated by scanning periodically the Recent items Windows system folder. Since QAP v9.2, these items are collected in the QAP database allowing to calculate the frequency and determine the order of items in the Frequent items menus. This also improves performance when refreshing Recent items and Frequent items menus.
If, for privacy or any other reason, you want to remove the content of the Recent and Frequent items menus, you need to delete this content from the database:
After you restart QAP, the Frequent and Recent items menus will be empty. If you keep the database enabled, these menus will be repopulated as new contents from the Windows recent items will be added, starting at the time of the last collection.
If you disable the Quick Access Popup Database (by unchecking the first check box in this dialog box), the QAP Recent folders and Recent files menus are populated by reading directly the Windows Recent items menus. To remove these items from the QAP menus, you need to reset the Windows special folder by following these instructions:

More info:
Yes. Quick Access Popup menu can include favorites from network drives using UNC locations (like \\MyPortablePC\c\SomeFolder\…), a network drive letter (like N:\SomeFolder) and WebDAV locations (like https://sharepoint.server.com/SomeFolder). However, you have to pay attention to some situations that can occur when using network drives with QAP.
In IT environments, corporate servers are normally always online. But in other environments, it can happen that network drives are temporarily offline. For example, if you attach your portable PC drive to your desktop PC, this network resource can be offline if the portable is on the road or just turned off.
When you use folders or files on a network drive, Windows remembers them in its Recent Items system folder. QAP reads this folder to add these resources to its Frequent and Recent menus. When QAP refreshes these menus, it normally accesses the resource’s drive (to check if a file exists or to read a menu icon, for example). If QAP was not protected against offline drives, accessing a network resources when a QAP background task refreshes its menus could cause a long delay before the menu is displayed (see: Why does QAP sometimes look frozen or takes time to show its popup menu?).
Starting with v11.0.7, QAP adds more robust protection against offline drives and add new options in Options, Menus Advanced Options.

Keep the checkbox Network drives (“\\” or with drive letters) can sometimes be offline selected. QAP will avoid actions that could cause unexpected delays when refreshing its menus.
If you use drive letters to attach your network drives, enter the letters of these drives in the Drive letters for network drives text box. For example, enter “NSW” for if drives N:, S: and W: are sometimes offline (in fact, you could also enter “N: S: W:” if you prefer since non-letters characters in this field are ignored). Resources on these drives will be treated as network resources.
Of course, if you try to launch a favorite from a network drive when it is offline, expect a delay (that could be as long as 20-60 seconds) during which QAP will be not responding as it waits for a response from Windows.
Also, avoid using Shared menus and Live folders on network drives that could be offline.
USB drives and USB keys assigned to drive letters do *not* cause a delay when QAP refreshes its menu. This is because Windows “knows” rapidly when these resources are unplugged and does not cause a delay when accessed by QAP. For this reason, these drives letters for these USB resources do not need a special treatment and do not have to be considered in this option.
If your network servers are normally always online, uncheck the checkbox Network drives (“\\” or with drive letters) can sometimes be offline (you do not need to specify network drive letters). In this case, QAP will check if files or folders exist before including them in its Recent and Frequent menus, retrieve custom icon folder and display the network drive’s label and free space in the Drives QAP feature (under My QAP Essentials).
If a network location is password protected, you may need to be logged in manually *before* navigating to it using Quick Access Popup.
HTTP locations (URL format) will be automatically transformed to network path (UNC format) for compatibility with Windows Explorer. For example, http://abc.server.com/folder/subfolder/My Name.doc will be replaced by \\abc.server.com\folder\subfolder\My%20Name.doc.
Yes. Tech support, sysadmin and other power users love it!
In any file path (folder, document or application), the system environment variables like %appdata%, %public%, %temp% or %userprofile% (etc.) are supported in favorite location (for example: “%appdata%\Microsoft\Templates” will take you to the folder “C:\Users\[username]\AppData\Roaming\Microsoft\Templates”).
System variables can also be inserted in favorite advanced settings Parameters, Launch with this application and Start in. See What are favorites advanced settings?
You can also enter a location without path. In this case, the file is searched in the PATH environment variable directories or in app paths in the Windows registry. See Can I use relative paths in favorite settings?.
Finally, you can enter environment variables in favorites name. For example, a favorite name could be “Docs of %username%”.
Yes. You can enter path such using the .. (parent directory) and \ (root directory) symbols in favorite locations or advanced settings. Relative paths are “expanded” based on the current QAP working directory (see What’s the QAP working directory?).
In the following table, the relative paths are expanded as if the working directory was “M:\MyTools\QAP\”.
| Relative path | Expanded path |
| ..\Editor\MyNotepad.exe | M:\MyTools\Editor\MyNotepad.exe |
| ..\..\setup.ini | M:\setup.ini |
| \MyTools\MyDocs | M:\MyTools\MyDocs |
That way, a user having to run various tools on a host PC can carry a set of apps on a USB drive or key and use Quick Access Popup to easily launch these tools regardless of the drive letter assigned to the USB device by the host system. Combined with the use of system environment variables and special folders to easily access host PC’s system folders and user’s data, this make QAP the perfect tool for tech support users.
Relative paths can be used in favorite locations, advanced settings Parameters, Launch with this application and Start in. It can also be used for icons with the Edit icon resource link in the Menu Options tab of the Add/Edit favorite dialog box.
For favorites of types Application and Document, you can also enter a location without path. In this case, the file is searched in the PATH environment variable directories or in app paths in the Windows registry. In these examples, the folders in the resolved path column are assumed to be in the PATH variable. If you enter a location without a file extension, it is searched with all executable extensions in the PATHEXT variable: .COM; .EXE; .BAT; .CMD; .VBS; etc.
| File without path | Resolved path |
| Shell32.dll | C:\Windows\System32\Shell32.dll |
| Notepad.exe | C:\Windows\Notepad.exe |
| Notepad | C:\Windows\Notepad.exe |
| System.ini | C:\Windows\System.ini |
Yes. If QAP is running with administrator permission, all applications it will launch will automatically inherit the admin level. Is it a good idea to launch QAP as Administrator? This could allow the launched applications to do changes on your system without prompting you. From a system security point of view, this may put your system at risk. In other words, you have to know what you are doing.
If QAP is running with normal user privileges, you can launch only some favorite applications with elevated privileges. Check the option Elevate application with administration privileges in the Advanced Settings of the Edit Favorite dialog box. Of course, before launching the application, Windows will display the usual approval dialog box or ask for the admin password.

See more information about Windows ACL (Access Control List) and QAP.
Yes, starting with QAP v8.7.1. But do you really want to launch QAP as an administrator? Keep in mind that User Account Control (UAC) is there to protect you against yourselves or against hackers. When running Quick Access Popup in Administrator mode, every application launched by QAP inherits administrative privileges. This can result in unexpected consequences when launching programs that may themselves be infected with malicious code. This could allow malicious programs to inherit administrative privileges and to damage, infect or take control of your computer.
Windows User Account Control (UAC) logo
To launch QAP with “elevated UAC privileges”, click the checkbox Run as administrator in the Options window, Launch Advanced Options tab. After saving options with Run as administrator enabled, QAP will offer to reload itself in Admin mode. On the opposite, after saving with this option turned OFF, QAP could not relaunch itself as normal user because the reloaded instance of QAP would inherit admin privileges. Instead, QAP will offer to quit and you will have to relaunch it yourselves.
When launching QAP with administrator privileges, Windows asks for an administrator password if the current user has normal privileges. If user declines elevation (ie: do not enter the admin password), QAP is launched with normal privileges. If user enters the admin password, QAP displays a security alert to remind user about the risks described earlier. Also, the QAP icon in the Notification zone (tray icon) embeds the Windows UAC logo and the “[admin]” tag is added to the application name in Settings window and other dialog boxes when QAP is running as administrator (only if QAP is running as admin because of the “Run as administrator” option, ie: not if user launched QAP as administrator by other means).
Power user who need to run QAP in admin mode and want to skip the security alert can launch QAP with the command-line parameter /AdminSilent (you can use a Windows shortcut to add this parameter).
The Customize window is where you make Quick Access Popup work for you by managing your favorites. It is also where you can access various options and tools using the QAP menu bar.
After QAP installation, the Customize window is displayed automatically at QAP startup. If, after you customized your QAP menu, you prefer this window to open only on demand, you can stop showing it at startup: open Options, Customize Window and deselect the checkbox Open “Customize” window at Startup. Other options for this window are described below.

When the Customize window is closed, you can reopen it in different ways.


By default, the Customize window is displayed at the last position you used it. There is an exception on dual-display or multiple-monitor systems: when QAP detects that the “active” monitor has changed, it centers its window on the newly activated monitor. QAP detects the active monitor based on the mouse or active window position when you opened the QAP menu.
To change the Customize Window settings, select the Options, Customize Window item in the QAP menu bar.

In the right column, you can set options for search results.
The Customize menu item was automatically added to your menu the first time you ran QAP. You can move this menu item up or down, move it to any submenu or change the menu hotkey to anything better fitting your preferences by editing the Customize item in the favorites list.

If you deleted this menu item and wish to restore it in your QAP menu, click the Add button, select the type QAP Feature and choose Customize under the QAP Management category (more info on adding favorites in How do I add a favorite to my menu?).

There are several ways to add favorites to your menu. But the most common one is to open the Customize window, click the Add button and, in the Add Favorite Type dialog box, select the type of favorite. For each favorite type, you see a short description on the right side. See this quick overview of favorite types.
To edit a favorite, select it in the Customize window and click the Edit button. You can also double-click a favorite in the list edit it (except for submenus where the double-click will open the submenu). Skip the first section and go to Basic Settings tab, just below.
In this page, we will see the most common options, available for all favorite types, using the Folder example.
In this example, select Folder and click Continue.

| See also more options about favorite folders and options for the other types of favorites: |

If whenever you want to temporarily remove this item from your menu without deleting it, click the Disable this favorite checkbox. If you only want to hide a menu item but keep its keyboard shortcut or hotstring active, check only the Hide this favorite checkbox.
In the Menu Options tab, choose in which section of your menu the new favorite will appear. In the first drop down list Favorite parent menu, select the Main menu or one of its submenus (more about submenu).

After you selected the parent menu, set the position of the new favorite in the drop down list Insert the favorite before this item.

Next, select the icon for your favorite. By default QAP chooses a default icon based on the favorite type or, for applications and their documents, the system default icon for this application. In the Windows dialog box Change icon (or Changer d’icône in my French version of Windows), select an icon in the current file or browse for another icon file. You can find icons in .EXE, .DLL and .ICO files (more about icons).

Finally, in the Menu Options tab, you can set a keyboard or mouse shortcut for your favorite folder. This will allow to open this folder without having to open and browse the menu. Beside the Shortcut field, click Change. In the Change shortcut dialog box, select the keyboard modifiers (Shift, Alt, etc.) and the mouse button or key of your shortcut (more about shortcuts). Click OK to save your shortcut. Alternatively, in the field below, you can also assign a hotstring to launch your favorite (more about hotstrings).

There are other options in the remaining tabs but these options will be covered in the FAQ pages dedicated to adding the various types of favorites (see the list in the text box at the top of this page).
To save your new favorite, click the Add button (or to save your changes when editing an existing favorite, click the OK button) and do not forget to save your changes by clicking one of the big buttons Save & Close or Save in the Customize window.

See your new favorite in your menu. In this example, we added the favorite:


Types of favorites proposed when you click the Add button

An example menu with one favorite of each type
In your Quick Access Popup menu, you can add favorites of any of these twelve types:
To add these types of favorites, see How do I add a favorite to my menu?
Two tabs of the Add/Edit Favorite Folder dialog box give more advanced options for favorite folders.
In the Windows Options tab, you can set where the Explorer window will be displayed. First, uncheck the Use default window position checkbox. Then, decide if you want to display the favorite folder in a maximized, minimized or normal Explorer window. If you choose normal, you can decide at what position and what size this window will be displayed. If your system has more than one monitor and you choose Maximized, you can select on which monitor the window will be maximized (more info about multi-monitor systems).

These window options are only available for the favorite types open with Windows Explorer (Folders, Special Folders and FTP site). For most other applications and documents, moving and resizing the window proved to be unreliable.
Often, when you open a given folder, what you want, in fact, is to work in one of its sub folders. For example, let’s say you have folder for a client and, under it, sub folders for each of its orders. Most probably, you will want to work in the folder for the latest order of this client. This folder should be the one that was the most recently created.
When you open a favorite folder, you can ask QAP to automatically open the most recently created sub folder in this favorite folder. Set this option in the Advanced Settings tab. QAP could also open the most anciently created, or the most recently/anciently modified or accessed sub folder. Note about the last accessed date-time: if accessed date tracking is disabled on your system (it is disabled by default), this date-time should be the same as the last modified date-time. See how you could enable accessed date tracking on Windows 7 or 10.
Normally, favorite folders are open in Windows Explorer (or Directory Opus / Total Commander if you selected one of these file managers in Options). In the Advanced Settings tab, you can tell QAP to launch the folder with another application. The designated application will be launched with the favorite folder path as parameter. This option is also available for Document, Special folders, URL and FTP favorites.
In the following example, the folder will be launched by the following batch file (saved here as C:\Users\Standard\my_batch.bat) :
c:
cd \
echo List files in %1
dir %1
pause

When launched with QAP, this folder path is passed to the target application (here, my_batch.bat) as the first command-line parameter. See the result of the execution of this batch.

See also, about Live Folders: Can a submenu be updated live with the content of a folder?
In QAP, this feature is called a Live Folder. To turn a regular favorite folder into a Live Folder, click the Live Folder Options tab and check the Live Folder (including subfolders) checkbox. This turn your favorite folder into a submenu containing the actual content of the folder.

Set the Number of subfolder levels to include in Live Folder menu. Subfolders will be displayed as submenus. Choose a sort criteria and sort order. By default, Live Folders are sorted alphabetically.
You can choose to Hide in menu the Icons or the File extensions. If you show icons, you can set their size with the dropdown list Size of icons in this menu:
You can also choose to include or not Hidden or System files in this Live folder menu. If your Live Folder contains many items, you can display its menu in multiple columns. Set the Number of items per columns (0 for no column break) depending on your screen size.
You can see on the following screen capture a Live Folder submenu. The My Project Folder opens a submenu with, at the first position, an entry to open the folder itself and, below, the three subfolders in that folder. This Live Folder menu can be open using the shortcut Shift + Control + P.

Finally you can also include documents in your Live Folder. If you check the Include documents option, by default, all documents are included. You can select which files are included or excluded using the Include or Exclude radio buttons and the text box below to list:
bak bk);*.bak "my file??.ext" *copy*.*);Regex:i)^\Qabc\E.*\Q.docx\E$).If you include documents in a Live Folder menu, you can choose to Exclude folders. If there are multiple levels of folders, folders are excluded only in the deepest level’s menu.
This second example shows a Live Folder with two levels of subfolders and including documents (for this screen capture, icons size was reduced to 16 px). In the Customize window, Live folders are identified in the Type column.
Note: Take care not to overload your QAP menu with Live Folders. Windows menu are not designed to handle very large number of items. There is a default limit of 500 items in QAP Live Folders. This limit is there to protect you against too large number of items that could make QAP unstable, including hanging it. You should see Live folders as a way to put the most used big branches of your file system into your QAP menu and use your file manager or the file dialog box to navigate into the smaller branches and leaves.
The QAP Features Add Active Folder or Web page and Add Active Folder or Web page Express allow to quickly add the current folder or web page to your menu. You can add folders this way in Explorer windows or in file dialog box windows (if this option is enabled) and you can add links to web pages in most web browsers (Internet Explorer, Google Chrome, Firefox, Safari, etc.). When you are in the folder or the web page that you want to add to your menu, select one of these features.


Adding one of the 50 Windows Special Folders to your menu is as easy as adding a normal folder, and even easier. All you have to do is to select the Special folder in one of the section of the Special Folders tree view, grouped by type of usage:
In addition, the section All (alphabetical order) at the bottom of the tree view shows all 50 Special Folders.
When you select a Special Folders in the tree view, its name is automatically entered in the Short name for menu text zone (if it was not already filled) and the default icon for this special folder is selected in the Menu Options tab. You can change these default name and icon. In the Menu Options tab, as for other types of favorites, you can also select in what submenu and at what position the Special Folder will be inserted, as well as assigning it a shortcut or an hotstring.

Settings in the Window Options tab are identical to those of Folders favorites, as described in the FAQ page about advanced options for favorite folders.
To add a document to your menu, in the Basic Settings tab, click the Browse button to choose the document in the file dialog box. If the Short name for the menu is empty, it is automatically filled with the file name of the selected document (without its extension).

In the Menu Options tab, the icon is automatically set with the system default icon for this type of document (based on the document’s file extension). You can customize this icon. As for other favorites, you can also select the submenu, position in the menu, shortcut or hotstring for this favorite document.
When you click a document favorite in the menu, it is automatically launched with its associated application (based on its file extension). In the Advanced Settings tab, you could choose to launch the document with another application. In the following example, the document would be open with a application named “Translate”.

QAP can launch applications (.EXE or .COM) files, scripts (like .BAT batch files, .VBS or .AHK scripts, etc.). To add a favorite application or script, as for documents and folders, you can click the Browse button in the Basic Settings tab to select the application file. But, if the target application is already running, it is much easier to select it in the drop down list of running applications.

When you choose the application, the Short name for menu is automatically filled if it is not already entered.
Still in the Basic Settings tab, you can click the checkbox If the application is already running, activate it instead of launching. This will avoid launching multiple instances of the same application.

In the Advanced Settings tab, you can run the application “as Administrator” by clicking the checkbox Elevate application with administration privileges. When launching this favorite, you may be prompted with the elevation alert or asked for the administrator password.
Also in the Advanced Settings tab, in the Start in zone, you can set the default directory for the application.

In this example, the ExamDiff application will open its Select file dialog boxes in the Music Docs folder. Take note that, unfortunately, not all application comply with the Windows Start in setting when launched.

Also in the Advanced Settings tab, the Parameters text box allows to pass additional information to the launched application. In the following example, the application Windows Explorer is launched with the /e parameter that opens Windows Explorer in multipane view (the parameter /n opens Windows Explorer in single-pane view).


QAP supports these apps known as: Windows Apps (under Windows 10), Universal Applications, Metro Apps (under Windows 8) or Universal Windows Platform (UWP) apps. This new Windows application type doesn’t use the traditional executable (.exe) files anymore. These apps are pre-installed in Windows 8 and 10 or downloaded from Windows Store.
This family of applications has the advantage of being available in a very similar way under various Microsoft devices. But, technically, their architecture and behavior differs in many ways from regular applications. This is why a specific favorite type is required to configure and launch them.

Default “My Windows Apps”
The first time you run QAP with Windows 10, QAP creates automatically a new sub menu named My Widows Apps at the bottom of your main menu. This menu contains a sample of the most common Windows Apps normally installed with Windows 10. You can edit, move or remove this menu as for other submenus.
Click the Add button and select the favorite type Windows Apps. In the Basic Settings tab, see the dropdown list of Windows Apps installed on your system. You can click the Refresh button to add the freshly installed Windows Apps to the list (to have the list refreshed each time QAP is launched, enable this options in Options, Launch Advanced Options).

Select a Windows App in the list. This list is built with Windows App “code names” as they are registered in Windows. Some of these names a unfriendly codes but, at this time, QAP could not retrieve more friendly or localized names from Windows (still doing research on this). When you select an app in the list, its name is loaded in the Short name for menu text box. Also, QAP could not currently retrieve the default icon for a Windows App. Fortunately, you can change the app’s name for a more user friendly name and select your preferred icon in the Menu Options tab.
If whenever you need to add an app not in the list, you can select the Custom Windows App identifier (Application User Model ID – AUMID) entry at the end of the list. However, you will have to fill the Application User Model ID (AUMID or Windows Apps identifiers) code for this app (for example “Microsoft.MicrosoftEdge_8wekyb3d8bbwe!MicrosoftEdge” for Microsoft Edge).
Finally, when you will install Windows updates, it may happen that the Windows App ID for a given app changes. If whenever this happens, you will only have to select the Windows App again in the list and save your favorite.
To add a web link to your menu, in the Basic Settings tab, enter the address in the Link (URL) text zone. After you filled the address, you can click the Get title button to retrieve the page title from the web (some site may not return the title). Of course, you can also enter a short name of your choice.

By default, Links favorites are always open in a new browser tab. You can have them open in the current tab (to navigate the browser to the selected URL) if you deselect the options Always open Links in a new tab or window in Options, Various Advanced Options.
Other settings in the Menu Options and Advanced Settings are similar to those described in the other Add Favorite FAQ pages.
The favorites of type Snippet allow to send pieces of text or keystrokes to the active application using the QAP popup menu, hotstrings or keyboard shortcut. To add a Snippet, in the Customize window, click the Add button and select Snippet.
Enter a short name for your menu and enter the snippet content.
More information about snippets in the section Automating your work with Snippets.
A powerful way to paste or launch snippets is to trigger them using a shortcode called a hotstring. Find out more about Hotstrings.

An FTP favorite allows you to open a file transfer session between an FTP server and your local file system using, depending on your configuration, your default browser (Internet Explorer, Chrome, Firefox, …), Windows Explorer or a dedicated FTP Client software (like FileZilla).
In the Basic Settings, enter the Short name for the menu and the FTP Site URL. If you enter only this information, you will be asked for a login name and password each time you launch the favorite.
You can enter the Login name that will be sent automatically to the server in the format ftp://username@ftp.myserver.com. In this case, you will be asked only for the password.
Finally, you can enter both Login name and Password that will be sent automatically to the server in the format ftp://username:password@ftp.myserver.com. Then you will be logged automatically without any prompt. However, take note the password is NOT encrypted when sent over the Internet or saved in your settings file. Do not enter your password if the data it protects is sensitive.

When sent to the server, the login name and password can be encoded or sent plain. With most browser and file manager, it is recommended to encoded it. In some case, like when using the file manager Total Commander, it should be sent as plain text. By default, the info is sent encoded except if QAP is configured to use Total Commander as default file manager. If whenever you receive an error message like the one below, you can try changing the encoding setting in the Advanced Settings tab.
Take note that “encoded” is not “encrypted”. Remember that the password is NOT encrypted.

In the Advanced Settings, you can also choose your own FTP client software. Browse for its executable file in the Launch with this application text zone. You can also send parameter to the FTP client using the Parameters field.

In this example, the software FileZilla is used to open the FTP server and is instructed to open the c:/temp folder as local folder (as shown below).

QAP Features are powerful functionalities that can be inserted in any QAP menu or submenu. When you installed QAP, the In the Works and My QAP Essentials menu were automatically built with some of the most useful features: Frequent Folders, Recent Files, Current Windows, Repeat Last Actions, Reopen a Folder, Clipboard, Drives and much more (see more info about the In the Works menu and the My QAP Essentials menu).
But there are much more QAP Features to discover: see more than 50 features in the table below! To add a QAP Feature to your menu, click the Add button in the Customize window and select the feature to add in the categorized tree view. See also the All (alphabetical order) list at the bottom of the tree view. Take a minute to read the description on the right side or to click on the Help on this feature links.

For more information on adding these favorites to your menu, see How do I add a favorite to my menu?
Here is a comprehensive list of more than 50 useful features, grouped by categories.
| Category | Feature Name | Feature Description | Internal Code |
|---|---|---|---|
| Dynamic Menus | Clipboard | Display a dynamic menu with the content of you current Windows Clipboard. If the Clipboard contains documents, applications or folders file path, QAP shows this list in the menu, allowing you to open a document, launch an application or navigate to a folder found in the Clipboard. | {Clipboard} |
| Dynamic Menus | Current Windows | Display a dynamic menu in two parts: 1) the folders already open in the Windows Explorer and Directory Opus windows 2) the applications currently running on your system (starting with the most recently activated window). When you select an item, its window is automatically taken to the front. This menu is refreshed every time you open the QAP menu. | {Switch Folder or App} |
| Dynamic Menus | Directory Opus Favorites | For Directory Opus (DOpus) users, display a dynamic menu built with the folders added to the DOpus Favorites. If DOpus was selected when you installed QAP, the Directory Opus Favorites has been automatically added to your menu. | {DOpus Favorites} |
| Dynamic Menus | Drives | Display a dynamic menu showing the drives on your system with label, free space, capacity and an icon showing the drive type. This menu is refreshed every time you open the QAP menu. | {Drives} |
| Dynamic Menus | Frequent Files | Display a dynamic menu showing the most frequently used files as collected by Windows and used in QAP. This menu is refreshed every time you open the QAP menu. | {Popular Files} |
| Dynamic Menus | Frequent Folders | Display a dynamic menu showing the most frequently used folders as collected by Windows and used in QAP. This menu is refreshed every time you open the QAP menu. | {Popular Folders} |
| Dynamic Menus | Recent Files | Display a dynamic menu containing the ten most recently used documents as remembered by Windows in its "Recent items" virtual folder. You can configure the number of items in this menu in the "Options", "Menu" tab. Items in this menu are sorted with most recent file first, as recorded by Windows. | {Recent Files} |
| Dynamic Menus | Recent Folders | Display a dynamic menu containing the ten most recently opened folders as remembered by Windows in its "Recent items" virtual folder. You can configure the number of items in this menu in the "Options", "Menu" tab. Items in this menu are sorted with most recent folder first, as recorded by Windows. | {Recent Folders} |
| Dynamic Menus | Reopen a Folder | Display a dynamic menu showing the folders already open in Windows Explorer and Directory Opus windows. This menu is refreshed every time you open the QAP menu. The Reopen a Folder is particularly useful when you are in a file dialog box and want to open a file in a folder already open in another window. See also "Reopen Current Folder in Dialog Box". | {Current Folders} |
| Dynamic Menus | Repeat Last Actions | Display a dynamic menu containing the ten most recent favorites that you launched. You can configure the number of items in this menu in the "Options", "Menu" tab. Items in this menu are sorted with most recently used first. When you reopen an item, its entry is moved to the top of the menu. | {Last Actions} |
| Dynamic Menus | TC Directory hotlist | For Total Commander (TC) users, display a dynamic menu built with the favorites added to the TC Hotlist as found in the file wincdm.ini. Set the wincdm.ini file location in "Options", "File Managers" tab. If TC was selected when you installed QAP, the Directory Hotlist has been automatically added to your menu. | {TC Directory hotlist} |
| Dynamic Menus | Favorites in Customize window | Show a menu with the favorites displayed in the Customize window, including when it contains a search result. In search results, duplicate menu names are appended with the "[!]" suffix to make them unique. | {Container In Gui} |
| Menu Editing | Add Favorite - (Type) | Add a favorite. In the "Add Favorite" dialog box, enter : - a name for your favorite - a content, depending on the selected type of favorite - various settings like icon, shortcut, hotstring, parameters, etc. In feature code, replace "(Type)" with: "Folder", "Document", "Application", "Special", "URL", "FTP", "QAP", "Menu", "Group", "Snippet", "External", "Text", "WindowsApp", "X" (separator) or "K" (column break) | {Add Favorite - (Type)} |
| Menu Editing | Add Active Folder or Web page Express | Similar to the "Add this Folder or Link" feature except that the new favorite will be automatically added at the top of the Main menu without any interruption. If you need to change default settings, you can click the "Edit" button to change the name, position or various settings of the favorites. In "Options", you can set the new favorite to be added by default at the bottom of the Main menu. | {Add This Folder Express} |
| Menu Editing | Add Active Folder or Web page… | Quickly add to your menu the active folder or web page. You can add folders this way in Explorer windows or in file dialog box windows. You can add links to web pages from most web browsers. In the "Add favorite" dialog box, confirm the name for your favorite and enter various settings like icon, shortcut, hotstring, parameters, etc. By default this feature is included in the Main menu. | {Add This Folder} |
| Menu Editing | Add Favorite… | Display a list of favorite types where you select the type of the favorite to add. In the next window, you enter : - a name for your favorite - a content - various settings like icon, shortcut, hotstring, parameters, etc. Depending on the selected type of favorite, the content of the favorite can be a folder, document or application file path, web link, snippet text, submenu name, etc. | {Add Favorite} |
| Menu Editing | Add shared favorites menu from catalogue… | Add to your menu a shared menu from the Shared Menus Catalogue, a repository of favorites settings files managed by the menu administrators or by other workgroup members. You can select an existing Shared menu file from the repository, add a shared menu not in the catalogue or create a new shared menu. | {AddExternalFromCatalogue} |
| Menu Editing | Customize | Display the "Customize" window where you can customize your QAP popup menu, manage your favorites and set various options. By default this feature is included in the Main menu. | {Settings} |
| Menu Editing | Manage Hotstrings | Display a dialog box with a global view of your hotstrings (small sequences of keys that automatically trigger QAP favorites). You can sort favorites by clicking the header. Double click an hotstring to edit it. Click the "See all favorites" checkbox to assign hotstrings to other favorites. | {Hotstrings} |
| Menu Editing | Manage Icons | Display a dialog box listing all the favorites in your QAP menu with their current icon and the default icon for this type favorite. Favorites are grouped by submenus, in the order they appear in your menu. Click the buttons to select a custom icon for a favorite or reset a favorite to its default icon. | {Icons} |
| Menu Editing | Refresh Live Folders and Shared menus | Refresh on-demand the "Live folders" menus. This action can also be executed repeatedly by entering an interval (in seconds) in the "Scheduled QAP menu refresh" of the "Menu" tab in the "Options" windows. During the short (depending on the number of Live folders or Shared menus) refresh time, the QAP menu is not available. | {RefreshMenu} |
| Menu Editing | Manage Shortcuts | Display a dialog box with a global view of your keyboard or mouse shortcuts. You can sort favorites by clicking the header. Double click a shortcut to change or remove its assigned hotkey. Click the "See all favorites" checkbox to assign shortcuts to other favorites. | {Hotkeys} |
| Menu Editing | Switch Settings file… | Select another QAP settings file and restart Quick Access Popup with these settings (including favorites and various options). Make sure you save changes in Settings before restarting QAP. | {SwitchSettings} |
| Menu Editing | Switch to default settings file | Restart Quick Access Popup with the Settings file at its default location. If you installed QAP using the "one-step installation" procedure, the default location is located under the User directory (for example, "C:\Users\Jean\AppData\Roaming\Quick Access Popup"). If you preferred the portable installation, the default location is where the QuickAccessPopup.exe program is running. | {SwitchSettingsDefault} |
| Window management | Close all windows… | Display a list of windows currently open. Uncheck those to keep and click "Close selected windows" to close the other windows. Double-click or press Enter to close one window or see its details. | {Close All Windows} |
| Window management | Reopen Current Folder from Dialog Box | Reopen the current folder in a new Explorer window (also in Directory Opus or Total Commander). Useful when you want to open the folder you are browsing in a file dialog box in an Explorer window. | {Reopen in New Window} |
| Window management | Reopen Current Folder in Dialog Box | Change the folder in a file dialog boxes to the folder currently active in Windows Explorer. To use this feature, the "Change folder in dialog box..." option must be checked in "Options", tab "General". | {ReopenCurrentFolder} |
| Window management | Window Always on Top | Set the current window "Always on Top" property on or off (toggle) | {Window Always on Top} |
| Close Computer | Close Computer Control Center… | Take full control on how your computer will shutdown: - Logoff, Shutdown, Reboot, Power down, forced or not - Sleep or Hibernate, immediately or not, disabling wake events or not - Turn off monitor, Turn on low monitor power mode or Start screen saver. | {Close Computer Control} |
| Close Computer | Hibernate computer | Put the computer in a power-saving state that allows it to quickly resume full-power operation (similar to Sleep but uses less power). When you start up the PC again, you’re back to where you left off (though not as fast as Sleep). Hibernate is designed for laptops and might not be available for all PCs. | {Hibernate Computer} |
| Close Computer | Logoff user | Close all applications and terminate current user session. | {Logoff} |
| Close Computer | Power down computer | Close all applications and turn off computer power. | {Power Down Computer} |
| Close Computer | Put monitor in low-power mode | Put computer's monitor in low-power mode. Low-power mode is designed for laptops and might not be available for desktop monitors. | {Monitor Low Power} |
| Close Computer | Restart computer | Close all applications and restart the computer as if user turned power off and on again. | {Restart} |
| Close Computer | Shutdown computer | Close all applications in preparation to turn off a computer's power. Depending on your system configuration, this could be followed by a system power down. | {ShutDown} |
| Close Computer | Sleep computer | Put the computer in a power-saving state that allows it to quickly resume full-power operation when you want to start working again. Sleep mode uses very little power, your computer starts up faster, and you’re instantly back to where you left off. | {Suspend Computer} |
| Close Computer | Start screen saver | Start default system screen saver. | {Start Screen Saver} |
| Close Computer | Turn monitor off | Turn off computer's monitor. | {Turn Off Monitor} |
| Utility | Get window info… | Help you identify a window that you want to exclude from the QAP menu mouse hotkey. This feature will prompt you to click in the target window with the QAP menu hotkey (by default, middle mouse button) and copy the window title and class name in your Clipboard. See the "Exclusions" tab in the "Options" dialog box for complete explanations. | {GetWinInfo} |
| Utility | Repeat Last Action | Add an item labeled "Repeat Last Action" to your menu. When you select this menu item, it reopens the last favorite you opened. The label of this feature is always "Repeat Last Action" (QAP limitation). You have to remember what was the last action you selected. | {Last Action} |
| Utility | Restart Quick Access Popup | Restart Quick Access Popup. Make sure you save changes in Settings before restarting QAP. | {Reload} |
| QAP Management | About | Display development, translation and other credits, application and runtime version numbers, licence, current user and PC names, link to support website. | {About} |
| QAP Management | Check for update | Check on Quick Access Popup web site if a new version is available. | {Check for update} |
| QAP Management | Close this menu | Close the QAP menu if it is not closed by clicking outside of the menu or by hitting the Escape key as it would do normally. This is related to an intermittent issue (probably caused by Windows) preventing users from closing the menu normally. | {CloseMenu} |
| QAP Management | Edit QuickAccessPopup.ini | Edit the active Quick Access Popup settings file (.ini). | {Edit Settings file} |
| QAP Management | Exit Quick Access Popup | Quit Quick Access Popup, releasing all mouse or keyboard menu triggers and shortcuts assigned to favorites. | {Exit} |
| QAP Management | Help | Show the short QAP "Help" window. | {Help} |
| QAP Management | Import/Export Settings… | Display a dialog box where you can export your favorites and other settings to create a backup in a location of your choice. You can also import favorites and settings from another PC or another user. | {ImportExport} |
| QAP Management | List Applications Windows | List title, process path, and other properties of running windows. Double-click on a window to display a dialog box where you can switch to the window or close it. | {List Applications} |
| QAP Management | Options | Display the "Options" dialog box allowing to make QAP work the way you want. | {Options} |
| QAP Management | Restore "Customize" window position | Restore "Customize" window size and position at the center of main screen. | {Restore Settings Position} |
If your QAP menu gets too long, divide and conquer! Gather your favorites by types, subjects or projects in submenus. To add a submenu, in the Customize window, click the Add button and, in the Add Favorite Type dialog box, select the Submenu radio button.


This will create an empty submenu named My Project Submenu. You will see below how you can move existing favorites to this new menu or how to add new favorites to it.

Submenus can be nested in submenus at will. For example, in the screen shot above, the Final Report is a submenu of My Project Submenu.
To move a favorite from one menu to another, click the Edit button or double-click the favorite name and, in the Menu Options tab, select the new menu in the Favorite parent menu drop down list and choose the favorite’s position in the list Insert the favorite before this item.

To add a new favorite in a submenu, you can also open this menu in the Customize window and select the new favorite position before clicking on the Add button.


To share favorites with your colleagues or friends, create a Shared menu. Three types of Shared menus are available:
To add a Shared menu, in the Customize window, click the Add button and select Shared Menu.
Enter a short name for your menu and select a shared menu type. More information about shared menus in the section Collaborate with shared Menu.
You can use Windows Explorer context menu (right-click menu) to add favorites of any of these three types: Folder, Document and Application. In the following example, the user right-clicked the Excel file project-budget-WBS. The context menu Add File to Quick Access Popup menu will create a favorite for this document.
![]()
Quick Access Popup will automatically detect if the selected file is a folder, a document or an application and will create a favorite of the correct type.
![]()
Explorer context menus are also available in Total Commander or Directory Opus.
Fore more details, read the page Explorer Context Menus Help.
You can use Windows Explorer context menus (right-click menus) to add favorites to your Quick Access Popup menu. You can also right-click the Desktop background to show the QAP popup menu!

Add Folder context menu in Explorer
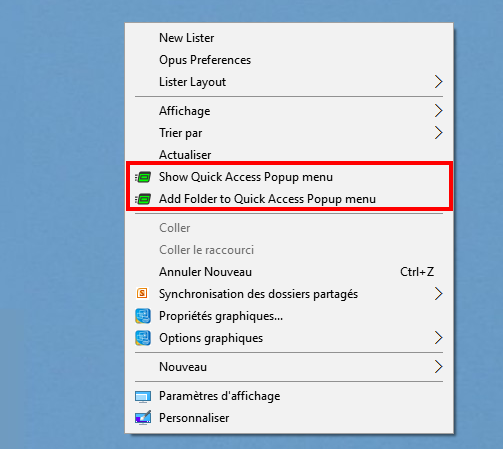
Context menu in Desktop background
The following eleven context menus are added to your Windows Explorer menus:
| Target | Trigger | Menu name |
|---|---|---|
| Files in Explorer | Right-Click | Add File to Quick Access Popup menu |
| Files in Explorer | Shift + Right-Click | Add File to Quick Access Popup menu Express |
| Folders in Explorer | Right-Click | Add Folder to Quick Access Popup menu |
| Folders in Explorer | Shift + Right-Click | Add Folder to Quick Access Popup menu Express |
| Desktop background | Right-Click | Show Quick Access Popup menu |
| Desktop background | Shift + Right-Click | Show Quick Access Popup Alternative menu |
| Explorer window background | Right-Click | Show Quick Access Popup menu |
| Explorer window background | Shift + Right-Click | Show Quick Access Popup Alternative menu |
| Explorer window background | Right-Click | Add Folder to Quick Access Popup menu |
| Explorer window background | Shift + Right-Click | Add Folder to Quick Access Popup menu Express |
| Windows Shortcut icon | Right-Click | Add favorite and import settings from Windows shortcut |
To find more about installation and enabling of Explorer context menu, read the Explorer Context Menus Help.
In this page:
You can add favorites to your QAP menu with the Windows Explorer context menus. Right-click or Shift+Right-click on any file or folder to show its context menu. QAP’s command in this menu are recognizable by the QAP icon on the left. You can also right-click the Desktop background to show the QAP popup menu!
Add Folder context menu in Explorer
Context menu in Desktop background
The following eleven context menus are added to your Windows Explorer menus:
| Target | Trigger | Menu name | Action |
|---|---|---|---|
| Files in Explorer | Right-Click | Add File to Quick Access Popup menu | Open the Add Document or Add Application dialog box ready with the selected file |
| Files in Explorer | Shift + Right-Click | Add File to Quick Access Popup menu Express | Add the selected document or application at the top of the main QAP menu, no question asked |
| Folders in Explorer | Right-Click | Add Folder to Quick Access Popup menu | Open the Add Folder dialog box ready with the selected folder |
| Folders in Explorer | Shift + Right-Click | Add Folder to Quick Access Popup menu Express | Add the selected folder at the top of the main QAP menu, no question asked |
| Desktop background | Right-Click | Show Quick Access Popup menu | Open the QAP popup menu |
| Desktop background | Shift + Right-Click | Show Quick Access Popup Alternative menu | Open the QAP Alternative popup menu |
| Explorer window background | Right-Click | Show Quick Access Popup menu | Open the QAP popup menu |
| Explorer window background | Shift + Right-Click | Show Quick Access Popup Alternative menu | Open the QAP Alternative popup menu |
| Explorer window background | Right-Click | Add Folder to Quick Access Popup menu | Open the Add Folder dialog box ready with the current folder |
| Explorer window background | Shift + Right-Click | Add Folder to Quick Access Popup menu Express | Add the current folder at the top of the main QAP menu, no question asked |
| Windows Shortcut icon | Right-Click | Import Windows shortcut to Quick Access Popup menu | Open the Add Folder dialog box ready with settings imported from the shortcut: working directory and parameters (for application favorites), window state (for folder favorites) and icon settings (for any type of favorites) |
You can install or remove Windows Explorer context menu entries in the Windows Registry using a batch file created by Doğan Çelik (thank you, Doğan!):
1) Unzip the file ManageContextMenu.bat from the QAP zip file and save it in the same folder where you unzipped the files QAPmessenger.exe and QuickAccessPopup.ico.
2) You will need administrator privileges to execute this command. To run this batch file as administrator, in Windows Explorer, right-click its icon and select Run as administrator.
3) In the menu, select 1) Install… to create the registry keys or 2) Uninstall… to remove them.
When installed with in setup mode, QAP always enable its Explorer Context Menus. There are two exceptions: context menus will *not* be enabled if “ExplorerContextMenus=0” in either of the quickaccesspopup.ini file in current user’s appdata folder or common appdata folder. More about installation on a server: Are administrator rights required to install QAP?
See also how you can use a command-line to display the QAP menu to your menu and how you can use a command-line to display the QAP menu to your menu.
You do it with the QAP executable companion QAPmessenger.exe installed in the QAP application folder. This utility is used to send commands to QAP from the Windows Explorer Context menus. But you can also use it this utility to add QAP favorites from the command line, a batch file, a Windows shortcut, etc.
Enter one of the following lines at the command prompt, in a .BAT file line or in the Target field in a Windows shortcut. Replace C:\Program Files\Quick Access Popup\QAPmessenger.exe with the current path and filename of QAPmessenger in your setup.
The two first lines add folders and the other ones add files. The ones with “Express” add favorites with default values without showing the dialog box (be cautious if you use them in a batch loop).
"C:\Program Files\Quick Access Popup\QAPmessenger.exe" AddFolder "C:\FolderPath"

"C:\Program Files\Quick Access Popup\QAPmessenger.exe" AddFolderXpress "C:\FolderPath"

"C:\Program Files\Quick Access Popup\QAPmessenger.exe" AddFile "C:\Folder\FilePath.ext"

"C:\Program Files\Quick Access Popup\QAPmessenger.exe" AddFileXpress "C:\Folder\FilePath.ext"
See also how you can use a command-line to display the QAP menu to your menu.
Yes. In the Customize window, you can copy favorites of types Folder, Document, Application, Special Folder, Link, Snippet, FTP and QAP Feature. The Menus and Groups cannot be copied.
To copy a favorite, select it and click the Copy button or hit Control + Y. Rename the new favorite or select another submenu using the Menu Options tab.

You can copy multiple favorites in one click. Select the favorites with Shift + Click or Ctrl + Click, click the Copy button and select the destination menu (you cannot copy multiple favorites in their original menu).

This feature is available with QAP v11 or more recent.
You can add multiple favorites in one operation from various sources. Select the Favorite, Add Multiple Favorites from the Customize window menu. In the dialog box, select the source of these favorites and click Continue.

The various sources are:


Adding from a CSV file is available using QAP v11.6.2 (or more recent). The requirements to add favorites by importing a CSV import file are:
For all favorites, the only required fields are the three firsts (except for submenus where the FavoriteLocation field is empty).
FavoriteType
FavoriteName
FavoriteLocation
Other fields are optional. Favorites types supported are:
Folder
Document
Application
URL
FTP
Snippet
To insert a menu separator line, simply add a line with FavoriteType X, remaining fields being empty. If the exporting app supports column breaks in menu, the FavoriteType for a column break is K, remaining fields being empty.
The possible values for the property FavoriteDisabled are: 0 (favorite enabled and visible, default value), 1 (favorite disabled and hidden) or -1 (favorite enabled but hidden in menu, shortcut/hotstring active).
In this simple example, after the header, the file contains a Folder, a line separator, a Document (with a comma in its name), a Menu containing only an Application (see the line closing the menu) and, back in the main menu, a Snippet. A last Folder favorite is hidden. In each case, except for the Menu-End line and the line separator, after the favorite type, the line includes the favorite name (that should be unique in its menu), the favorite location (or content for Snippets) and, optionally, an icon resource, a keyboard shortcut,a hotstring, etc.
FavoriteType,FavoriteName,FavoriteLocation,FavoriteIconResource,FavoriteShortcut,FavoriteHotstring,FavoriteArguments,FavoriteAppWorkingDir,FavoriteLaunchWith,FavoriteLoginName,FavoritePassword,FavoriteDisabled
Folder,My Projects,C:\Projects\,"C:\My Icons\IconFile.dll,3",+^p
X
Document,"Project Charter, 1234",C:\Projects\My Project Charter.docx,"C:\My Icons\IconFile.dll,5"
Menu-BEGIN,My Menu,,"C:\My Icons\IconFile.dll,8"
Application,Gantt App,C:\Apps\GanttApp\GanttApp.exe,"C:\Apps\GanttApp\GanttApp.exe,1",,,-option x,C:\Projects\
FTP,Project Repository,ftp://www.server.com/folder,"C:\My Icons\IconFile.dll,5",,,,,,username,password
Menu-END
Snippet,My ProjectName,Project ABC,,,"::,pn"
Folder,Hidden Folder,C:\Program Files,,,,,,,,,1

Select the favorites you wish to add to in your menu and click the Add button.
Submenu can be embedded, for example:
...
Menu-BEGIN,My Menu,,"C:\My Icons\IconFile.dll,8"
...
Menu-BEGIN,My SubMenu,,"C:\My Icons\IconFile.dll,8"
...
Menu-BEGIN,My SubSubMenu,,"C:\My Icons\IconFile.dll,8"
...
Menu-END
...
Menu-END
...
Menu-END
...


The favorites of type “Snippet” allow to send pieces of text or keystrokes to the active application using the QAP popup menu, hotstrings or keyboard shortcut. There are two types of snippets:
Text snippet
By default, snippets are of type Text containing characters, end-of-lines and tabs. When you select a text snippet (in the popup menu, by typing its hotstring or by hitting its shortcut), its content is sent to the active application at the current insertion point as you would do using the Windows Clipboard Paste command (although, the content of the Clipboard is not impacted by this action).
See:
Macro snippet
The second type of snippet, Macro, is for users with some experience with scripting language. Instead of pasting the snippet to a text box or editor, QAP sends its content to the active application as keystrokes that you would type at the keyboard. Macro snippets support the AHK special characters allowing to send special keystrokes like Backspace, Home, Control, etc.
See:
Hotstrings
A powerful way to paste or launch snippets is to trigger them using a shortcode called a hotstring.
See:
Snippets are pieces of text that you can paste into the active application using the QAP popup menu, hotstrings or shortcuts. Text snippets can contain characters, end-of-lines, and tabs.
Creating a snippet


In these examples, the selected shortcut (left side) is Shift + Control + H and the hotstring trigger (right side) is #html# (TIP: for hotstrings, use “#” or any other symbol to make the hotstring trigger unique).
You can also add a Snippet using the content of the Windows Clipboard. See Can I create a Snippet using the Clipboard and define its Hotstring in one step?
Pasting snippets
You can paste snippets in three ways (as for other types of favorites) but the first one is particularly useful for snippets. First, select the keyboard insertion point in a text zone of the active window. Then, paste the snippet using one of these techniques:
The snippet’s content is sent to the active application at the current insertion point as you would do using the Windows Clipboard Paste command. Although, the content of the Clipboard is not impacted by this action.
Snippets tips and tricks
{Clipboard} with the current content of the Windows Clipboard. Placeholders can also be replaced with various file locations. See Can I insert values in favorites location, parameters or snippets using placeholders?See also:
The Snippet Quick Add QAP Feature combines the creation of a Snippet and its Hotstring in one dialog box. And it uses the content of Windows Clipboard to suggest a title and a text for your new Snippet. Click the Change button to assign an hotstring to your snippet.
To add the Snippet Quick Add feature to a menu, select Add Favorite, choose the type QAP Feature, section QAP Menu Editing and select Snippet Quick Add.

The Macro snippets are for users with some experience with scripting language. To create a macro snippet, open the snippet’s Advanced Settings tab in the Add/Edit favorite dialog box and select Macro mode. In this mode, instead of pasting the snippet, QAP sends its content to the active application as keystrokes that you would type at the keyboard.

Macro snippets support the special keys (defined by scripting language AutoHotkey) allowing to send special keystrokes like Backspace, Home, Control, etc. These special keys are always enclosed between curly brackets, for example: {Backspace}.
In addition, QAP offers some special commands for macro snippets:

Here is a full working macro snippet example. This macro snippet will launch Notepad, beep and wait for the space bar keypress, type some text, wait for the Shift keypress, add some text and open the Notepad Save dialog box:
{&SetKeyDelay:50}#r{&500}notepad{Enter}{&KeyWait:Space,B}
{Backspace}You are in Notepad{!}
Choose a location to save this file...{&500}^s
Windows + R to open the Windows Run dialog boxnotepad and press Enter to launch Notepadspace bar keypressControl + S to open the Notepad Save dialog boxPlaceholders in macro snippets: You can use the Windows Clipboard, user input or the current date-time to insert variable pieces of text in your snippets. For example, when you launch your favorite, QAP automatically replaces the placeholder {Clipboard} with the current content of the Windows Clipboard. Placeholders can also be replaced with various file locations. See Can I insert values in favorites location, parameters or snippets using placeholders?
Prompt before launching the macro snippet: In the Advanced Settings tab, you can enter text in Prompt before launching the snippet that will be displayed with a prompt to hit Enter or Space to launch the snippet, or Esc to cancel it. The prompt can include placeholders.
Macro programming experience is strongly recommended before using this feature. If you need help writing AHK macro, I recommend searching answers or asking question in the “Ask for help” section of the AHK forum where you will find plenty of knowledgeable people who love helping new macro programmers. You can also learn it with these books.
Can I insert command from the AHK programming language in a snippet of type macro? A QAP macro snippet favorite can send pieces of text and basic commands to your keyboard using the SendInput AHK command. However, it is not the place for full-fledge AHK macro language. Variables, conditional expressions (if), loops, etc. are not supported in macro snippet. But you can easily write an AutoHotkey macro using a text editor, save it in a file with .ahk extension and launch your AHK macro from QAP. To do this, create a QAP favorite of type Application and enter the location of your script (for example c:\AHKscripts\myscript.ahk) in the Application (path and file name).
See also:
The following table lists the keys that can be inserted in Snippets of type Macro (each key name must be enclosed in braces). See: How do I create a macro Snippet to send special keys to applications or insert pauses when pasting?
These keys are defined by the scripting language AutoHotkey (AHK). See more info about AHK at the end of the page.
These special keys are always enclosed between curly brackets, for example {Backspace}. For this reason, as explained in AutoHotkey documentation, if whenever you need to enter opening or closing curly brackets in your snippet, you will have to enclose them that way: {{} and {}}.
The modifiers !+^# affect only the very next key. To send the corresponding modifier key on its own, enclose the key name in braces. To just press (hold down) or release the key, follow the key name with the word “down” or “up” as shown below.
| Symbol | Key | Press | Release | Examples |
|---|---|---|---|---|
| ! | {Alt} | {Alt down} | {Alt up} | !a presses Alt+A |
| + | {Shift} | {Shift down} | {Shift up} | +abC sends the text “AbC”!+a presses Alt+Shift+A |
| ^ | {Ctrl} | {Ctrl down} | {Ctrl up} | ^{Home} presses Control+Home |
| # | {LWin} {RWin} |
{LWin down} {RWin down} |
{LWin up} {RWin up} |
#e holds down the Windows key and then presses the E key |
| Symbol | Meaning | |||
| { } | Braces are used to enclose key names and other options, and to send special characters literally. For example, {Tab} is the Tab key and {!} is a literal exclamation mark. |
|||
Note: As capital letters are produced by sending the Shift key, A produces a different effect in some programs than a. For example, !A presses Alt+Shift+A and !a presses Alt+A. If in doubt, use lowercase.
| Key | |
|---|---|
| {F1} – {F24} | Function keys. For example: {F12} is the F12 key. |
| {!} | ! |
| {#} | # |
| {+} | + |
| {^} | ^ |
| {{} | { |
| {}} | } |
| {Enter} | Enter key on the main keyboard |
| {Escape} or {Esc} | Escape |
| {Space} | Space (this is only needed for spaces that appear either at the beginning or the end of the string to be sent — ones in the middle can be literal spaces) |
| {Tab} | Tab |
| {Backspace} or {BS} | Backspace |
| {Delete} or {Del} | Delete |
| {Insert} or {Ins} | Insert |
| {Up} | ↑ (up arrow) key on main keyboard |
| {Down} | ↓ (down arrow) key on main keyboard |
| {Left} | ← (left arrow) key on main keyboard |
| {Right} | → (right arrow) key on main keyboard |
| {Home} | Home key on main keyboard |
| {End} | End key on main keyboard |
| {PgUp} | PageUp key on main keyboard |
| {PgDn} | PageDown key on main keyboard |
| {CapsLock} | CapsLock |
| {ScrollLock} | ScrollLock |
| {NumLock} | NumLock |
| {Control} or {Ctrl} | Control |
| {LControl} or {LCtrl} | Left Control key |
| {RControl} or {RCtrl} | Right Control key |
| {Control down} or {Ctrl down} | Holds the Control key down until {Ctrl up} is sent. To hold down the left or right key instead, use {RCtrl down} and {RCtrl up}. |
| {Alt} | Alt |
| {LAlt} | Left Alt key |
| {RAlt} | Right Alt key (or AltGr, depending on keyboard layout) |
| {Alt down} | Holds the Alt key down until {Alt up} is sent. To hold down the left or right key instead, use {RAlt down} and {RAlt up}. |
| {Shift} | Shift |
| {LShift} | Left Shift key |
| {RShift} | Right Shift key |
| {Shift down} | Holds the Shift key down until {Shift up} is sent. To hold down the left or right key instead, use {RShift down} and {RShift up}. |
| {LWin} | Left Win key |
| {RWin} | Right Win key |
| {LWin down} | Holds the left Win key down until {LWin up} is sent |
| {RWin down} | Holds the right Win key down until {RWin up} is sent |
| {AppsKey} | Menu key (invokes the right-click or context menu) |
| {Sleep} | Sleep key. |
| {ASC nnnnn} | Sends an Alt+nnnnn keypad combination, which can be used to generate special characters that don’t exist on the keyboard. To generate ASCII characters, specify a number between 1 and 255. To generate ANSI characters (standard in most languages), specify a number between 128 and 255, but precede it with a leading zero, e.g. {Asc 0133}.
Unicode characters may be generated by specifying a number between 256 and 65535 (without a leading zero). However, this is not supported by all applications. For alternatives, see the virtual key and scan code below. |
| {vkXX} {scYYY} {vkXXscYYY} |
Sends a keystroke that has virtual key XX and scan code YYY. For example: Send {vkFFsc159}. If the sc or vk portion is omitted, the most appropriate value is sent in its place.
|
| {Numpad0} – {Numpad9} | Numpad digit keys (as seen when NumLock is ON). For example: {Numpad5} is 5. |
| {NumpadDot} | . (numpad period) (as seen when NumLock is ON). |
| {NumpadEnter} | Enter key on keypad |
| {NumpadMult} | * (numpad multiplication) |
| {NumpadDiv} | / (numpad division) |
| {NumpadAdd} | + (numpad addition) |
| {NumpadSub} | - (numpad subtraction) |
| {NumpadDel} | Delete key on keypad (this key and the following Numpad keys are used when NumLock is OFF) |
| {NumpadIns} | Insert key on keypad |
| {NumpadClear} | Clear key on keypad (usually the ‘5’ key when NumLock is OFF). |
| {NumpadUp} | ↑ (up arrow) key on keypad |
| {NumpadDown} | ↓ (down arrow) key on keypad |
| {NumpadLeft} | ← (left arrow) on keypad |
| {NumpadRight} | → (right arrow) key on keypad |
| {NumpadHome} | Home key on keypad |
| {NumpadEnd} | End key on keypad |
| {NumpadPgUp} | PageUp key on keypad |
| {NumpadPgDn} | PageDown key on keypad |
| {Browser_Back} | Select the browser “back” button |
| {Browser_Forward} | Select the browser “forward” button |
| {Browser_Refresh} | Select the browser “refresh” button |
| {Browser_Stop} | Select the browser “stop” button |
| {Browser_Search} | Select the browser “search” button |
| {Browser_Favorites} | Select the browser “favorites” button |
| {Browser_Home} | Launch the browser and go to the home page |
| {Volume_Mute} | Mute/unmute the master volume. |
| {Volume_Down} | Reduce the master volume. |
| {Volume_Up} | Increase the master volume. |
| {Media_Next} | Select next track in media player |
| {Media_Prev} | Select previous track in media player |
| {Media_Stop} | Stop media player |
| {Media_Play_Pause} | Play/pause media player |
| {Launch_Mail} | Launch the email application |
| {Launch_Media} | Launch media player |
| {Launch_App1} | Launch user app1 |
| {Launch_App2} | Launch user app2 |
| {PrintScreen} | Print Screen |
| {CtrlBreak} | Ctrl+break |
| {Pause} | Pause |
These keys are defined by the scripting language AutoHotkey (AHK) used to develop Quick Access Popup. In QAP Macro Snippets, these keys are sent using the AHK command Send in Input mode. If the command SetKeyDelay is used in a macro snippet, the mode is changed to Event to allow the delay.
See also: How do I create a macro Snippet to send special keys to applications or insert pauses when pasting?